はじめに
バッテリーが長く持ちませんか?交換しましょう。
必要な工具と部品
ビデオの概要
-
-
ディスプレイのガラスにひびが入った場合は、ガラスをテープで留めて修理中にさらなる破損を防ぎます。
-
透明なガムテープをiPhoneをディスプレイの上に、全体が覆われるまで重ねておきます。
 FixBotに聞いてみる
-
-
-
吸盤から金属ハンドルを取り外します。金属ハンドルでなく、吸盤ベースを握る方が簡単で安全です。
-
ホームボタンの近くにある小さな吸盤を使用し、iPhoneディスプレイアセンブリの下部をゆっくりと引きあげます。
-
-
-
片手でディスプレイアセンブリを持ち、もう片方の手でスパッジャーを使用して、1というラベルのついた黒いリボンケーブルを外します。(ケーブル1はディスプレイ用です。)
-
-
-
ディスプレイアセンブリはほぼ垂直になるまで、上げます。これによって、残りのケーブルを簡単に取り外せるようになります。
-
スパッジャーを使用して、2というラベルのついた黒いリボンケーブルを外します。(2は静電容量式タッチパネル用です。)
-
-
-
-
スパッジャーを使用して、ケーブル3を所定の位置に保持している白いプラスチックのタブを跳ね上げます。白いタブが垂直に上げられるとリボンケーブルが解放されます。
-
黒いリボンケーブルをコネクタからスライドさせて外し、iPhone からディスプレイアセンブリを取り外します。
-
-
-
付属のSIMピンまたは、ペーパークリップを使用して、ヘッドホンジャック横の小さな穴に挿入します。
-
SIMトレイが飛び出すまで、SIMピンまたは、ペーパークリップを押し下げます。
-
SIMトレイが飛び出したら、トレイを掴んでiPhoneから取り外します。
-
-
-
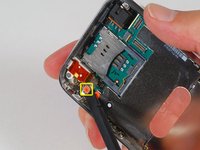
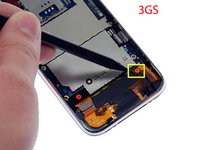
次の8本のネジを取り外します:
-
5 本の 2.3 mm #00 プラスネジ (部分ネジ付き) がロジックボードをリアケースに固定します。
-
ロジックボードとカメラを固定する全ねじの 2.3 mm #00 プラスネジ 2 本。
-
「剥がさないでください」ステッカーの下から 2.9 mm #00 プラスネジ 1 本を取り外します。
-
再組み立て時の注意点;
-
カメラ横にあるネジ(右下オレンジ色で強調表示されているネジ)にもカメラを所定の位置に保持する金属ストリップが付いています。
-
-
-
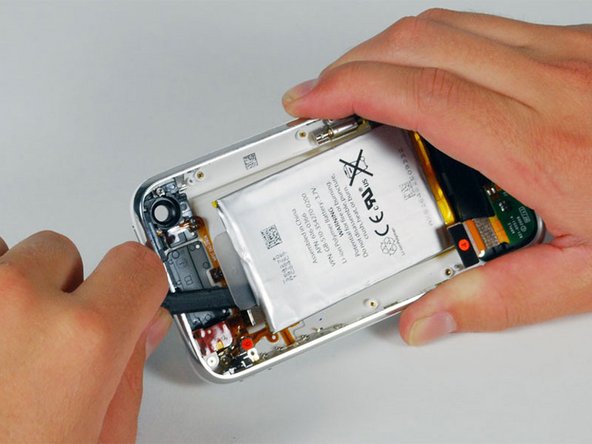
ロジックボードをドックコネクタ方向にスライドさせて、iPhoneから取り外します。
-
バッテリーを取り付けた後にロジックボードを交換する場合は、カメラをケースに挿入する前にロジックボードに接続してください。次にボードの残りの部分を所定の位置に固定する前に必ずボード上部(SIMトレイがある場所)を所定の位置に設定してください。SIMカードスロットの位置が合わない場合があるため重要です。SIMトレイがiPhoneの開口部と位置が合って、カメラモジュールの所定の位置に収まれば、ロジックボードが正しく取り付けられていることがわかります。
-


デバイスを組み立てるには、この説明と逆の順序を辿ってください。
2464 の人々がこのガイドを完成させました。


99件のガイドコメント
pay close attention to the pictures
use a business card type refrigerator magnet to keep the screws in order and to keep them from being lost. Its hard to see the black plastic latch that retains the ribbon number 3, it simply flips up toward the top of the phone. go slow and methodical.when reinstalling insert the Sim card holder before replacing all the screws, it helps to hold the board in the proper place.
There is a tiny metal clip that holds the camera down on my iPhone 3GS. It fell out after I had removed the screw that holds the camera in place, as directed. Only intuition and good luck allowed me to figure out where it had come from.
I also found out that the connector for my camera came loose from the BACK of the logic board. it snapped back in place, no problem, but I could have easily tried reassembling the phone without it connected, and either found things didn't want to fit, or ended up without a functioning camera, and a panic attack that I had clumsily destroyed same.
Hi. The little metal clip that holds the camera fell out for me too. Where exactly do you reinstall it and how does it line up? Thanks.
Simple Simon - 返信 共有