メインコンテンツにスキップ

この翻訳は、ソースガイドの最新の更新を反映していない可能性があります。 翻訳の更新に協力してください。 または ソースガイドを参照してください

必要な工具と部品

  1. , 割れたガラス: 手順 1、 3の画像 1 , 割れたガラス: 手順 1、 3の画像 2 , 割れたガラス: 手順 1、 3の画像 3
    • ディスプレイのガラスにひびが入った場合は、ガラスをテープで留めて修理中にさらなる破損を防ぎます。

    • 透明なガムテープをiPhoneをディスプレイの上に、全体が覆われるまで重ねておきます。

    • これにより、ディスプレイをこじ開けたり持ち上げたりするときにガラスの破片が閉じ込められますます。

    • 修理中に飛び散るガラスから目を守るため、安全メガネを着用してください。

  2. : 手順 2、 1の画像 1
    • iPhoneのドックコネクタ先端から#00プラスネジを2本外します。

  3. この手順は未翻訳です。 翻訳を手伝う。

    : 手順 3、 1の画像 1
    • Remove the metal handle from the suction cup. It's easier and safer to grip the suction cup's base instead of the metal handle.

    • Be very careful when opening the iPhone so that the cables under the display are not severed.

    • There is a rubber gasket between the silver front bezel and black display assembly. A bit of force is required in this step to separate the iPhone's display assembly.

    • Use a small suction cup near the Home button to gently pull up the bottom portion of the iPhone's display assembly.

    • If the display assembly is too damaged to allow the suction cup to adhere, tape with a strong adhesive such as duct tape may be used.

  4. この手順は未翻訳です。 翻訳を手伝う。

    : 手順 4、 1の画像 1
    • The display assembly is still connected to the iPhone by several cables, so don't try to remove it entirely just yet.

    • Rotate the display assembly up until it is at an angle of approximately 45 degrees.

  5. この手順は未翻訳です。 翻訳を手伝う。

    : 手順 5、 1の画像 1
    • Continue to hold the display assembly with one hand, and use your other hand and a spudger to disconnect the black ribbon cable labeled "1."

  6. この手順は未翻訳です。 翻訳を手伝う。

    : 手順 6、 1の画像 1
    • Rotate the display assembly up until it is roughly vertical. This will allow easier access for disconnecting the remaining cables.

    • Use a spudger to disconnect the black ribbon cable labeled "2."

  7. この手順は未翻訳です。 翻訳を手伝う。

    : 手順 7、 1の画像 1
    • Use a spudger to flip up the white plastic hinged flap holding the remaining ribbon cable in place. The white tab will rotate up 90 degrees, releasing the ribbon cable.

    • This flap may be black or white. Be sure you are flipping up the hinged flap, not the socket itself.

    • Slide the black ribbon cable out of its connector, and remove the display assembly from the iPhone.

  8. この手順は未翻訳です。 翻訳を手伝う。

    : 手順 8、 1の画像 1
    • Insert your SIM eject tool or a paper clip into the hole next to the headphone jack.

    • Press down on the tool until the SIM card tray pops out.

    • Grasp the SIM card tray and slide it out of the iPhone.

  9. この手順は未翻訳です。 翻訳を手伝う。

    : 手順 9、 1の画像 1
    • Use a spudger to disconnect the ribbon cable labeled "4."

  10. この手順は未翻訳です。 翻訳を手伝う。

    : 手順 10、 1の画像 1
    • Use a spudger to disconnect the ribbon cable labeled "5."

  11. この手順は未翻訳です。 翻訳を手伝う。

    : 手順 11、 2の画像 1 : 手順 11、 2の画像 2
    • Use a spudger to disconnect the ribbon cable labeled "6."

    • If you have an iPhone 3GS, refer to picture 2 and use a spudger to disconnect the ribbon cable labeled "7."

  12. この手順は未翻訳です。 翻訳を手伝う。

    : 手順 12、 1の画像 1
    • Carefully peel up the small sticker labeled "Do not remove."

  13. この手順は未翻訳です。 翻訳を手伝う。

    : 手順 13、 1の画像 1
    • Remove the following 8 screws:

    • Five 2.3 mm Phillips #00 screws with partial threads securing the logic board to the rear panel.

    • Two 2.3 mm Phillips #00 screws with full threads securing the logic board and camera.

    • One 2.9 mm Phillips #00 screw from beneath the "Do not remove" sticker.

  14. この手順は未翻訳です。 翻訳を手伝う。

    : 手順 14、 1の画像 1
    • Use a spudger to gently remove the camera retaining clip, (formerly secured by the removed screw) and gently pry the camera up and out of its housing in the rear panel. The camera cannot be removed entirely yet because it's connected to the bottom of the logic board.

  15. この手順は未翻訳です。 翻訳を手伝う。

    : 手順 15、 1の画像 1
    • Use a spudger to gently pry up the end of the logic board closest to the dock connector.

    • If the board won't lift up, double check to make sure all the screws securing the logic board have been removed.

  16. この手順は未翻訳です。 翻訳を手伝う。

    : 手順 16、 1の画像 1
    • Slide the logic board towards the dock connector and out of the iPhone.

  17. この手順は未翻訳です。 翻訳を手伝う。

    : 手順 17、 1の画像 1
    • Remove the two Phillips #00 screws securing the vibrator to the rear panel.

    • These screws are smaller diameter than all the others. Make sure you don't mix them up with the other screws. On reassembly, only these two screws will fit.

  18. この手順は未翻訳です。 翻訳を手伝う。

    : 手順 18、 1の画像 1
    • Lift the vibrator up and out of the iPhone.

ゴール

54 の人々がこのガイドを完成させました。

以下の翻訳者の皆さんにお礼を申し上げます:

en jp

4%

railgunさんは世界中で修理する私たちを助けてくれています! あなたも貢献してみませんか?
翻訳を始める ›

作成者

14人の作成者と共同で作成されました。

iRobot

メンバー登録日: 09/24/09

1 ポイント

636のガイドは作成済み

5 件のコメント

After you are done with the replacement and get everything back in place, hard reset the phone as it is the only way to turn it on.

VAMSIPUNNA - 返信

I have just successfully replaced the motor, remarkably straightforward (though in parts very fiddly), and an excellent guide up to step 6.

Couple of tips -

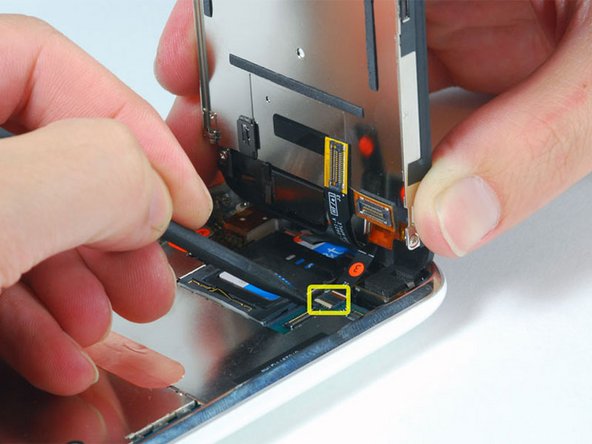
Step 2: The screen really comes up with a jerk, I actually pulled off a connector with the initial separation and was very lucky nothing broke. Be very gentle with the initial separation.

Step 6: The white/black parts were reversed on mine, I guess it's fairly random. But all you need to know is that you very carefully flip up the smaller section, whichever colour it may be.

At this point, I had access to the motor so I tried my luck. It came out, and the next one went in, with great ease. You do not need to go any further than step 6 to do this fix. The small section of the motor still covered just slides out with a gentle tug, and my replacement is working fine.

analhamster - 返信

After step 6, you can replace the vibration motor by loosening the two screws. You can then tilt the motor from below the motherboard. All the other steps are unnecessary.

I just replaced a 3GS vibration motor with a 3G vibration motor, and yes, it works.

Eur van Andel - 返信

apple 3g ear speaker is not working

Birendra Pradsad Chaudhary - 返信

thank you so much

Limenha Kediro - 返信

コメントを追加

統計データ:

過去 24時間: 1

過去 7 日: 4

過去 30 日: 8

今までの合計 115,848