はじめに
必要な工具と部品
-
-
ディスプレイのガラスにひびが入った場合は、ガラスをテープで留めて修理中にさらなる破損を防ぎます。
-
透明なガムテープをiPhoneをディスプレイの上に、全体が覆われるまで重ねておきます。
-
-
-
吸盤から金属ハンドルを取り外します。金属ハンドルでなく、吸盤ベースを握る方が簡単で安全です。
-
ホームボタンの近くにある小さな吸盤を使用し、iPhoneディスプレイアセンブリの下部をゆっくりと引きあげます。
-
-
-
片手でディスプレイアセンブリを持ち、もう片方の手でスパッジャーを使用して、1というラベルのついた黒いリボンケーブルを外します。(ケーブル1はディスプレイ用です。)
-
-
-
ディスプレイアセンブリはほぼ垂直になるまで、上げます。これによって、残りのケーブルを簡単に取り外せるようになります。
-
スパッジャーを使用して、2というラベルのついた黒いリボンケーブルを外します。(2は静電容量式タッチパネル用です。)
-
-
-
-
スパッジャーを使用して、ケーブル3を所定の位置に保持している白いプラスチックのタブを跳ね上げます。白いタブが垂直に上げられるとリボンケーブルが解放されます。
-
黒いリボンケーブルをコネクタからスライドさせて外し、iPhone からディスプレイアセンブリを取り外します。
-
-
-
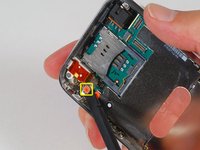
付属のSIMピンまたは、ペーパークリップを使用して、ヘッドホンジャック横の小さな穴に挿入します。
-
SIMトレイが飛び出すまで、SIMピンまたは、ペーパークリップを押し下げます。
-
SIMトレイが飛び出したら、トレイを掴んでiPhoneから取り外します。
-
-
-
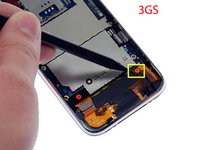
次の8本のネジを取り外します:
-
5 本の 2.3 mm #00 プラスネジ (部分ネジ付き) がロジックボードをリアケースに固定します。
-
ロジックボードとカメラを固定する全ねじの 2.3 mm #00 プラスネジ 2 本。
-
「剥がさないでください」ステッカーの下から 2.9 mm #00 プラスネジ 1 本を取り外します。
-
再組み立て時の注意点;
-
カメラ横にあるネジ(右下オレンジ色で強調表示されているネジ)にもカメラを所定の位置に保持する金属ストリップが付いています。
-


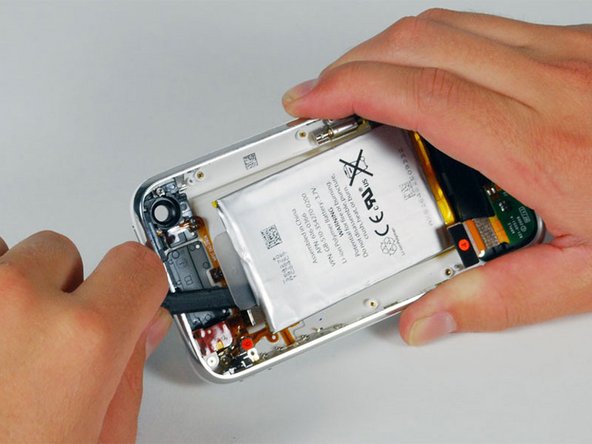
交換が終わったら、逆の手順で組み立ててください。
交換が終わったら、逆の手順で組み立ててください。
934 の人々がこのガイドを完成させました。
以下の翻訳者の皆さんにお礼を申し上げます:
100%


これらの翻訳者の方々は世界を修理する私たちのサポートをしてくれています。 あなたも貢献してみませんか?
翻訳を始める ›

35 件のコメント
I replaced the battery in both my iPhone and my wife's in the same session. Using the slideshow and directions I was able to successfully do the replacement. Of course my iPhone was the first one done so as to gain some experience before tackling my wife's iPhone. I had two minor issues in reassembling mine. Firstly, I completely missed re-installing the number 3 cable. It wasn't till I was reassembling my wife's iPhone that I realized I'd missed it. Not sure what it supports as I had my phone up and running, checked the GPS, etc while it wasn't connected. Secondly, my camera wasn't seated properly and I got the strangest imagery when I launched it. All green and black, looking like one of those ghost buster reality shows using night vision. Fortunately, both issues were easy to correct. Outstanding directions and slides! Oh yeah finally, the kits for the battery comes with both a #00 Phillips screwdriver and a spudge, however, I ordered the extra spudge and got one that is better suited for prying the battery up.
Hey,
first of all - BIG UPS AND THX for everything.
That means FAST shipping to germany and the great tutorials, manuals etc.
I did change the battery in less than 15 minutes whit ur manual this was easy as.... dunno :).
the "hardest part" was to remove the battery from the cover - but with a bit of tact it works fine.
So thx :)
Incredibly easy to make the swap. Thanks for the great writeup. I was able to complete the battery replacement within about 20 minutes. I've swapped an iPod battery before and although this was a bit more complex it really wasn't that tough. Anyone who's a bit handy should be able to complete it with no trouble at all. Thanks.
Great instructions, very clear. A couple points:
1) The screwdriver I had wasn't working that well, so I had to use a different one. I found that a 0# worked fine (although I suspect a 00# would work better.0
2) When I reassembled the phone, the home button didn't work. You really need to press down on the bottom of the screen when you screw the bottom screws (by the dock connector) back in. Otherwise, the contacts for the home button won't reliably hit.
dlinsalata - 返信