メインコンテンツにスキップ

この翻訳は、ソースガイドの最新の更新を反映していない可能性があります。 翻訳の更新に協力してください。 または ソースガイドを参照してください

iPhone 初代のヘッドホンジャックの交換

必要な工具と部品

  1. iPhone 初代のヘッドホンジャックの交換, SIMカード: 手順 1、 1の画像 1
    • SIMカードイジェクトツールまたはペーパークリップをヘッドホンジャックの横のホールに差し込みます。

    • ペーパークリップを押し込み、SIMカードトレイを取り出します。

  2. iPhone 初代のヘッドホンジャックの交換: 手順 2、 1の画像 1
    • SIMカードトレイをつかみ、iPhoneから引き出します。

  3. iPhone 初代のヘッドホンジャックの交換, アンテナカバー: 手順 3、 1の画像 1
    • この画像は、アンテナカバーの下側にある2つのタブと対応する2つの受け皿を示しています。 画像の上部にある2つのタブを外すには、黒いカバーに向かって押し出してください。

  4. iPhone 初代のヘッドホンジャックの交換: 手順 4、 1の画像 1
    • メタル製スパッジャーをドックコネクタとアンテナカバーの間にスライドさせてください。ドックコネクタ自体には差し込まないでください。

    • ドックコネクタとアンテナカバーの間のスロットにメタル製のスパッジャーを挿入します。 2つのタブの付近を慎重にこじ開けて、アンテナカバーとシルバーのフロントベゼルの間に小さな隙間を作ります。

  5. iPhone 初代のヘッドホンジャックの交換: 手順 5、 1の画像 1
    • アンテナカバーとフロントベゼルの間の隙間にiPod開口ツールを挿入します。 ツール先端はアンテナカバーの方を向けてください。 メタルの裏張りに達するまで、ツールをコーナー周辺にスライドさせます。

    • ドックコネクタの反対側でも同じ手順を繰り返します。

  6. iPhone 初代のヘッドホンジャックの交換: 手順 6、 1の画像 1
    • 両側のアンテナカバーをつかみ、上にスライドさせてiPhoneから離します。 これにはある程度の力が必要です。 外れない場合は、アンテナカバーが十分に持ち上げられて受け皿が外れているか確認してください。

  7. iPhone 初代のヘッドホンジャックの交換, ヘッドホンジャック: 手順 7、 1の画像 1
    • リアパネルをiPhoneに固定している#00プラスネジを3本外します。

  8. この手順は未翻訳です。 翻訳を手伝う。

    iPhone 初代のヘッドホンジャックの交換: 手順 8、 1の画像 1
    • Getting the iPhone open is a challenging feat, so don't get discouraged. Take a deep breath and make sure you have plenty of time to get the job done.

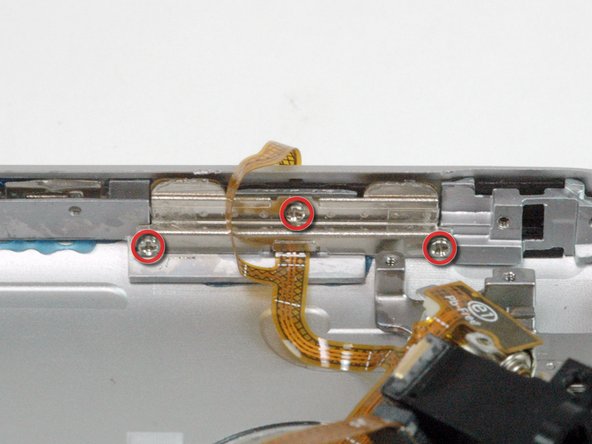
    • The small square hole is the location to insert the dental pick in the next step.

    • Insert the pointed end of a heavy-duty spudger into the space between the gray metal bar and the rear panel. Pry the panel up enough until you can get the tip of the iPod opening tool into the seam between the front bezel and rear panel.

  9. この手順は未翻訳です。 翻訳を手伝う。

    iPhone 初代のヘッドホンジャックの交換: 手順 9、 1の画像 1
    • Start removing the rear panel on the side with the buttons.

    • Slide the dental pick completely into the square hole. You may need to wiggle the tool and apply a good amount of force to get it to go all the way.

  10. この手順は未翻訳です。 翻訳を手伝う。

    iPhone 初代のヘッドホンジャックの交換: 手順 10、 1の画像 1
    • Pry up the rear panel by pulling the dental pick counterclockwise in a quick motion. Apply force perpendicular to the plane of the display assembly. You may be afraid to go fast, but going slowly is more likely to bend the case.

  11. この手順は未翻訳です。 翻訳を手伝う。

    iPhone 初代のヘッドホンジャックの交換: 手順 11、 1の画像 1
    • Use a spudger to free the rear panel from the iPhone along the corner and top.

    • The rear panel is still attached to the iPhone by the headphone jack cable, so don't entirely remove the rear panel from the iPhone just yet.

  12. iPhone 初代のヘッドホンジャックの交換: 手順 12、 1の画像 1
    • iPhoneの反対側でも同じ手順を繰り返します。デンタルピック(爪楊枝)をスライドして正方形の穴に完全に差し込みます。最後まで入れるには、ツールを揺らして、十分な力を加える必要があるかもしれません。

  13. iPhone 初代のヘッドホンジャックの交換: 手順 13、 1の画像 1
    • 素早くデンタルピック(爪楊枝)を反時計回りに引っ張りながら、リアパネルを持ち上げます。ディスプレイアセンブリ表面に対して垂直に力を加えます。早いと感じるかもしれませんが、ゆっくり力を加えてしまうと、ケースが歪んでしまいます。

    • リアパネルは、ヘッドホンジャックケーブルでiPhoneにまだ付いているため、iPhoneからリアパネルを完全に取り外さないでください。

  14. iPhone 初代のヘッドホンジャックの交換: 手順 14、 1の画像 1
    • ヘッドホンジャックケーブルの接続を外す前に、スマートフォンの電源が切れているか確認してください。

    • スパッジャーを使って、ロジックボードからヘッドホンジャックケーブルの接続を外します。

  15. iPhone 初代のヘッドホンジャックの交換: 手順 15、 1の画像 1
    • オン/オフスイッチをリアパネルに固定している#00プラスネジを2本外します。

  16. この手順は未翻訳です。 翻訳を手伝う。

    iPhone 初代のヘッドホンジャックの交換: 手順 16、 1の画像 1
    • Remove the following 3 screws:

    • Two Phillips #00 screws securing the vibrator to the rear panel.

    • One larger head and longer Phillips #00 screw securing the headphone jack to the rear panel.

  17. この手順は未翻訳です。 翻訳を手伝う。

    iPhone 初代のヘッドホンジャックの交換: 手順 17、 1の画像 1
    • Grasp the metal screw plate attached to the on/off switch and lift slightly up and away from the rear panel. The button should come with the cable.

    • Gently peel up the on/off switch ribbon cable. Be sure to pull near where the ribbon cable is glued to the rear panel.

  18. この手順は未翻訳です。 翻訳を手伝う。

    iPhone 初代のヘッドホンジャックの交換: 手順 18、 1の画像 1
    • The headphone jack is slightly recessed into the rear panel. First slide the headphone jack away from its housing and then lift it up slightly (only 1/4 inch or 1/2 centimeter) so that it is no longer in the rear panel.

  19. この手順は未翻訳です。 翻訳を手伝う。

    iPhone 初代のヘッドホンジャックの交換: 手順 19、 1の画像 1
    • Grasp the headphone jack at the tip and gently lift up, pulling the vibrator out of the rear panel.

  20. この手順は未翻訳です。 翻訳を手伝う。

    iPhone 初代のヘッドホンジャックの交換: 手順 20、 1の画像 1
    • Remove the two Phillips #00 screws securing the silent/ring switch to the rear panel.

    • Pry off the metal backing with the screw holes and save for securing the replacement switch.

  21. この手順は未翻訳です。 翻訳を手伝う。

    iPhone 初代のヘッドホンジャックの交換: 手順 21、 1の画像 1
    • Grasp the silent/ring switch and lift it up to reveal the screw beneath.

  22. iPhone 初代のヘッドホンジャックの交換: 手順 22、 1の画像 1
    • 音量スイッチをリアパネルに固定している#00プラスネジを3本外します。

  23. iPhone 初代のヘッドホンジャックの交換: 手順 23、 1の画像 1
    • リアパネルからヘッドホンジャックアセンブリを持ち上げます。

終わりに

デバイスを再度組み立てるには、この説明書の逆の順番で組み立ててください。

52 の人々がこのガイドを完成させました。

以下の翻訳者の皆さんにお礼を申し上げます:

en jp

52%

これらの翻訳者の方々は世界を修理する私たちのサポートをしてくれています。 あなたも貢献してみませんか?
翻訳を始める ›

作成者

11人の作成者と共同で作成されました。

iRobot

メンバー登録日: 09/24/09

1 ポイント

636のガイドは作成済み

2 件のコメント

Keep in mind there is two different models - always check part number on actual flex - if you'll replace it with wrong one audio will work "other way around" - if you plug in headphones - speakers will start to work, if you unplug them speakers will not work.

DigiHead - 返信

I bought a iphone 2g off ebay and it has this problem.. :( Please is there anyway to fix it? There is 0 information on the internet about this problem.

Robert -

コメントを追加

統計データ:

過去 24時間: 1

過去 7 日: 15

過去 30 日: 56

今までの合計 130,123