メインコンテンツにスキップ

iPhone 11 Display Panel Replacement

必要な工具と部品

ビデオの概要

  1. iPhone 11 Display Panel Replacement, Remove the pentalobe screws: 手順 1、 2の画像 1 iPhone 11 Display Panel Replacement, Remove the pentalobe screws: 手順 1、 2の画像 2
    • Before you begin, discharge your iPhone battery below 25%. A charged lithium-ion battery can catch fire and/or explode if accidentally punctured.

    • Power off your iPhone before beginning disassembly.

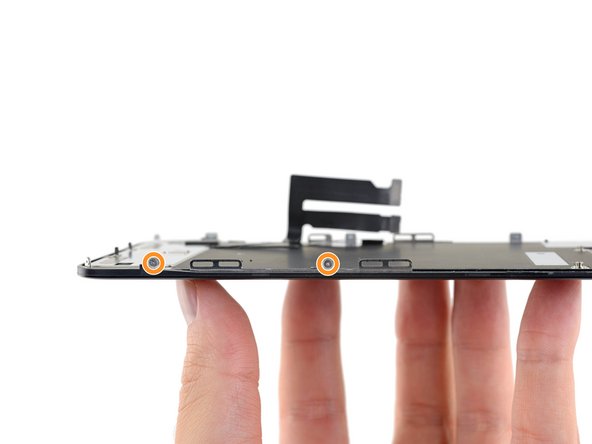
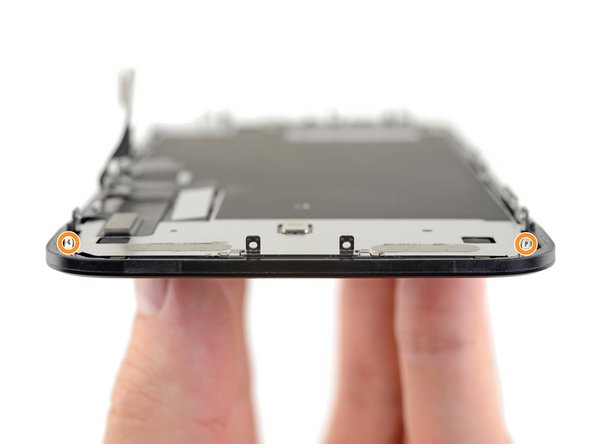
    • Remove the two 6.7 mm-long pentalobe screws at the bottom edge of the iPhone.

    • Opening the iPhone's display will compromise its waterproof seals. Have replacement seals ready before you proceed past this step, or take care to avoid liquid exposure if you reassemble your iPhone without replacing the seals.

  2. iPhone 11 Display Panel Replacement, Mark your opening picks: 手順 2、 3の画像 1 iPhone 11 Display Panel Replacement, Mark your opening picks: 手順 2、 3の画像 2 iPhone 11 Display Panel Replacement, Mark your opening picks: 手順 2、 3の画像 3
    • If inserted too far, an opening pick can damage your device. Follow this step to mark your pick and prevent damage.

    • Measure 3 mm from the tip and mark the opening pick with a permanent marker.

    • You can also mark the other corners of the pick with different measurements.

    • Alternatively, tape a coin to a pick 3 mm from the tip.

  3. iPhone 11 Display Panel Replacement, Tape over any cracks: 手順 3、 3の画像 1 iPhone 11 Display Panel Replacement, Tape over any cracks: 手順 3、 3の画像 2 iPhone 11 Display Panel Replacement, Tape over any cracks: 手順 3、 3の画像 3
    • If your iPhone has a cracked screen, keep further breakage contained and prevent bodily harm during your repair by taping over the glass.

    • Lay overlapping strips of clear packing tape over the iPhone's screen until the whole face is covered.

    • Wear safety glasses to protect your eyes from any glass shaken free during the repair.

    • If you can't get the suction cup to stick in the next few steps, fold a strong piece of tape (such as duct tape) into a handle and lift the screen with that instead.

    • If all else fails, you can superglue the suction cup to the screen.

  4. iPhone 11 Display Panel Replacement, Anti-Clamp instructions: 手順 4、 3の画像 1 iPhone 11 Display Panel Replacement, Anti-Clamp instructions: 手順 4、 3の画像 2 iPhone 11 Display Panel Replacement, Anti-Clamp instructions: 手順 4、 3の画像 3
    この手順で使用する道具:
    Anti-Clamp
    $24.95
    購入する
    • The next three steps demonstrate the Anti-Clamp, a tool we designed to make the opening procedure easier. If you aren't using the Anti-Clamp, skip down three steps for an alternate method.

    • For complete instructions on how to use the Anti-Clamp, check out this guide.

    • Pull the blue handle backwards to unlock the Anti-Clamp's arms.

    • Slide the arms over either the left or right edge of your iPhone.

    • Position the suction cups near the bottom edge of the iPhone—one on the top, and one on the bottom.

    • Squeeze the cups together to apply suction to the desired area.

    • If you find that the surface of your iPhone is too slippery for the Anti-Clamp to hold onto, you can use tape to create a grippier surface.

  5. iPhone 11 Display Panel Replacement: 手順 5、 3の画像 1 iPhone 11 Display Panel Replacement: 手順 5、 3の画像 2 iPhone 11 Display Panel Replacement: 手順 5、 3の画像 3
    • Pull the blue handle forward to lock the arms.

    • Turn the handle clockwise 360 degrees or until the cups start to stretch.

    • Make sure the suction cups remain aligned with each other. If they begin to slip out of alignment, loosen the suction cups slightly and realign the arms.

  6. iPhone 11 Display Panel Replacement: 手順 6、 3の画像 1 iPhone 11 Display Panel Replacement: 手順 6、 3の画像 2 iPhone 11 Display Panel Replacement: 手順 6、 3の画像 3
    • Heat an iOpener and thread it through the arms of the Anti-Clamp.

    • You can also use a hair dryer, heat gun, or hot plate—but extreme heat can damage the display and/or internal battery, so proceed with care.

    • Fold the iOpener so it lays on the bottom edge of the iPhone.

    • Wait one minute to give the adhesive a chance to release and present an opening gap.

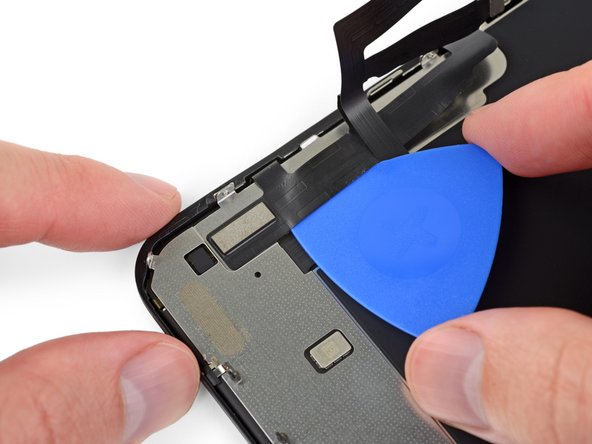
    • Insert an opening pick into the gap under the screen and the plastic bezel, not the screen itself.

    • If the Anti-Clamp doesn't create a sufficient gap, apply more heat to the area and rotate the handle a quarter turn.

    • Don't crank more than a quarter turn at a time, and wait one minute between turns. Let the Anti-Clamp and time do the work for you.

    • Skip the next three steps.

  7. iPhone 11 Display Panel Replacement, Heat the lower edge of the phone: 手順 7、 1の画像 1
    • Heating the lower edge of the iPhone helps soften the adhesive securing the display, making it easier to open.

    • Use a hairdryer or heat gun or prepare an iOpener and apply it to the lower edge of the iPhone for about a minute.

  8. iPhone 11 Display Panel Replacement: 手順 8、 2の画像 1 iPhone 11 Display Panel Replacement: 手順 8、 2の画像 2
    • If you're using a single suction handle, apply it to the bottom edge of the phone, while avoiding the curved portion of the glass.

  9. iPhone 11 Display Panel Replacement, Lift the display slightly: 手順 9、 3の画像 1 iPhone 11 Display Panel Replacement, Lift the display slightly: 手順 9、 3の画像 2 iPhone 11 Display Panel Replacement, Lift the display slightly: 手順 9、 3の画像 3
    • Pull up on the suction cup with firm, constant pressure to create a slight gap between the front panel and rear case.

    • Insert an opening pick into the gap under the screen and the plastic bezelnot the screen itself.

    • The watertight adhesive holding the display in place is very strong; creating this initial gap takes a significant amount of force. If you're having a hard time opening a gap, apply more heat, and gently rock the screen up and down to weaken the adhesive until you create enough of a gap to insert your tool.

  10. iPhone 11 Display Panel Replacement, Separate the screen adhesive: 手順 10、 3の画像 1 iPhone 11 Display Panel Replacement, Separate the screen adhesive: 手順 10、 3の画像 2 iPhone 11 Display Panel Replacement, Separate the screen adhesive: 手順 10、 3の画像 3
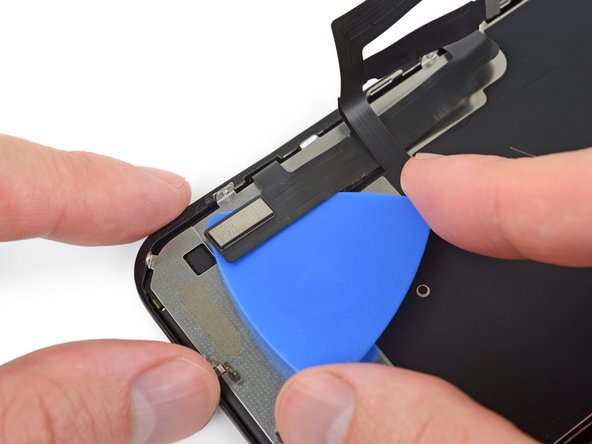
    • Slide the opening pick around the lower left corner and up the left edge of the iPhone, slicing through the adhesive holding the display in place.

    • Don't insert your pick more than 3 mm, as you may damage internal components.

  11. iPhone 11 Display Panel Replacement, Screen information: 手順 11、 1の画像 1
    • There are delicate cables along the right edge of your iPhone. Don't insert your pick here, as you may damage the cables.

  12. iPhone 11 Display Panel Replacement: 手順 12、 3の画像 1 iPhone 11 Display Panel Replacement: 手順 12、 3の画像 2 iPhone 11 Display Panel Replacement: 手順 12、 3の画像 3
    • Re-insert your pick at the bottom edge of the iPhone, and slide it up the right side to continue separating the adhesive.

    • Don't insert your pick more than 3 mm, as you may damage the display cables.

  13. iPhone 11 Display Panel Replacement: 手順 13、 3の画像 1 iPhone 11 Display Panel Replacement: 手順 13、 3の画像 2 iPhone 11 Display Panel Replacement: 手順 13、 3の画像 3
    • The top edge of the display is secured with both glue and clips.

    • Gently pull the right edge of the display down slightly (in the direction of the Lightning port).

    • Insert your pick into the top-right corner of the phone.

  14. iPhone 11 Display Panel Replacement: 手順 14、 2の画像 1 iPhone 11 Display Panel Replacement: 手順 14、 2の画像 2
    • Continue pulling the display down (toward the Lightning port) as needed in order to make a gap large enough for the pick.

    • Slide the pick to the top left corner and cut any remaining adhesive securing the display.

    • Don't insert your pick more than 3 mm, as you may damage the Face ID sensor array.

  15. iPhone 11 Display Panel Replacement, Remove the suction cup: 手順 15、 1の画像 1
    • Pull the small nub on the suction cup to detach it from the front panel.

  16. iPhone 11 Display Panel Replacement, Open the iPhone: 手順 16、 3の画像 1 iPhone 11 Display Panel Replacement, Open the iPhone: 手順 16、 3の画像 2 iPhone 11 Display Panel Replacement, Open the iPhone: 手順 16、 3の画像 3
    • Open the iPhone by swinging the display up from the left side, like the back cover of a book.

    • Don't try to fully separate the display yet, as several fragile ribbon cables still connect it to the iPhone's logic board.

    • Prop the display up against something sturdy.

    • During reassembly, lay the display in position, align the clips along the top edge, and carefully press the top edge into place before snapping the rest of the display down. If it doesn't click easily into place, check the condition of the clips around the perimeter of the display and make sure they aren't bent.

  17. iPhone 11 Display Panel Replacement, Display Assembly: 手順 17、 2の画像 1 iPhone 11 Display Panel Replacement, Display Assembly: 手順 17、 2の画像 2
    • To access the screws in the following step, tilt the display by slightly lifting its lower edge.

    • Be careful not to strain or tear the display cables.

  18. iPhone 11 Display Panel Replacement, Unscrew the battery connector cover: 手順 18、 2の画像 1 iPhone 11 Display Panel Replacement, Unscrew the battery connector cover: 手順 18、 2の画像 2
    この手順で使用する道具:
    Magnetic Project Mat
    $19.95
    購入する
    • Use a Y000 driver to remove the three 1.1 mm-long screws securing the battery connector bracket.

    • Throughout this repair, keep track of each screw and make sure it goes back exactly where it came from.

    • During reassembly, this is a good point to power on your iPhone and test all functions before you seal the display in place. Be sure to power your iPhone back down completely before you continue working.

  19. iPhone 11 Display Panel Replacement, Remove the battery connector cover: 手順 19、 1の画像 1
    • Remove the bracket.

  20. iPhone 11 Display Panel Replacement, Disconnect the battery: 手順 20、 2の画像 1 iPhone 11 Display Panel Replacement, Disconnect the battery: 手順 20、 2の画像 2
    • Use a spudger or a clean fingernail to pry the battery connector up from its socket on the logic board.

    • Try not to damage the black silicone seal surrounding this and other board connections. These seals provide extra protection against water and dust intrusion.

    • Bend the connector slightly away from the logic board to prevent it from accidentally contacting the socket.

  21. iPhone 11 Display Panel Replacement, Unscrew the logic board cover screws: 手順 21、 2の画像 1 iPhone 11 Display Panel Replacement, Unscrew the logic board cover screws: 手順 21、 2の画像 2
    • Use a Y000 driver to remove the five 1.1 mm screws securing the logic board cover bracket.

  22. iPhone 11 Display Panel Replacement, Remove the logic board cover bracket: 手順 22、 1の画像 1
    • Remove the bracket.

  23. iPhone 11 Display Panel Replacement, Disconnect the display: 手順 23、 3の画像 1 iPhone 11 Display Panel Replacement, Disconnect the display: 手順 23、 3の画像 2 iPhone 11 Display Panel Replacement, Disconnect the display: 手順 23、 3の画像 3
    • Use a spudger or a fingernail to disconnect the LCD panel cable connector.

    • Disconnect the digitizer connector next to it.

  24. iPhone 11 Display Panel Replacement, Disconnect the front sensors: 手順 24、 2の画像 1 iPhone 11 Display Panel Replacement, Disconnect the front sensors: 手順 24、 2の画像 2
    • Use the point of a spudger or a fingernail to disconnect the front panel sensor assembly connector.

  25. iPhone 11 Display Panel Replacement, Remove the display assembly: 手順 25、 1の画像 1
  26. iPhone 11 Display Panel Replacement, Unscrew the front assembly: 手順 26、 1の画像 1
    • Remove four screws securing the speaker/sensor assembly:

    • Three 1.6 mm Phillips screws

    • One 1.3 mm Y000 screw

  27. iPhone 11 Display Panel Replacement, Flip the speaker assembly over: 手順 27、 3の画像 1 iPhone 11 Display Panel Replacement, Flip the speaker assembly over: 手順 27、 3の画像 2 iPhone 11 Display Panel Replacement, Flip the speaker assembly over: 手順 27、 3の画像 3
    • Use the point of a spudger to gently pry up the top edge of the speaker.

    • Flip the speaker assembly over—down and away from the top edge of the display.

    • The speaker remains attached via very thin ribbon cables. Be careful not to strain or damage the cables.

  28. iPhone 11 Display Panel Replacement, Heat up the top edge of the display: 手順 28、 1の画像 1
    • Use a hairdryer or heat gun or prepare an iOpener and apply it to the top front of the display for 1-2 minutes, in order to soften the adhesive securing the sensors.

  29. iPhone 11 Display Panel Replacement, Pry up the microphone: 手順 29、 3の画像 1 iPhone 11 Display Panel Replacement, Pry up the microphone: 手順 29、 3の画像 2 iPhone 11 Display Panel Replacement, Pry up the microphone: 手順 29、 3の画像 3
    • Carefully slide the edge of your opening pick underneath the flex cable below the microphone.

    • Twist gently to separate the microphone, while being careful not to strain or damage the flex cable.

    • If needed, use the point of the spudger to finish separating the microphone from its notch in the front panel.

  30. iPhone 11 Display Panel Replacement, Remove the ambient light sensor bracket: 手順 30、 2の画像 1 iPhone 11 Display Panel Replacement, Remove the ambient light sensor bracket: 手順 30、 2の画像 2
    • Use tweezers to slide the small bracket straight up and off of the ambient light sensor.

  31. iPhone 11 Display Panel Replacement, Loosen the ambient light sensor: 手順 31、 2の画像 1 iPhone 11 Display Panel Replacement, Loosen the ambient light sensor: 手順 31、 2の画像 2
    • Use tweezers to wiggle the ambient light sensor and lift it from its notch in the display.

    • If the sensor does not wiggle free after a few seconds, apply more heat and try again.

    • The sensor remains attached to the rest of the sensor assembly via a very thin flex cable. Be careful not to strain or damage the cable.

  32. iPhone 11 Display Panel Replacement: 手順 32、 3の画像 1 iPhone 11 Display Panel Replacement: 手順 32、 3の画像 2 iPhone 11 Display Panel Replacement: 手順 32、 3の画像 3
    • Working left to right, slide an opening pick beneath the flex cable and underneath the proximity sensor + flood illuminator module.

    • Gently wiggle and lift to separate the module from its notch in the front panel.

    • It's helpful to lift and hold the speaker out of the way for access. Just be careful not to pull on the thin flex cable while you work.

  33. iPhone 11 Display Panel Replacement, Remove the speaker + front sensors: 手順 33、 3の画像 1 iPhone 11 Display Panel Replacement, Remove the speaker + front sensors: 手順 33、 3の画像 2 iPhone 11 Display Panel Replacement, Remove the speaker + front sensors: 手順 33、 3の画像 3
    • Remove the earpiece speaker and front sensor assembly.

    • During reassembly, check the position of the black plastic module containing these components:

    • Proximity sensor

    • Flood illuminator

    • The module must be positioned so that these components are not obstructed by any adhesive.

  34. iPhone 11 Display Panel Replacement, Unscrew the LCD shield plate: 手順 34、 3の画像 1 iPhone 11 Display Panel Replacement, Unscrew the LCD shield plate: 手順 34、 3の画像 2 iPhone 11 Display Panel Replacement, Unscrew the LCD shield plate: 手順 34、 3の画像 3
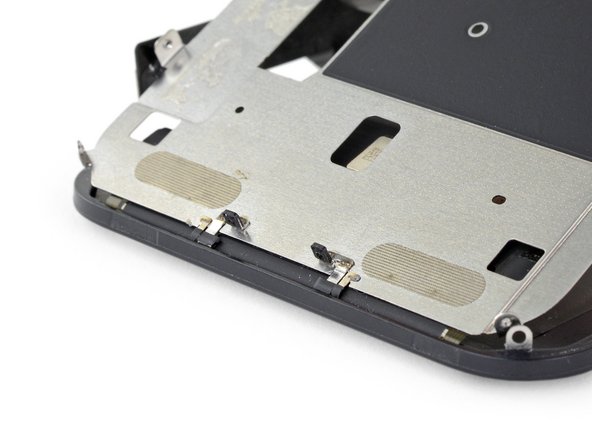
    • Use a Y000 driver to remove the 1.1 mm screws securing the LCD shield:

    • Three screws on the side nearest the display cables

    • Two more screws on the opposite side

    • Press your driver firmly into the screw while turning it. If needed, you can use your spudger to brace each screw from behind, in order to apply more pressure to the screws without bending the shield.

  35. iPhone 11 Display Panel Replacement: 手順 35、 2の画像 1 iPhone 11 Display Panel Replacement: 手順 35、 2の画像 2
    • Remove the remaining 1.1 mm Y000 screws from the top and bottom edges of the LCD shield:

    • Two screws near the camera cutouts

    • Two screws at the bottom corners

  36. iPhone 11 Display Panel Replacement, Add a little heat: 手順 36、 2の画像 1 iPhone 11 Display Panel Replacement, Add a little heat: 手順 36、 2の画像 2
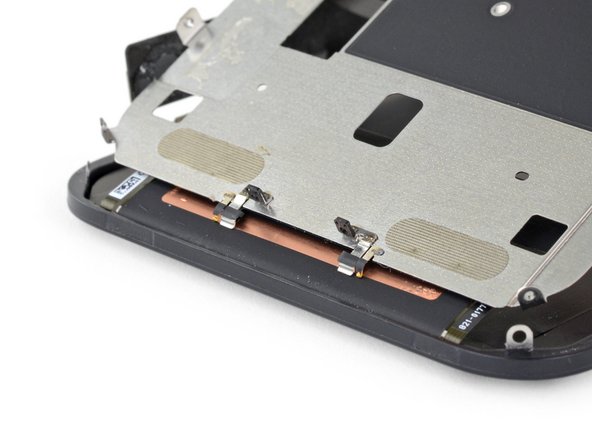
    • Apply a little heat from an iOpener (or hair dryer / heat gun) to the back of the display, in order to soften the adhesive securing the display cables to the LCD shield.

  37. iPhone 11 Display Panel Replacement, Unstick the display cables: 手順 37、 2の画像 1 iPhone 11 Display Panel Replacement, Unstick the display cables: 手順 37、 2の画像 2
    • Insert an opening pick between the display cables and LCD shield.

    • Slide it toward the bottom edge of the display to begin separating the cables.

    • Stop when you reach the end of the first cable.

  38. iPhone 11 Display Panel Replacement, Separate the two cables: 手順 38、 3の画像 1 iPhone 11 Display Panel Replacement, Separate the two cables: 手順 38、 3の画像 2 iPhone 11 Display Panel Replacement, Separate the two cables: 手順 38、 3の画像 3
    • Re-insert your opening pick, this time between the two cables.

    • Slide the pick to the bottom edge of the display to separate the cables from each other.

  39. iPhone 11 Display Panel Replacement: 手順 39、 2の画像 1 iPhone 11 Display Panel Replacement: 手順 39、 2の画像 2
    • Grab each cable near its 90° bend, and peel them apart.

  40. iPhone 11 Display Panel Replacement: 手順 40、 2の画像 1 iPhone 11 Display Panel Replacement: 手順 40、 2の画像 2
    • Peel the entire digitizer cable away from the LCD shield, and fold it aside.

  41. iPhone 11 Display Panel Replacement, Lift the shield plate: 手順 41、 2の画像 1 iPhone 11 Display Panel Replacement, Lift the shield plate: 手順 41、 2の画像 2
    • Insert an opening pick under the top edge of the LCD shield, and twist to separate it from the display.

  42. iPhone 11 Display Panel Replacement: 手順 42、 2の画像 1 iPhone 11 Display Panel Replacement: 手順 42、 2の画像 2
    • Grab the LCD shield by its top edge and swing it upward a few degrees.

    • Using your spudger, press gently on the lower part of the display cable, pushing it through the cutout in the LCD shield.

  43. iPhone 11 Display Panel Replacement: 手順 43、 3の画像 1 iPhone 11 Display Panel Replacement: 手順 43、 3の画像 2 iPhone 11 Display Panel Replacement: 手順 43、 3の画像 3
    • Raise the top edge of the LCD shield a bit higher, and feed the rest of the display cable through the cutout in the shield.

  44. iPhone 11 Display Panel Replacement, Separate the display cable: 手順 44、 3の画像 1 iPhone 11 Display Panel Replacement, Separate the display cable: 手順 44、 3の画像 2 iPhone 11 Display Panel Replacement, Separate the display cable: 手順 44、 3の画像 3
    • Raise the LCD shield up at a higher angle, until you can see the rest of the display cable stuck to the back.

    • Slide a spudger between the LCD shield and the display cable, and separate them completely.

  45. iPhone 11 Display Panel Replacement, Check the EMI fingers: 手順 45、 3の画像 1 iPhone 11 Display Panel Replacement, Check the EMI fingers: 手順 45、 3の画像 2 iPhone 11 Display Panel Replacement, Check the EMI fingers: 手順 45、 3の画像 3
    • As you lift the LCD shield, note the metal prongs on the bottom edge.

    • During reassembly, make sure these prongs (a.k.a. EMI fingers) are correctly inserted into the LCD frame as shown.

  46. iPhone 11 Display Panel Replacement, Remove the shield: 手順 46、 1の画像 1
    • Remove the LCD shield.

  47. iPhone 11 Display Panel Replacement: 手順 47、 1の画像 1
    • Only the LCD and digitizer remains.

終わりに

Compare your new replacement part to the original part—you may need to transfer remaining components or remove adhesive backings from the new part before installing.

To reassemble your device, follow the above steps in reverse order.

Take your e-waste to an R2 or e-Stewards certified recycler.

Repair didn’t go as planned? See our extensive iPhone troubleshooting library, or specifically our iPhone 11 won't turn on page. Try our basic troubleshooting tips or you can also ask our iPhone 11 Answers community for help.

172 の人々がこのガイドを完成させました。

作成者

13人の作成者と共同で作成されました。

Jeff Suovanen

メンバー登録日: 08/06/13

427,853 ポイント

259のガイドは作成済み

チーム

iFixit iFixit人のメンバー

Staff

135 メンバー

16,732のガイドは作成済み

23 件のコメント

I am a repair technician from California, and I use your company’s tools and I gotta say that I love them. Very sleek, and the powerful magnetic bits help me get the job done. I did 5 repairs yesterday and each one finished was a good feeling of satisfaction. In the future, if you guys decide to make some sort of in-depth manual for the newer iPhones, that would be great because diagrams are not only a great way for me to sharpen my own skills, but will help make training new techs a breeze.

Cheers all the way from Fresno!

anthony_brletic - 返信

Hi, I replaced the display independently, not in the Apple service, to my disappointment I found a message in the device that warned me that the part is not original, consequently the FaceID was disabled. Can you tell me about ear? Thank you

954kuki - 返信

Getting a message saying not genuine is known issue. there is no workaround yet. as far as face ID not working, you need to check for tear on the flex as you probably damaged it during transfer. If it’s broken, there is no way to fix.

iFIX smartphone -

The Important Display Message can be removed, check here: https://www.youtube.com/watch?v=bLo0_p7O...

Ricky LV -

Great repair guide. My only issues:

1. There are no instructions for removing the metal panel from the back of the old screen (nor how to reinstall it).

2. There are no instructions for removing the old, black adhesive from around the edge of the old case (nor the much needed instructions for reinstalling the new adhesive without damaging it or compromising the purpose of replacing this adhesive). This info is also missing from the adhesive replacement page for the iPhone 11.

I was able to patiently work my way through both of these issues and complete the repair on an iPhone 11. Covering these issues as additional steps of the repair guide would be very helpful for future iFixers.

Ryan R. Smith - 返信

コメントを追加

統計データ:

過去 24時間: 180

過去 7 日: 1,137

過去 30 日: 5,484

今までの合計 532,259