はじめに
この修理ガイドを参照して、iPad mini 5 Wi-Fi モデルのスクリーンを交換します。
また、純正のホームボタンや磁気センサーを交換用パーツに移植する方法も紹介しています。
なお、Touch ID機能を搭載できるのは、iPadのオリジナルホームボタンアセンブリのみです。。Touch IDの機能を維持したい場合は、オリジナルのホームボタンのアセンブリを新しいスクリーンに移植する必要があります。
交換用スクリーンの中には、磁気センサーが装着されていないものもあります。 磁気センサーがないと、Smart Cover使用時にiPadのスリープやスリープ解除ができなくなります。また、電源ボタンでもiPadをスリープ/スリープ解除できなくなる可能性があります。さらにAssistiveTouchのスリープ/スリープ解除機能が失われる場合があります。磁気センサーがない場合、電源ボタンを長押しして電源オフスライダーを表示させても、画面は起動します。また、ホームボタンを押しても画面は起動します。
安全のため、ラップトップを解体する前にバッテリー残量を25%以下に放電してください。これにより、修理中に誤ってバッテリーを損傷した場合、熱に伴う危険な事故の発生リスクを軽減することができます。バッテリーが膨張している場合は、 適切な方法で処理を行ってください。
この修理ガイドの画像は、別モデルのものを使用しているため、見た目に若干の相違がある場合がありますが、作業自体には影響ありません。
必要な工具と部品
-
-
ディスプレイのガラスにひびが入った場合は、ガラスにテープを貼るなどして、それ以上亀裂が広がらないようにし、修理作業の事故を予防します。
-
iPadのディスプレイの上に透明な梱包用テープを重ね、表面全体が覆われるように貼ります。
-
あとはガイドに従って作業を進めてください。ただし一度割れたガラスは、作業中に割れ続ける可能性が高いので、金属製のこじ開けツールを使ってガラスをすくい取る必要があるかもしれません。
-
-
-
吸盤でガラスを引き上げながら、オープニングピックの先端をガラスとiPad本体の隙間に差し込みます。
“Don't insert the opening pick any deeper than the black bezel on the side of the display. Inserting the pick too far may damage the LCD.”
Unfortunately, you only know you have inserted it too far when you have, and you start seeing little bubble veins form between the glass screen and the LCD.
The adhesive can be very stiff/hard, and if pushing through it can result in the pick plunging into the LCD when the adhesive finally gives way.
Take your time, use alot of heat, and if you need to try and push the pick in, try and do so in a slicing motion along the edge, use the wide edge, or hold the pick so that your finger will hit the edge of the screen before the pick tip will pass the bezel.
Adhesive strips are only 1mm wide on sides. Up to 5mm wide top and bottom. I used the Isclack. Screen seemed ok bending without breaking. Worth looking for a photo of the replacement adhesive strips so you know what you have to separate. Be extra careful at the lower right corner where the cables are.
ian cheong - 返信
This is a failure of a guide as it doesn’t tell you to insert at a downward angle so you don’t potrude into the LCD… Now I have to spend more money to replace the screen as I pushed adhesive between the LCD and the screen even though I went no farther than a millimeter short of the screen...
can you open the right side if the left is too cracked to use a suction cup on?
This guide needs amending urgently.
You MUST NOT put the pick or whatever you are using more than 2mm under the sides of the screen, or you will cut through the adhesive tape securing the backlight assembly to the LCD glass.
This will push adhesive into the viewable area of the LCD and cause the backlight assembly to no longer be secured against the LCD fully.
I now need a new screen.
This line below from the guide is absolutely INCORRECT and will ruin your expensive display:
”Don't insert the opening pick any deeper than the black bezel on the side of the display.”
The black bezel is 5mm to 6mm wide; you MUST NOT insert anything to that depth or you will destroy your display. 2mm maximum!
thanks. will take this into account for my repair
Adab Abu -
I too damaged my display because of this absolute nonsense (The German version, which I used, still had this INCORRECT portion in it). I can't believe how long it took iFixit to update this, even though people have been reporting this for years on end. Sadly iFixit still haven't updated a variety of other things that are still at the very least high risk instructions. I just messaged them the other day, but they don't seem to care about or understand the remaining issues that this guide has. At least they updated one of the most severe things, but they just plainly told me 'I'm wrong' about the rest. I liked iFixit it so far, and I've worked on a variety of (difficult) repairs - but this experience was a very huge let down.
A few thoughts after opening a number of Mini 4’s.
1) if the display is warm enough you can squeeze the digitizer and LCD back together after a minor incursion with the opening pick and it will reseal.
2) I’ve started going in at the top just to the right of the camera (I use an iFlex to get in then switch to a pick). Then I run down either side with my fingers choked up on the pick so there only a mm or 2 sticking out. Usually after running down one side, I can get the display open enough to get the pick in behind the LCD when I do the other side
-
-
-
iOpenerを再び温めて、先ほどと同じ位置に約2分間当てます。
If your iPad is cold, consider leaving the iOpener on for longer than 5 minutes. The aluminum housing is a very large thermally dissipating mass and will quickly cool off the glass and make you have to start over and wait the 10 minutes to reheat. There’s a very slim window in which you’re able to insert the pick into the glass adhesive before it solidifies once again. I’ve been fighting with it for like 20 minutes following these instructions and it’s not working. You really need to leave it for longer than just 5 minutes to get the back housing hot too.
Heat is essential. I used a 3d printer’s heated set at 65 degrees. Chris Storer’s stip above saved me as you really need to let it sit for quite a while to soften the adhesive. Since I was doing a battery change, I heated both sides as the aluminum back is a huge heatsink that really sucks up the heat. Don’t try forcing it; if the suction cup isn’t pulling a gap in the screen, leave it on the heater for additional time.
Love the 3d printer idea, I hadn’t thought of that! I have used a heat gun as well but you have to be very careful to not use too much heat. Also watch for inserting the pick too far, it is really easy to delaminate glass from the display!
russ -
-
-
-
-
2つの開口ピックをiPad上部で同時に捻り、ディスプレイアセンブリを固定する最後の接着剤を剥がします
-
ディスプレイを上端から持ち上げてデバイスを開きます。
"Twist the two picks at the top edge of the iPadTwist the two picks at the top edge of the iPad "
When I did this twisting motion, and I thought I was being gentle, one of the picks cracked nearly in half. That adhesive is very strong! I probably did not cut into it far enough before applying the twisting to open the screen.
-
-
-
プラスドライバーを使用して、ディスプレイケーブルブラケットを固定している2つの1.3mmネジを取り外します。
-
-
-
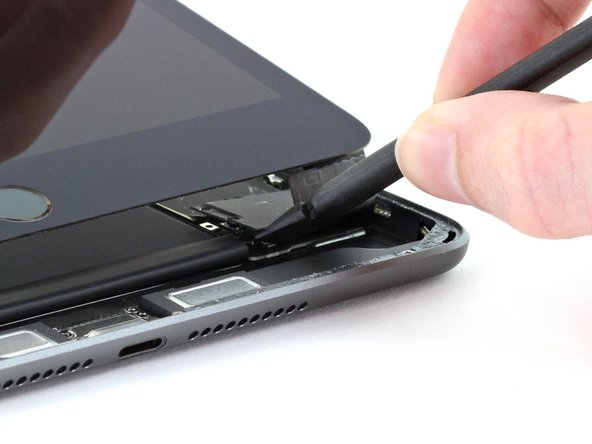
ディスプレイケーブルブラケットの下にスパッジャーの平面側先端を差し込み、持ち上げてロジックボードからバッテリープレスコネクタを外します。
The guide says "Don't try to remove the display cable bracket as it's attached to the battery by the battery cable.Don't try to remove the display cable bracket as it's attached to the battery by the battery cable.".
Well then, please explain how to attach a new battery since my battery does not come with an attached display cable bracket. This point caused me a lot of confusion and finally I removed the bracket and installed it on the new battery. But the question remains about exactly what is the required steps.
The bracket has conductive material fixed to the underside but the part that goes on the battery connector has a separate piece of adhesive which may or may not serve as to insulate. Without any available guidance, I installed the battery cable and the top of it rests on the conductive material, apparently providing a ground bond between the other 3 connectors and the bracket.
More information should be provided here.
-
-
-
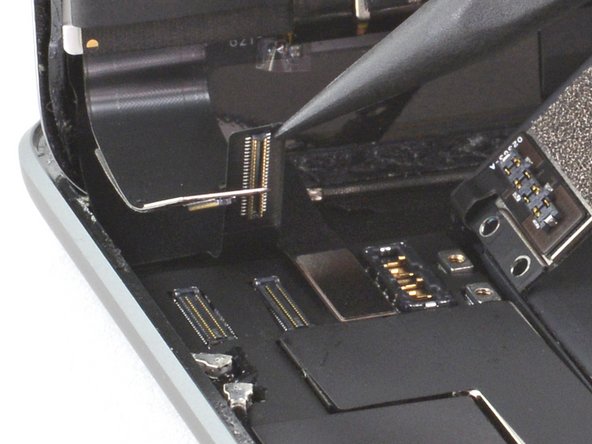
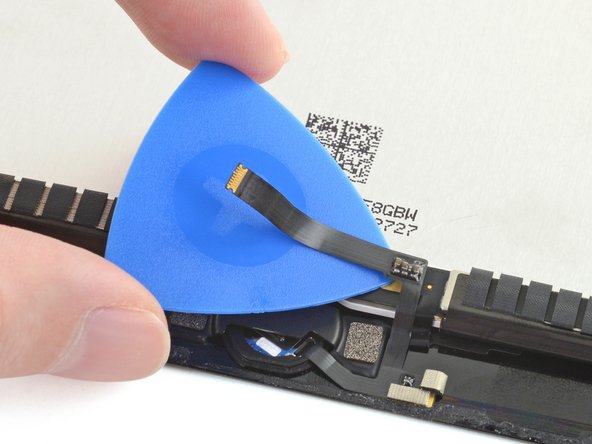
ピンセットを使って、フレームの端の下からディスプレイケーブルブラケットのクリップを引き抜きます。
-
バッテリー側に向けてディスプレイケーブルブラケットを回転します。
-
-
-
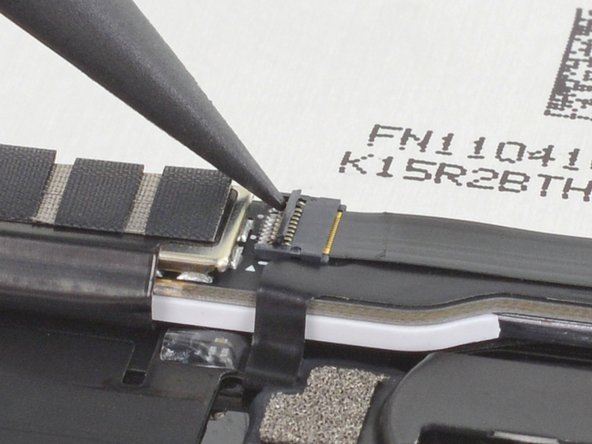
ホームボタンアセンブリのZIFコネクタにある小さなヒンジ付きロックフラップを、スパッダーの尖った部分、オープニングツール、または指の爪を使って跳ね上げます。
-
-
-
プラスチック製オープニングツールを使って、ホームボタンのブラケットをスクリーンからこじ開けます。
-
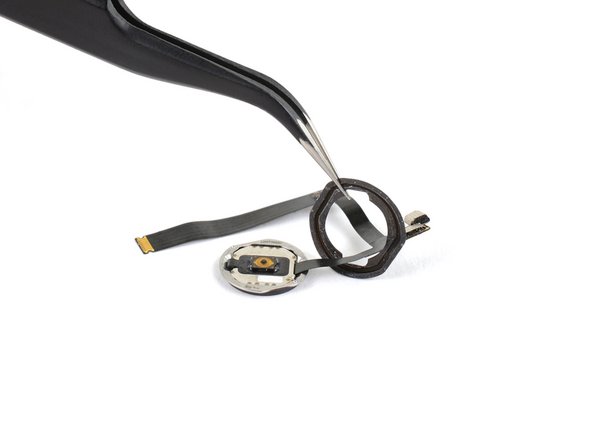
ピンセットを使って、ホームボタンのブラケットを持ち上げて外します。
-
硬化時間中は、小さなクランプなどを使用してブラケットをスクリーンに固定してください。
-
-
-
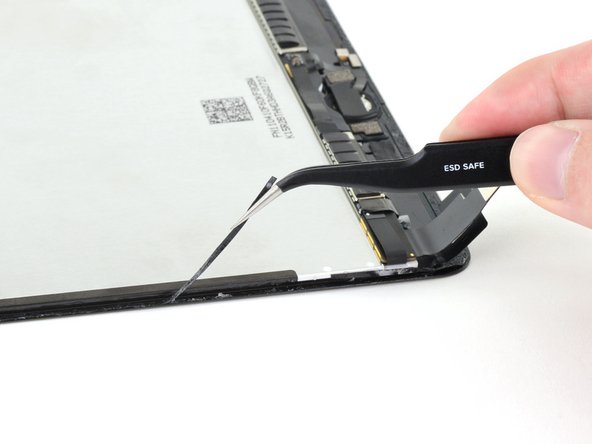
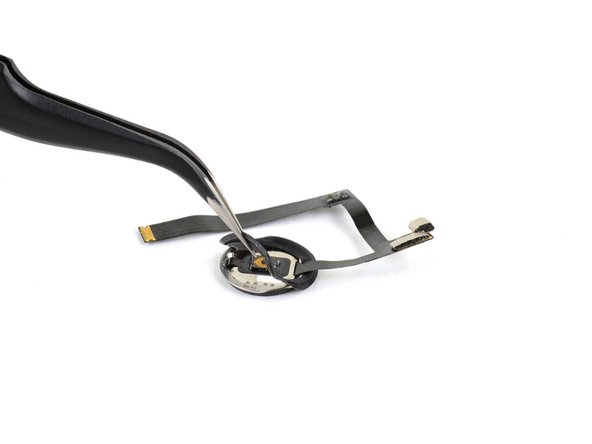
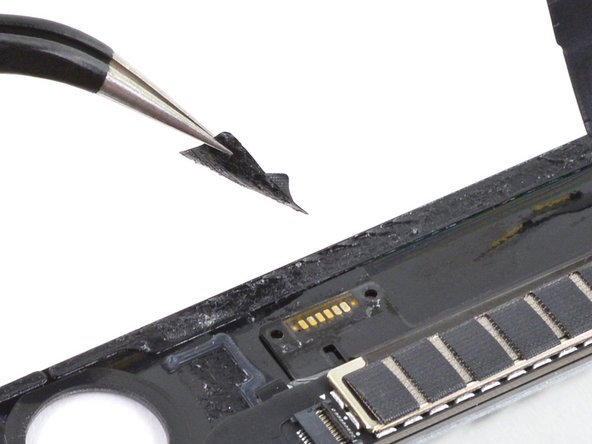
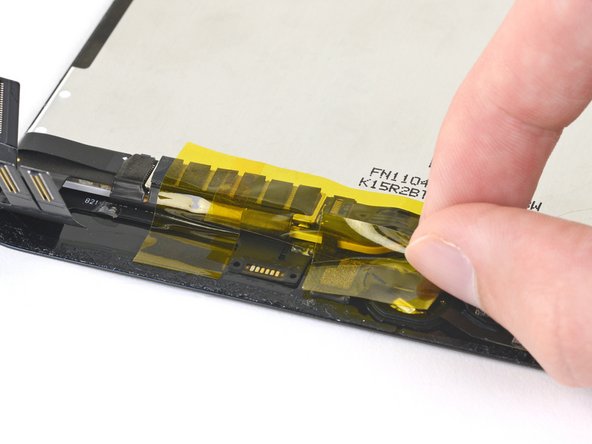
はんだパッドのはんだが溶けたら、ピンセットで磁気センサーをスクリーンから切り離します。
-
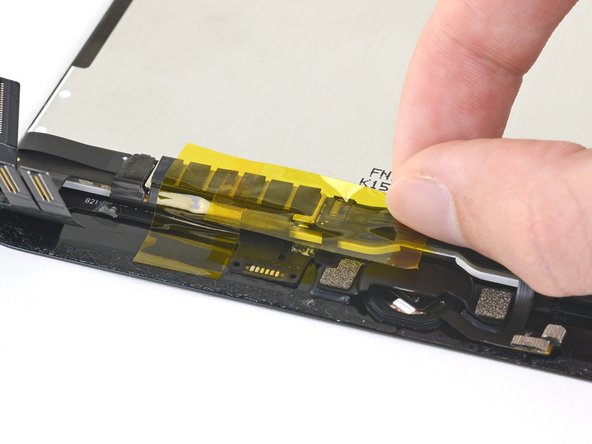
触ってみて十分に冷えたら、ポリイミドテープを剥がします。
-
ピンセットを使って、磁気センサーケーブルを取り外します。
-


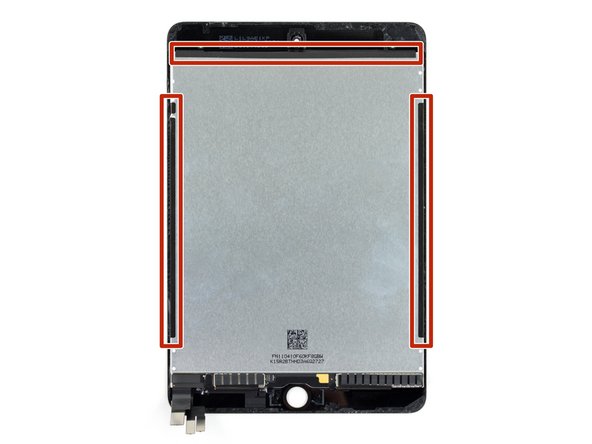


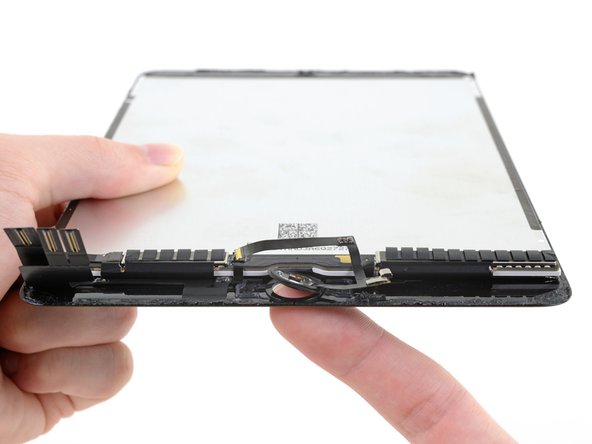


オリジナルのパーツと交換用パーツをよく見比べてください。交換用パーツに付いていない残りのコンポーネントや接着シールなどは、インストールする前に新パーツに移植する必要があります。
デバイスを再組み立てするには、これらのインストラクションを逆の順番に従って作業を進めてください。
e-wasteを処理する場合は、認可済みリサイクルセンターR2を通じて廃棄してください。
修理がうまく進みませんか?ベーシックなトラブルシューティングを試してみるか、iPad mini 5のアンサーコミュニティを参照してください。
オリジナルのパーツと交換用パーツをよく見比べてください。交換用パーツに付いていない残りのコンポーネントや接着シールなどは、インストールする前に新パーツに移植する必要があります。
デバイスを再組み立てするには、これらのインストラクションを逆の順番に従って作業を進めてください。
e-wasteを処理する場合は、認可済みリサイクルセンターR2を通じて廃棄してください。
修理がうまく進みませんか?ベーシックなトラブルシューティングを試してみるか、iPad mini 5のアンサーコミュニティを参照してください。
9 の人々がこのガイドを完成させました。
以下の翻訳者の皆さんにお礼を申し上げます:
100%

これらの翻訳者の方々は世界を修理する私たちのサポートをしてくれています。 あなたも貢献してみませんか?
翻訳を始める ›

3 件のコメント
is it possible to buy the screen with the magnetic sensor already on it?
Yes, if it is in stock.
hello sir
I want to replace my ipad with another apple products
its possible or no ?