はじめに
このガイドの手順に従って、iPad mini 4 LTEの故障、経年劣化、または膨張が発生したバッテリーを交換します。
リチウムイオンバッテリーには、危険な化学物質が含まれており、穴を開けたり、取り扱いを誤ったりすると、引火や爆発が発生するおそれがあります。慎重にすべての警告に従ってください。
バッテリーが膨張している場合は、適切な予防措置を取ってください。
このガイドに掲載されている写真はWi-Fiモデルで撮影されたものであり、内部のいくつかのパーツはセルラーモデルのものと異なっています。注意書きがあるものを除いて両モデルとも手順は同じです。
必要な工具と部品
-
-
ガラスに亀裂が入った場合は、ガラスをテープで固定することにより、破損箇所の拡大を食い止め、修理時の負傷を防止します。
-
透明な梱包用テープを、iPadのディスプレイの面全体が覆われるように貼り付けます。特に破損が酷い場合は、2枚重ねて貼らなければならないことがあります。
-
このガイドの残りの説明にできるだけ従うようにしてください。ただし一度ガラスが破損すると、作業の進行に従って亀裂が広がりやすくなるため、金属製のヘラでガラスを剥がして除去することが必要になる場合があります。
-
-
-
吸盤でガラスを引き上げながら、オープニングピックの先端をガラスとiPad本体の隙間に差し込みます。
“Don't insert the opening pick any deeper than the black bezel on the side of the display. Inserting the pick too far may damage the LCD.”
Unfortunately, you only know you have inserted it too far when you have, and you start seeing little bubble veins form between the glass screen and the LCD.
The adhesive can be very stiff/hard, and if pushing through it can result in the pick plunging into the LCD when the adhesive finally gives way.
Take your time, use alot of heat, and if you need to try and push the pick in, try and do so in a slicing motion along the edge, use the wide edge, or hold the pick so that your finger will hit the edge of the screen before the pick tip will pass the bezel.
Adhesive strips are only 1mm wide on sides. Up to 5mm wide top and bottom. I used the Isclack. Screen seemed ok bending without breaking. Worth looking for a photo of the replacement adhesive strips so you know what you have to separate. Be extra careful at the lower right corner where the cables are.
ian cheong - 返信
This is a failure of a guide as it doesn’t tell you to insert at a downward angle so you don’t potrude into the LCD… Now I have to spend more money to replace the screen as I pushed adhesive between the LCD and the screen even though I went no farther than a millimeter short of the screen...
can you open the right side if the left is too cracked to use a suction cup on?
This guide needs amending urgently.
You MUST NOT put the pick or whatever you are using more than 2mm under the sides of the screen, or you will cut through the adhesive tape securing the backlight assembly to the LCD glass.
This will push adhesive into the viewable area of the LCD and cause the backlight assembly to no longer be secured against the LCD fully.
I now need a new screen.
This line below from the guide is absolutely INCORRECT and will ruin your expensive display:
”Don't insert the opening pick any deeper than the black bezel on the side of the display.”
The black bezel is 5mm to 6mm wide; you MUST NOT insert anything to that depth or you will destroy your display. 2mm maximum!
thanks. will take this into account for my repair
Adab Abu -
I too damaged my display because of this absolute nonsense (The German version, which I used, still had this INCORRECT portion in it). I can't believe how long it took iFixit to update this, even though people have been reporting this for years on end. Sadly iFixit still haven't updated a variety of other things that are still at the very least high risk instructions. I just messaged them the other day, but they don't seem to care about or understand the remaining issues that this guide has. At least they updated one of the most severe things, but they just plainly told me 'I'm wrong' about the rest. I liked iFixit it so far, and I've worked on a variety of (difficult) repairs - but this experience was a very huge let down.
A few thoughts after opening a number of Mini 4’s.
1) if the display is warm enough you can squeeze the digitizer and LCD back together after a minor incursion with the opening pick and it will reseal.
2) I’ve started going in at the top just to the right of the camera (I use an iFlex to get in then switch to a pick). Then I run down either side with my fingers choked up on the pick so there only a mm or 2 sticking out. Usually after running down one side, I can get the display open enough to get the pick in behind the LCD when I do the other side
-
-
-
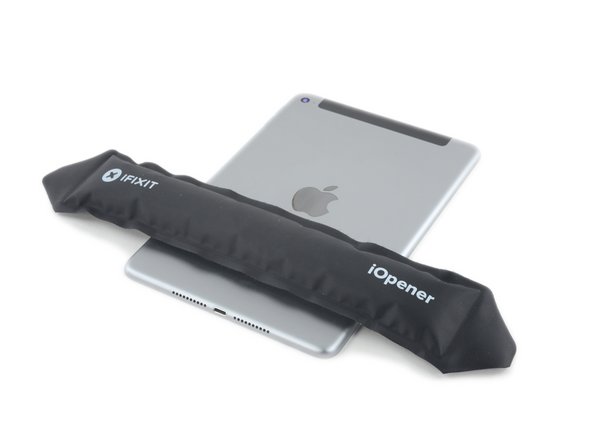
iOpenerを再び温めて、先ほどと同じ位置に約2分間当てます。
If your iPad is cold, consider leaving the iOpener on for longer than 5 minutes. The aluminum housing is a very large thermally dissipating mass and will quickly cool off the glass and make you have to start over and wait the 10 minutes to reheat. There’s a very slim window in which you’re able to insert the pick into the glass adhesive before it solidifies once again. I’ve been fighting with it for like 20 minutes following these instructions and it’s not working. You really need to leave it for longer than just 5 minutes to get the back housing hot too.
Heat is essential. I used a 3d printer’s heated set at 65 degrees. Chris Storer’s stip above saved me as you really need to let it sit for quite a while to soften the adhesive. Since I was doing a battery change, I heated both sides as the aluminum back is a huge heatsink that really sucks up the heat. Don’t try forcing it; if the suction cup isn’t pulling a gap in the screen, leave it on the heater for additional time.
Love the 3d printer idea, I hadn’t thought of that! I have used a heat gun as well but you have to be very careful to not use too much heat. Also watch for inserting the pick too far, it is really easy to delaminate glass from the display!
russ -
-
-
-
-
2つの開口ピックをiPad上部で同時に捻り、ディスプレイアセンブリを固定する最後の接着剤を剥がします
-
ディスプレイを上端から持ち上げてデバイスを開きます。
"Twist the two picks at the top edge of the iPadTwist the two picks at the top edge of the iPad "
When I did this twisting motion, and I thought I was being gentle, one of the picks cracked nearly in half. That adhesive is very strong! I probably did not cut into it far enough before applying the twisting to open the screen.
-
-
-
バッテリー/ディスプレイコネクタブラケットに留められた1.2mmプラスネジを4本外します。
-
-
-
バッテリー/ディスプレイケーブルブラケットを取り外します。
Is it the end of the world if the bracket is not reinstalled, will the device function normally or will it eventually have issues with the connectors coming loose following shock?
-
-
-
スパッジャーの平面側先端を使って、ロジックボード上のソケットからバッテリーコネクタの接続を外します。
When i was starting to disconnect the lcd to the board i hit the black film and it lit and now even the new display wont display anything how to fix it? The black film near the lcd connector.
-
-
-
スパッジャーの鋭利な先端を使って、ロジックボード上のソケットからディスプレイデータコネクタの接続を外します。
-
スパッジャーの鋭利な先端を使って、ロジックボード上のソケットからデジタイザーケーブルコネクタの接続を外します。
-
-
-
ディスプレイアセンブリを取り外します。
-
ディスプレイアセンブリを再装着するには、ディスプレイ接着剤を交換する必要があります。当社のディスプレイ接着剤の装着ガイドを参照して、ディスプレイ用接着剤を再塗布し、デバイスを再封印してください。
Ich habe eine Bücherstütze benutzt um das Display in senkrechter Position zu halten, während ich die vier Schräubchen gelöst habe.. So zieht man nicht so an den Flexkabeln….!
Because the 3-piece adhesive strips shown in the Display Adhesive Application Guide link were different from iPad Mini 4 Adhesive Strips (item code IF316-013-1), it wasn't easy to figure out the exact location of the bottom adhesive. It would be helpful to include a separate application guide or an additional picture showing the exact location of each strip) on the guide.
-
-
-
iOpenerを再度加熱します。
-
iPadの画面を下に向けて作業テーブルに置き、リアケースのバッテリーの下端にあたる部分にiOpenerを置きます。
-
-
-
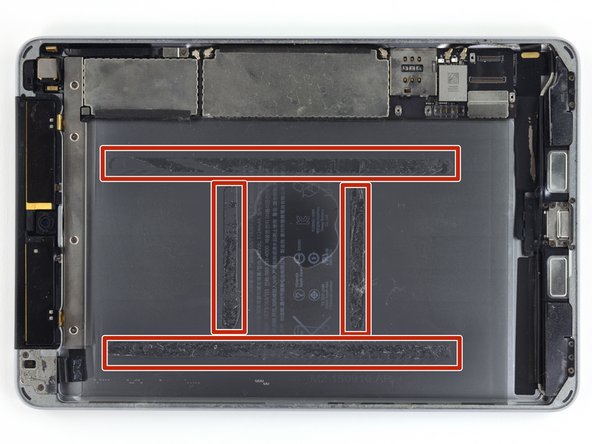
次の手順では、バッテリーの下の接着テープを剥がし、リアケースをこじ上げて外します。
-
接着テープはこの写真のように、2本が2つの長辺に沿って貼り付けられており、またこれらに対して垂直で、より短い2本が中心部に貼り付けられています。
-
バッテリーの損傷を防止するには、プラスチック製の工具、熱、そして辛抱強さが必要です。バッテリーを針などで刺したり、曲げたり、あるいは加熱しないでください。
-
ロジックボードの付近をこじ開けないでください。iPadが損傷するおそれがあります。
The only tape adhesive kit that iFixit sells is incomplete for the cellular model. The are five extra small pieces of tape that go inboard around the cellular antenna. You will need to request another tape kit from iFixit, like I recently did, to cut custom pieces for that section. Amazingly I got pushback on that and was told that their kit is correct for the cellular model too, even after showing clear and obvious closeup photos of the leftover adhesive in those sections. That’s inexcusable for a repair site!
In general the tape of the battery to open is more work and need more head the the Display. The Headsink of the backhousing and batterie itself is big.. I in the end used an big hot air dryer to heat up the backside of the Pad!!
-
-
-
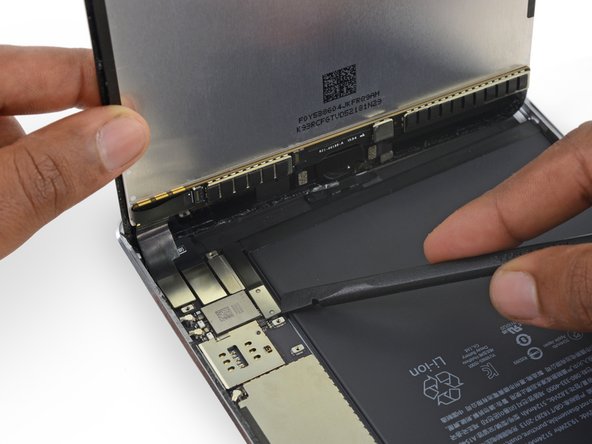
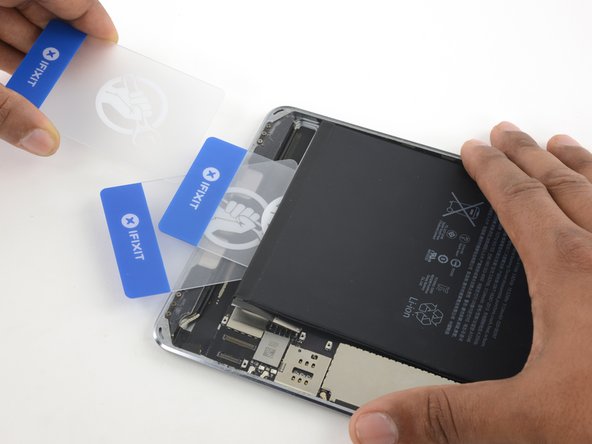
3枚目のプラスチック製カードを、1枚目と2枚目のカードの間に差し込みます。今回はバッテリーの左端に合わせて差し込みます。
-
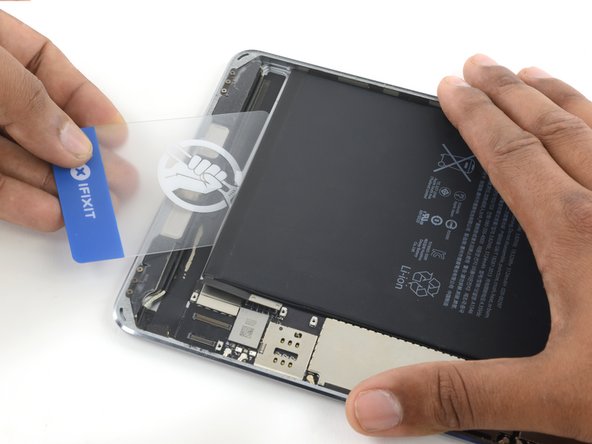
バッテリーが外れるまで、引き続きバッテリーの下の接着テープを剥がします。
-
こじ開けることが難しくなった場合は、iOpenerを再度加熱して接着部に当てます。必ずセッションの合間にiOpenerが冷えるまで待つようにしてください。
-
-
-
バッテリーを取り外します。
Reassembling it is not simply a matter of following the reverse of the disassembly instructions. You need to clean off all the adhesive tape pieces and residue. That is by far the most time consuming and potentially damaging part of this job. The adhesive will be very difficult to get off in some places. I use a combination of blow dryer with low heat, the pointed end if the plastic prying stick to rub it off, chiseled cut pieces of pencil eraser sticks, to rub it down even more, then finally, and very, very carefully, alcohol to get the residue off. Just wet enough on cotton cloth and cotton swabs to wipe but not to have it seep into delicate areas! Rub along and outboard of the edge of the display only to avoid damaging edge. It you don’t remove all the tape pieces and residue and have a clean and level result for the new tape then the display will not only not sit flush like a new iPad but it will not stick well!
Cellular model users see my important comment about thecelluar model in the beginning of the guide!
One big hint will be first to fix the batterie connector in the socket before You “drope” the battery in place! The new battery is a little bit smaller and if the battery ist fixed on the bottom, You have no chance to connect the plug without any damaging the socket!!!
One more hint conerning the tape which fix the Glass in the frame: I used the old tape and looked only that its “nearly undistroyed”.
A few overstreched pieces i cut away. It works fine!! After fixation in the frame of the Pad I heated up the whole Pad with a Hairdryer and pressed together again! Looks good !
Thanks general for this Documentation - Evan! ……..
For those worrying about glue residue, use pure IPA to soften the glue. Makes it very easy to remove. I also get it behind batteries when trying to remove them, they come unstuck much easier
You can clearly see there are four pieces of Plastic cards. In the kit there are only two. what would help would be a plastic card that is at least three times longer, so that it can be pressed bellow the battery.
You can make really short work of the glue residue by using Goo Gone. Spray it on a cotton cloth first sparingly (not on the device) and wipe it on the glue areas. It will come up very quickly. Then take a dry paper towel to ensure you don't leave any Goo Gone residual.
-


元通りに組み立てるには、これらの手順を逆に実行してください。
元通りに組み立てるには、これらの手順を逆に実行してください。
34 の人々がこのガイドを完成させました。
以下の翻訳者の皆さんにお礼を申し上げます:
100%


これらの翻訳者の方々は世界を修理する私たちのサポートをしてくれています。 あなたも貢献してみませんか?
翻訳を始める ›

7 件のコメント
This guide says ABSOLUTELY NOTHING about where the display and digitizer cables are connected. NO warning to be extremely careful in the bottom right corner where the display is connected. I was under the impression that I could stick a pick in to every corner of the iPad which is NOT the case. I’m just disappointed that because of this error in explanation I now have to buy a replacement screen. I hope the author and others performing this repair see this and let me be the person to screw up my screen not you! Again, disappointed!
Hi Karl,
I’m really sorry to hear that! I will add warnings to the appropriate steps to hopefully help mitigate this issue. If you purchased the screen from iFixit, please contact our support team at help.ifixit.com!
Exactly same happen to me! Replaced the battery, the iPad mini cannot be started. Just showing stripes on the display. I’ve read this instructions a few times but seems to missed the cables as well.. Too bad it was my kids’ iPad.
I would like to see one video showing how to open the ipad-mini 4 using the IOpener. Is there any?