はじめに
iPadのバッテリーを交換するための修理ガイドです。
必要な工具と部品
-
-
ディスプレイガラスにヒビが入ってしまった場合、さらにヒビが広がってしまったり、怪我をすることがないように、作業中はガラス表面にテープを貼ってください。
-
iPadディスプレイの上に透明の梱包用テープを貼り付け、ディスプレイ全体が覆われるまで重ねて貼ります。
-
この手順に書かれた通りに作業を進めるように最善を尽くしてください。しかしながら、ガラスが一度割れてしまうと、作業が進むにつれて広がってしまいます。その場合、ガラスを取り出すためにメタル性の開口ツールが必要になるかもしれません。
-
-
-
左の画像では、ディスプレイアセンブリを固定している14個のメタル製クリップがあります。次の手順でこじ開け作業をするとき、開口ツールを使って、これらのクリップ自体をスライスするのではなく、クリップ周辺をこじ開けるよう最善を尽くしてください。
A clearer explanation of the orientation is needed here. The bar code is at the top left of the iPad when you are looking at the screen.
-
-
-
上部ディスプレイアセンブリの端とリアパネルアセンブリの間にメタル製スパッジャーを差し込みます。
-
スパッジャーを回転させながらディスプレイの上部端に沿ってタブを解放します。
-
2本目のメタル製スパッジャーを上部ディスプレイアセンブリの端とリアパネルアセンブリの間に差し込み、タブが再装着するのを防ぎます。
-
-
-
スパッジャーを使って、iPadの右端に沿ってスライドします。
-
フロントパネルは、上部、下部、左側に付けられたメタル製クリップでアルミニウムの背面に固定されています。 右側には、バックプレートの凹みにスライドするためのプラスチックのタブが付いています。
-
クリップ全部が外れたら、フロントパネルの左側を持ち上げて、左側にスライドし、アルミ製バックプレートからタブを外します。
Its seems easier to undo the clips on the left and bottom by levering them with an iPad tool and pusing the clips in from the edge with another tool when i can visually see them. One the right side, bottom and most of the left side is done there isnt much need to do the top as it will slide off if moved about a centimeter
-
-
-
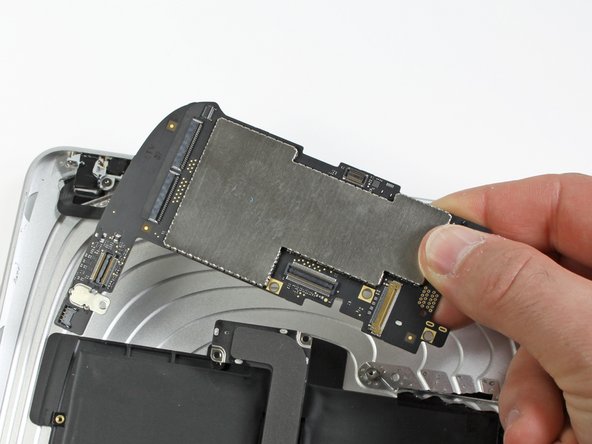
次の手順では、ディスプレイアセンブリをロジックボードに接続している3本のケーブルの接続を外します。ケーブルは、次のコンポーネント用です。
-
デジタイザー
-
環境光センサー
-
ディスプレイデータケーブル
It would be easier to detach the Display Data Cable at its connector on the far right in the picture, since there doesnt seem to be much play to undo the suggested one.
-
-
-
プラスチック製開口ツールの先端を使って、ロジックボード上のソケットにデジタイザーリボンケーブルを押さえている固定フラップを跳ね上げます。
-
ソケットからデジタイザーリボンケーブルをまっすぐ引き抜きます
Adding this comment in its proper place:
After flipping up the metal retainer, pull it sideways.
Do not pull it up vertically.
-
-
-
-
黒のプラスチック製プルタブを持って、メタル製リテーナーを跳ね上げて、メインボードからディスプレイデータケーブルの接続を外します。
-
ソケットからケーブルコネクタを引き抜きます。
IMHO, unhooking data display cable from the other end is preferable to the above location, since the cable itself is sealed or taped onto the assembly.
-
-
-
プラスチック製開口ツールの先端を使って、次の作業をします。
-
ワイヤーの下からロジックボードからサイドボタンコネクタを持ち上げます。
-
スピーカーワイヤーの下からロジックボード上のソケットからスピーカーコネクタを持ち上げます。
-
ヘッドホンジャック付近のソケット上のZIFリボンケーブル固定フラップを注意深く跳ね上げます。
-
iPadの左側に向けてヘッドホンジャックリボンケーブルを引っ張り、ソケットから接続を外します。
Just skip removing the “side button connector” as you may instead sever the small solder connections to the socket. It’s not a necessary step and is more dangerous than anything.
Max Powers - 返信
I wish I had understood your post a little better, the socket popped off of the logic board for me. Is there any way to reconnect it or did I just waste my money trying to fix my own device? Thanks for any suggestions, listen to Max, good advice, there’s no reason to remove that connection and it just puts you in danger of doing what i did. Good luck to all.
-
-
-
リアパネルアセンブリにスピーカーアセンブリを固定している、2.84mm T5トルクスネジを2本外します。
-
リアケースアセンブリに固定された中央のドックケーブルから、T5トルクスネジを1本外します。
-
-
-
スパッジャーの平面側先端を使って、下部ケースからバッテリーを慎重にこじ開けます。
-
スパッジャーでバッテリーの右側に沿って慎重に左右に揺らしながらスライドし、バッテリーとケースの隙間を大きくしていきます。
No joke with the “excessive amount of adhesive” you may cut yourself or bend your metal sponger like I did. This part alone took me about 25 min, just the removal from the back panel.
-
-
-
バッテリーが十分に外れたら、手でリアパネルにバッテリーを固定している接着剤の残りを剥がします。
-
バッテリーをリアパネルから取り出します。
-


デバイスを再組立する際は、これらのインストラクションを逆の順番に従って作業を進めてください。
デバイスを再組立する際は、これらのインストラクションを逆の順番に従って作業を進めてください。
114 の人々がこのガイドを完成させました。
以下の翻訳者の皆さんにお礼を申し上げます:
100%

これらの翻訳者の方々は世界を修理する私たちのサポートをしてくれています。 あなたも貢献してみませんか?
翻訳を始める ›

14 件のコメント
Tried this with 2 ebay "OEM" cheapo batteries. Both failed- wouldn't charge, reboot every few minutes.
Solution: Dissected both new and original batteries. Snipped out old LI-ION cells from original Apple battery pack frame. Soldered new LI-ON cells into original battery frame.
Success!
The battery pack includes both LI-ION cells and an small circuit board. The cheapo replacement battery packs don't work (with newer IOS versions? are they actively blocking 3rd party battery replacements?)
Using the circuit board from the original battery pack with new LI-ION cells seems to fix everything.
Be ready to peel off a lot of adhesive label stickers and maybe use a bit of electrical tape to produce a renovated battery pack that works- original Apple battery frame + new LI-ION cells..
Thanks for letting us know that battery PCB takes LiIon cells replacement. I have the same problem with reboot using cheap ebay replacement battery. Going to test new LiIon cells for capacity and if OK - will resolder them.
Paul G -
PS: just replaced two cells, it works. Just in case, to prevent the charging PCB to loose the power (some LiIon controllers can lock because of power loss) I did it one by one. First I removed one cell, soldered replacement, then second one. I estimated capacity of new cells using Imax B6 charger - both of them were around 3100mah, not bad for noname $12 battery from ebay.
Paul G -
I am new to this. Does the iPad need to be kept powered up by an external battery while changing out the battery pack to prevent loss of apps and data? I don't mind so much losing data, it is backed to cloud. But apps are a problem as many of mine are no longer available.
Mike Nixon - 返信
No, iProduct storage doesn't depend on the battery.
jasonq -
I've performed the steps and it worked with Kastar replacement part, just to note that to open it first I've used the side were the volume button is located and slided through the botton were the front button is located.
Also is almost impossible to open it without broke some clips, I've bought some spares (10 pieces) that come handy because 6 were broken during the procedure.
What kind of replacement adhesive would I need to secure the new battery? Or is it okay without any new adhesive?
The iPad gen 1 battery I replaced did not need any extra adhesive. It stuck to the old large mess without issue.
Post battery replacement. Looks like it worked but the screen would not light up. I assumed the back light was damaged from the water damage (was dropped in a full bath tub) so I replaced the screen and now it will not charge. Should I assume it’s a cable or the logic board?
this is purely entertainment and not for work.
tres bien moi jaurais preferer un film sur youtub
1) Are you recommending to cover the display with clear packing tape even if it is intact (not cracked)?
2) If so,will the tape take the display’s oleophobic coating with it when removed?
Mitch Stary - 返信
Hola necesito comprar
Alsone Michel - 返信
Hola, ¿no estoy seguro si te refieres a las gafas de protección o a la pantalla? Te dejo los dos enlaces aquí:
iPad LCD Panel
Safety Glasses
Sandra Hiller -