メインコンテンツにスキップ

iPad Pro 9.7" Opening Procedure

必要条件のみ
この修理ガイドは、他のガイドの前提条件として使用されます。それ自体は不完全で、単独で使用されることはありません。

必要な工具と部品

  1. iPad Pro 9.7" Opening Procedure, iPad Pro 9.7" Opening Procedure: 手順 1、 3の画像 1 iPad Pro 9.7" Opening Procedure, iPad Pro 9.7" Opening Procedure: 手順 1、 3の画像 2 iPad Pro 9.7" Opening Procedure, iPad Pro 9.7" Opening Procedure: 手順 1、 3の画像 3
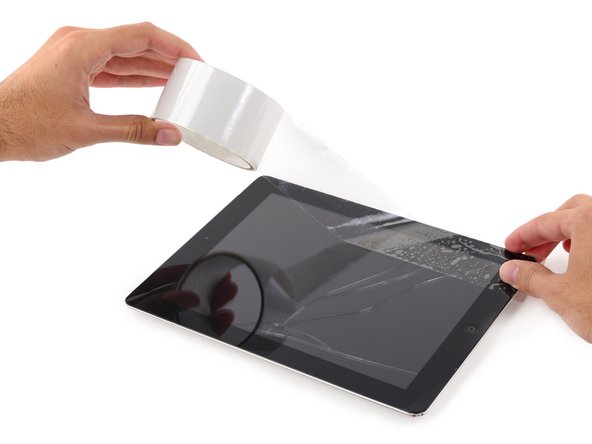
    • If your display glass is cracked, keep further breakage contained and prevent bodily harm during your repair by taping the glass.

    • Lay overlapping strips of clear packing tape over the iPad's display until the whole face is covered.

    • This will keep glass shards contained and provide structural integrity when prying and lifting the display.

    • Do your best to follow the rest of the guide as described. However, once the glass is broken, it will likely continue to crack as you work, and you may need to use a metal prying tool to scoop the glass out.

    • Wear safety glasses to protect your eyes, and be careful not to damage the LCD screen.

  2. iPad Pro 9.7" Opening Procedure: 手順 2、 1の画像 1
    • The following steps involve using an iOpener to soften the adhesive holding the front panel assembly in place. When using the iOpener, be sure to heat it in the microwave for no more than 30 seconds.

    • Handling it by the tabs on either end, place a heated iOpener over the top edge of the iPad.

    • Let the iOpener sit on the iPad for two minutes to soften the adhesive securing the front panel to the rest of the iPad.

  3. iPad Pro 9.7" Opening Procedure: 手順 3、 3の画像 1 iPad Pro 9.7" Opening Procedure: 手順 3、 3の画像 2 iPad Pro 9.7" Opening Procedure: 手順 3、 3の画像 3
    • While the iPad looks uniform from the outside, there are delicate components under certain portions of the front glass. To avoid damage, only heat and pry in the areas described in each step.

    • As you follow the directions, take special care to avoid prying in the following areas:

    • Home Button

    • Front Facing Camera

    • Main Camera

  4. iPad Pro 9.7" Opening Procedure: 手順 4、 2の画像 1 iPad Pro 9.7" Opening Procedure: 手順 4、 2の画像 2
    • Place a suction cup over the iPad's front-facing camera and press down to create a seal.

    • To get the most leverage, place the suction cup as close to the edge as possible without going past the edge of the display.

  5. iPad Pro 9.7" Opening Procedure: 手順 5、 3の画像 1 iPad Pro 9.7" Opening Procedure: 手順 5、 3の画像 2 iPad Pro 9.7" Opening Procedure: 手順 5、 3の画像 3
    • Firmly pull up on the suction cup to create a small gap between the front panel and the rear case.

    • Do not pull too hard or you may shatter the glass.

    • Once you've opened a sufficient gap, insert an opening pick into the gap to prevent the adhesive from resealing.

  6. iPad Pro 9.7" Opening Procedure: 手順 6、 3の画像 1 iPad Pro 9.7" Opening Procedure: 手順 6、 3の画像 2 iPad Pro 9.7" Opening Procedure: 手順 6、 3の画像 3
    • Slide the pick along the edge of the display, towards the headphone jack.

    • If there is still a considerable amount of resistance when sliding the opening pick, repeat the iOpener heating procedure and apply additional heat.

    • Don't insert the pick past the bezel into the display area, or you will damage it.

    • A good rule of thumb is to never insert the opening pick more than a quarter inch into the iPad.

  7. iPad Pro 9.7" Opening Procedure: 手順 7、 2の画像 1 iPad Pro 9.7" Opening Procedure: 手順 7、 2の画像 2
    • Insert a second opening pick by the front-facing camera.

  8. iPad Pro 9.7" Opening Procedure: 手順 8、 3の画像 1 iPad Pro 9.7" Opening Procedure: 手順 8、 3の画像 2 iPad Pro 9.7" Opening Procedure: 手順 8、 3の画像 3
    • Slide the second pick along the top edge of the iPad, towards the Sleep/Wake Button.

  9. iPad Pro 9.7" Opening Procedure: 手順 9、 2の画像 1 iPad Pro 9.7" Opening Procedure: 手順 9、 2の画像 2
    • Insert a third pick by the front-facing camera.

  10. iPad Pro 9.7" Opening Procedure: 手順 10、 3の画像 1 iPad Pro 9.7" Opening Procedure: 手順 10、 3の画像 2 iPad Pro 9.7" Opening Procedure: 手順 10、 3の画像 3
    • Bring the right opening pick down and around the top right corner of the iPad.

  11. iPad Pro 9.7" Opening Procedure: 手順 11、 3の画像 1 iPad Pro 9.7" Opening Procedure: 手順 11、 3の画像 2 iPad Pro 9.7" Opening Procedure: 手順 11、 3の画像 3
    • Bring the left opening pick around the top left corner of the tablet.

  12. iPad Pro 9.7" Opening Procedure: 手順 12、 1の画像 1
    • Reheat the iOpener and lay it over the right edge of the display to loosen the adhesive underneath.

  13. iPad Pro 9.7" Opening Procedure: 手順 13、 3の画像 1 iPad Pro 9.7" Opening Procedure: 手順 13、 3の画像 2 iPad Pro 9.7" Opening Procedure: 手順 13、 3の画像 3
    • Slide the right opening pick roughly halfway down the display.

  14. iPad Pro 9.7" Opening Procedure: 手順 14、 1の画像 1
    • Reheat the iOpener and apply heat to the left side of the iPad.

  15. iPad Pro 9.7" Opening Procedure: 手順 15、 3の画像 1 iPad Pro 9.7" Opening Procedure: 手順 15、 3の画像 2 iPad Pro 9.7" Opening Procedure: 手順 15、 3の画像 3
    • Slide the left-hand opening pick about halfway down the edge of the display.

  16. iPad Pro 9.7" Opening Procedure: 手順 16、 3の画像 1 iPad Pro 9.7" Opening Procedure: 手順 16、 3の画像 2 iPad Pro 9.7" Opening Procedure: 手順 16、 3の画像 3
    • Slide the opposite opening pick down to the bottom right corner of the iPad.

    • If necessary, reheat the adhesive on the right edge to loosen the display assembly.

  17. iPad Pro 9.7" Opening Procedure: 手順 17、 3の画像 1 iPad Pro 9.7" Opening Procedure: 手順 17、 3の画像 2 iPad Pro 9.7" Opening Procedure: 手順 17、 3の画像 3
    • Slide the left-hand opening pick down the edge of the display until you reach the corner.

  18. iPad Pro 9.7" Opening Procedure: 手順 18、 1の画像 1
    • Use the iOpener to apply heat to the bottom edge of the iPad.

  19. iPad Pro 9.7" Opening Procedure: 手順 19、 3の画像 1 iPad Pro 9.7" Opening Procedure: 手順 19、 3の画像 2 iPad Pro 9.7" Opening Procedure: 手順 19、 3の画像 3
    • Bring the right-hand opening pick around the bottom corner of the iPad.

  20. iPad Pro 9.7" Opening Procedure: 手順 20、 3の画像 1 iPad Pro 9.7" Opening Procedure: 手順 20、 3の画像 2 iPad Pro 9.7" Opening Procedure: 手順 20、 3の画像 3
    • Repeat for the left-hand pick.

    • Reheat and reapply the iOpener as needed.

  21. iPad Pro 9.7" Opening Procedure: 手順 21、 2の画像 1 iPad Pro 9.7" Opening Procedure: 手順 21、 2の画像 2
    • Remove the right-hand opening pick at the bottom of the iPad.

  22. iPad Pro 9.7" Opening Procedure: 手順 22、 3の画像 1 iPad Pro 9.7" Opening Procedure: 手順 22、 3の画像 2 iPad Pro 9.7" Opening Procedure: 手順 22、 3の画像 3
    • Slide the left-hand opening pick along the bottom edge of the display, then remove it from the bottom right corner of the iPad.

    • Be very careful to not insert the pick more than a quarter inch into the display to avoid damaging the Home Button and display cables underneath.

終わりに

To reassemble your device, follow these instructions in reverse order.

作成者

4人の作成者と共同で作成されました。

Arthur Shi

メンバー登録日: 01/03/18

252,729 ポイント

526のガイドは作成済み

チーム

iFixit iFixit人のメンバー

Staff

135 メンバー

16,817のガイドは作成済み

0 件のコメント

コメントを追加

統計データ:

過去 24時間: 0

過去 7 日: 0

過去 30 日: 0

今までの合計 154