はじめに
スクリーンを交換したり、内部の部品にアクセスするにはこのガイドに従ってください。
スクリーンに付いているホームボタンはiPadの基盤にくっついていて、新しいスクリーンに取り付け直す必要があります。
始める前に、ドーターボードが背面に接着されているか確認してください。接着されている場合は、このガイドを参照してください。接着されていないなら、基板を古いスクリーンから新しいスクリーンに移植する必要があります。ドーターボードを移し替えるためには特別な半田付けの器具が必要で、このガイドの手順よりDIYの記事を参考にすることをおすすめします。
このガイドのいくつかはWi-Fiモデル用で、LTEモデルには若干異なる場合があります。手順としては断りがない限り、どちらのモデルも同じです。
バッテリーブロッカーを使用してバッテリーを分離する際には、細心の注意を払ってください。 バッテリーの接点は損傷しやすく、致命傷につながります。バッテリーを分離せずにガイドを完成させる場合は、バッテリーのショートや繊細な回路部品の損傷を防ぐため、必要な場合(ネジを外すときなど)以外は金属製の工具を使用しないでください。
このiPad Proの開口手順は、ハルバードスパッジャーを使用しています。スパッジャーがない場合は、開口ピックで代用できます。
必要な工具と部品
-
-
作業を始める前に、iPadの電源を切ります。
-
スクリーンのガラスにヒビが入っている場合は、程度が広がらないようにするめ、または作業中怪我をしないように、ガラス表面にテープを装着してください。
-
あとはこの修理ガイドを参照しながらベストを尽くしてください。ただし、一度割れたガラスは、作業中でも広がる可能性が高いため、メタル製プライングツールで飛散したガラスをすくい出す必要があるかもしれません。
-
-
-
接着剤を切開する際は、次の点にご注意ください。
-
上部には大型で厚めの接着剤が仕様されています。接着剤を切開するには、1cmの深さまで接着剤をスライスする必要があります。
-
iPadの長辺側に沿って、2mm以上深い位置でスライスしないでください。ディスプレイベゼルを破損する可能性があります。
-
下部端には厚めの接着剤が使用されていますが、デリケートなフレックスケーブルが各コーナーに搭載されています。下側コーナー周辺を0.5cm以上深くまで差し込んで切開しないでください。
I have an A1652 iPad pro 12.9” that was originally my wife’s. The battery doesn’t hold a charge very long in use so I read through this guide and ordered the kit and battery. This iPad has a gold colored case that appears to wrap over the edges of the screen. As a result I could not find any place to slice through the adhesive. Model number brought up on the “about” screen is ML3P2LL/A and serial is DLXR3M7LGMW5. Is this possibly a transition model? Any ideas?
Hello! Based on the model number, it looks like you have the 1st generation cellular version of the iPad Pro 12.9". This guide should work for you. The tolerances on the iPad are very tight—you're looking for the seam between the black bezel and the gold case. You'll need a lot of heat in order to loosen the bezel.
-
-
-
iOpenerを温めて、iPadの左端上に載せます。スクリーンを固定している接着剤を柔らかくします。
-
次の手順に進む前に接着剤を柔らかくするため、約2分間待機してください。エッジ部分が熱くて触れない程度まで温めます。
Oven works fine: preheat to ~225 then turn off, protect back with towel and warm for 10-15 minutes. Basically the same as a car interior in summer, this skips about a dozen steps. Used mini plastic pry tools and a few picks/cards, no need for suction or iopener: yet another reason microwaves should be relegated to diners to destroy perfectly good food. Two issues from my surgery: damaged small section of screen border by carding too far inside the device while effortlessly slicing through adhesive, and one of the smart connector pins was revived from bent pin purgatory. Apple’s planned obsolescence genius truly shines through the multipin snap connectors. I detached the screen cable before disabling battery, YMMV; remainder of procedure was done to spec with disabled battery on reinstall. Screw monster only ate about 2, even after breaking an elbow sweat with 70% iso the residual adhesive should outlast the ios nerf that will bring this ipad to the grave. Much easier than first impression with oven.
-
-
-
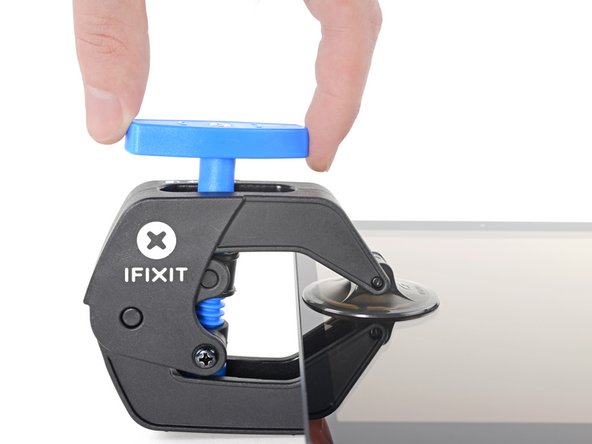
青いハンドルを後方に引き、リバースクランプのアームのロックを解除します。
-
iPadの下に何か安定したものを置き、吸盤の間が水平になるようにします。
-
吸盤の位置をデバイスの下端の中央付近に合わせ、前面と背面に1つずつ装着します。
-
リバースクランプの下部をしっかりと固定し、上部カップをしっかりと押し下げて吸盤を装着ます。
-
-
-
温めたiOpenerをiPadの左下コーナーに沿って当ててください。ホームボタンの下に開口ピックを挟みます。
-
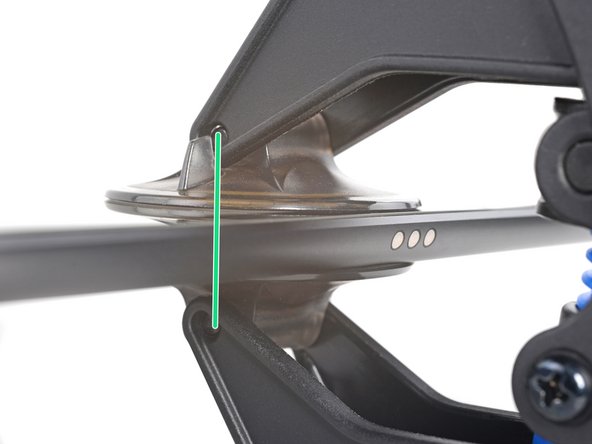
接着剤が柔らかくなったら、開口ピックもしくはハルベルトスパッジャーをSmart Connectorの隣の隙間に差し込みます。
-
開口ピックもしくはハルベルトスパッジャーを使ってiPadの左下側面に沿って接着剤を切開します。切開が困難な場合は、エッジを再度温めてから再試行してください。
Well, this is the scariest part so hold my beer. I tried something similar to the “iOpener” which is a gel filled heat/cold pack I could microwave. That was good to start warming, but I was too impatient to get the first pick under, so I got out my heat gun. Mine is a 1200 watt model and I used it on low, the tip about 3 fingers away from the glass, sweeping it over 8” sections about 10 times taking about 3 seconds per pass. It worked ok and I now have 10 picks pried under all edges. Took about 35 minutes to this point. Only difficulty here is bracing the iPad while sliding the picks under the glass - need to be careful to not knock out the picks you already have inserted.
One note I might offer is that it’s not entirely clear from your pics which is the top/bottom/left/right side because it’s hard to see the button on the screen in your pics. Another is to mark your 2mm pick depth with whiteout or something similar.
-
-
-
-
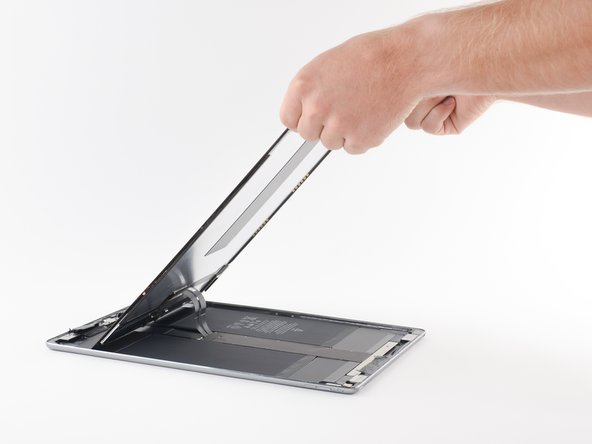
スクリーンの上端を持ち上げ、スクリーン全体を前面カメラに向かってスライドさせると、iPadの内部コンポーネントにアクセスできます。
-
スクリーンの下端をマスキングテープでフレームに貼り付けて、スクリーンのズレを防止してください。
For me, disaster struck at this step. I was being careful but somehow lifted the wrong end and snapped the ribbon cable.
😟😟😟 Be careful It would have been helpful to label the screen's top and bottom edges with a marker and tape at the beginning of the repair process. For that matter, label right and left edges as well. Then change all dialog to reference top, bottom, left, or right. I think it would make it easier to follow the instructions
-
-
-
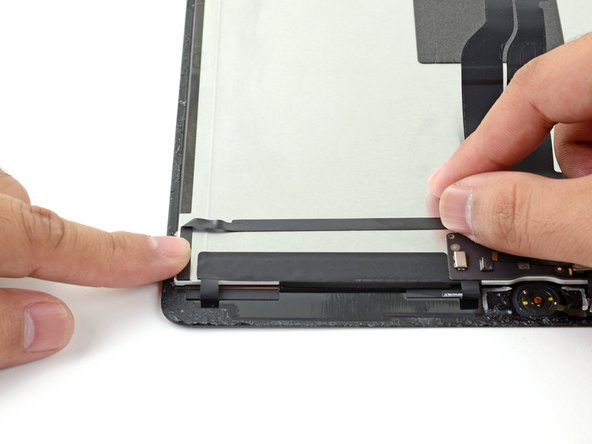
スクリーン上端にマスキングテープを長く貼る。テープは端から折っていき、しっかりと貼り付けてください。
-
スクリーン上端にマスキングテープを長く貼ります。テープは端から折り、しっかりと貼り付けます。
Just make sure you use plenty of tape on the backside of the screen and on the underside of the iPad and the tape won't slip.
-
-
-
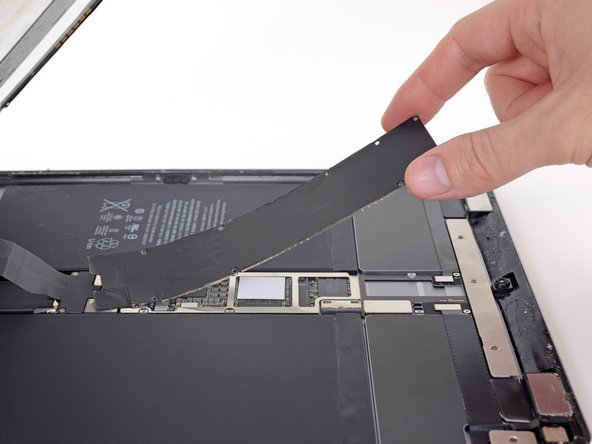
ロジックボードのEMIシールドをiPadの上部に近い端から持ち上げます。
-
ロジックボードからEMIシールドをはがし、取り外します。
-
ロジックボードのEMIシールドを外します。
In the iPad 4G version, this is where the cellular radio sits. You might see some different chips underneath the EM shield, and a little adhesive gasket. When I pulled my EM shield off I tried not to disturb that adhesive, and put it back when I was done.
-
-
-
トランプでバッテリーブロッカーを作り、ロジックボードのコネクタの下に滑り込ませてバッテリーを外します。
-
修理が完了するまで、バッテリーのコネクタリードが接触しないようにブロッカーを置いたままにしてください。
-
-
-
プラスドライバーを使って、ディスプレイケーブルのブラケットを固定している3本のネジを外します。
-
長さ2.4mmネジー2本
-
長さ1.2mmネジー1本
-
ディスプレイケーブルのブラケットを外します。
-
-
-
ディスプレイとデジタイザーのケーブルをスパッジャーの平面側でこじ開け、ロジックボードのソケットから外します。
Would it help to draw a sharpie line between the two parts of the connector, so these can be alingned when refitting?
-
-
-
スクリーンを外します。
-
交換用のスクリーンに事前に接着剤がついていない場合は、私たちのスクリーンに接着剤を装着する方法を参照して、新しい接着剤を取り付けてからiPadを組み立ててください。
Phew! One hour 45, took my time, maybe cut that in half if I did it again and pray I don’t have to. Working sideways, the little screws were usually caught by the battery on the bottom edge. Need a shorter Phillips than in the iFixit kit. And looks like I don’t need the pre-cut adhesives I bought as they were on the replacement screen - hopefully I can get a refund.
Good time for a coffee break before cleaning off the old adhesive. Quite a relief to get the screen off & thanks much to you guys for getting me this far.
Es wäre sehr schön, wenn hier noch jemand beschreiben könnte, wie man "unfallfrei" die Klebereste vom Display rundherum entfernt. Ich habe das in meinem Falle ganz vorsichtig mit Isopropanol (hochrein) getan. Die Klebereste gingen damit gut ab - trotzdem ist das eine sehr aufwendige Arbeit, bis man alles sauber hat. Zudem kann man noch so vorsichtig sein, durch die angebrachte Displayunit auf der Rückseite der Displayscheibe und die dadurch entstehende Kapillarwirkung zieht sich immer Isopropanol zwischen Display und Displayunit, was danach zu hellen Flecken führt. Ich hoffe, die verschwinden wieder, wenn das Iso abgetrocknet / ausgetrocknet ist.
Vielleicht hat jemand eine gute Idee, wie man diese Klebereste entfernt, ohne dass das Beschriebene passiert.
Markus,
I just wouldn't use any isopropyl alcohol to remove the residue. We're going to immediately apply more adhesive right after we remove the old adhesive, so if there's a little bit of sticky residue remaining, that's not a problem for us. I would just scrape as best as I could with a spudger, make sure there's no adhesive on the internals, and call it a day.
-
-
-
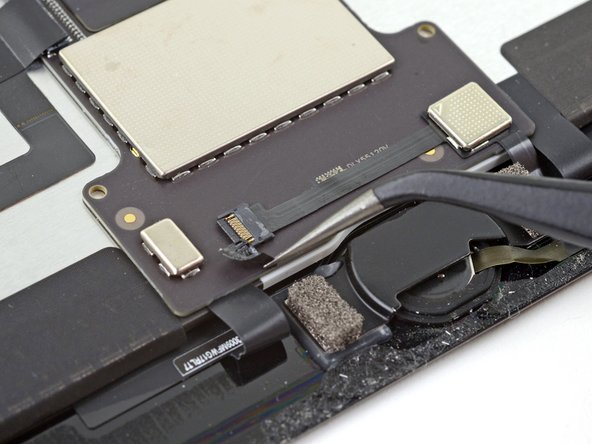
iOpener、ヒートガン、もしくはヘアドライヤーを使って、ケーブルの下に留められた接着剤を温めてから、ケーブルをこじ開けてください。
-
あるいは、ケーブルの下にイソプロピルアルコールを数滴垂らして、数分間待機して、接着剤を柔らかくします。
I used a heat gun on low air, set to 150°C, and very very gentle pressure with the tweezers, and it came out very easily and neatly.
-
-
-
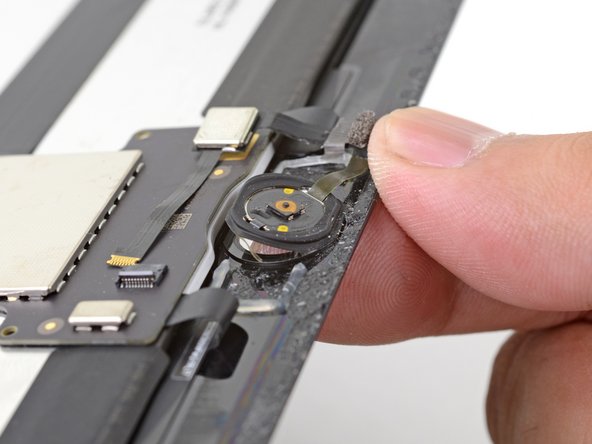
ホームボタンブラケットの底に、イソプロピルアルコールを数滴垂らして、接着剤を弱めます。
-
もしくは温めたiOpenerを使って、接着剤を柔らかくすることもできます。
-
-
-
ホームボタンブラケットを取り出します。
-
できる限り残り接着剤を綺麗に除去してください。高濃度イソプロピルアルコール(90%以上)もしくはアセトンで拭き取ります。
-
ブラケットをE6000の接着剤、ボンドもしくは強力両面テープなどで固定します。接着剤を装着する前に、ブラケットが正しい方向に並んでいるか、ホームボタンはクリックするか点検してください。
Would be really nice if the adhesive strip kit for the screen included the adhesive bits needed to secure the existing home button to the new screen (or a new home button to an existing screen).
One more thing about the bracket: you really need a strong adhesive when you put it back, so that pushing the button doesn’t dislodge it. If it doesn’t hold the button firmly, you can push the button out of its socket during normal use. Getting the bracket in and aligning it without accidentally sticking it in the wrong place or (much worse) sticking it to the fragile ribbon cable takes some very careful work.
This is an excellent guide, but I’d like to see maybe the first two steps of reassembly, showing how to do this correctly.
When replacing the bracket, a very slight difference in the replacement part caused the bracket to make the home button click all the time. The little white washer between the home button and the back of the glass was about 0.3 mm thicker than the original, and i had already superglued those parts together.
Fortunately, the playing card included in the kit is about 0.3 mm thick. I cut 2 small rectangles and superglued them to the feet of the bracket, so it would stand away from the home button. Then superglued the bracket on, and now it clicks perfectly. Hopefully I don't have any issues with the playing card delaminating as the home button wears, because I definitely don't know if i could get this ipad apart again (the first time was easier because the screen was already shattered).
-
-
-
指先を使って、ディスプレイ内側に向けて正面側からホームボタンをゆっくりと押し出します。
-
-
-
全ての梱包用テープを剥がします。
-
フレックスケーブル上の接着剤ライナーを剥がして、ディスプレイパネルの所定の位置にケーブルを押し付けて装着します。
-
スクリーン左下のフレックスケーブルを折りたたんで接続します。
-
修理がうまくいったか点検してからiPadを密封してください。
manca la parte di montaggio del nuovo schermo ?
Ciao Roberto,
Per montare il nuovo schermo, puoi seguire le istruzioni dello smontaggio in ordine inverso. I punti con la puntina da disegno si riferiscono in particolare al rimontaggio.
Buona riparazione!
-


オリジナルのパーツと交換用パーツをよく見比べてください。交換用パーツに付いていない残りのコンポーネントや接着シールなどは、インストールする前に新パーツに移植する必要があります。
このデバイスを再組み立てするには、インストラクションを逆の順番に従って作業を進めてください。
e-wasteを処理する場合は、認可済みリサイクルセンターR2を通じて廃棄してください。
修理がうまく進みませんか?トラブルシューティングのヘルプにはアンサーコミュニティを参照してください。
オリジナルのパーツと交換用パーツをよく見比べてください。交換用パーツに付いていない残りのコンポーネントや接着シールなどは、インストールする前に新パーツに移植する必要があります。
このデバイスを再組み立てするには、インストラクションを逆の順番に従って作業を進めてください。
e-wasteを処理する場合は、認可済みリサイクルセンターR2を通じて廃棄してください。
修理がうまく進みませんか?トラブルシューティングのヘルプにはアンサーコミュニティを参照してください。
88 の人々がこのガイドを完成させました。
以下の翻訳者の皆さんにお礼を申し上げます:
100%

これらの翻訳者の方々は世界を修理する私たちのサポートをしてくれています。 あなたも貢献してみませんか?
翻訳を始める ›

21 件のコメント
Hello there OK so I have 2 screens with 2 different connectors one L shaped (which is on the new screen) and the old cracked screen has a rectangular type? I’m not sure rather it’s a 1gen/2nd gen type of problem? I’m about to grab my hot air gun to completely disassemble the cracked screen, as maybe I’m missing something? Any assistance is welcome… well actually please help me with this before I get a headache since this has totally frustrated me and i’ve had this sitting for nearly 2 1/2 months now but it’s about that time that I readdress this in attempt to fix it.
Hi, does your replacement screen have the home button assembly included? Otherwise there's need of soldering the assembly to it before it can be installed.
Dreetn -
hi
does anyone knows why there is a foam adhesive in thr back of the screen ? do i need to put back when i replaxe screen ?
thanks
screensguy - 返信
I suppose the foam adhesive is similar to the one on the back of the 6s screens. I guess it has more of a heat dissipation function or is meant to absorb any pointy pressure points from inside that may develop (loose screw, sand, dirt...)
Dreetn -
hi
hope someone can help . i tested couple of screens before fitting them in they were working but once tech close it there no touch or black lcd (backlight on but no image )
NB : they disconnect battery before connecting Screen
screensguy - 返信
If you don't have this problem while the assembly is still loose, my best guess is that you have an unwanted contact somewhere, causing a short circuit or malfunction. Perhaps in the bending of the flex?
Dreetn -
Removing the screen takes a great degree of patience. You apply heat, and pull on the suction cup, and for a long time nothing seems to happen. Do not try to replace time with force at this point keep heating and pulling on various areas, you will get separation. It took 5 or 6 heating/pulling cycles to start to see results. Then you can work your way around.
MAKE SURE YOU DO NOT INSERT ANY CARDS/PICKS/SPUDGERS MORE THAN 1/4 inch tops!! YOU WILL DAMAGE THE SCREEN. Just replaced the battery in my iPad Pro 12.9 (A1652). Unfortunately I did not read this until completed. I now have several areas on my $1000 iPad where the white screen has orange burn looking marks around the edges. Looks like it was a $200 oops. Live and Learn. I’m now a member and will utilize this website for future endeavors…
You know any workshop who does a repair for my three iPad Pro 12.9 front glasses with the digitizer,
Sometimes the process is called OCA refurbishment oder LCD refurbishment.
NOT the display-unit as a whole. I have two models from 2015 and one from 2017. The model numbers are a 1584 and a 1670.
In Germany there are a few companies who are able to do it, but not affordable. The prices are nearly as high as a complete swap of the display unit.
Just wondering, I work in a repair shop, and am replacing the front panel entirely but unfortunately screwed up soldering the daughterboard. Is this a part they MUST be transferred or am I safe to just replace it?
Zane Clark - 返信
Hello.
Is it possible to change only the “Glas” and not the Display? My display works fine but the Protecting Glas is broken.
Hi, that’s possible for very, very experienced technicians. Not only do you need to heat up the screen quite a lot to soften up the LOCA glue, but furthermore you need to cut it with a cutting wire while making sure not to damage the LCD underneath. I also fear the iPad pro will probably require some micro-soldering to be able to (dis)connect the glass from all the rest (but perhaps I’m confusing things with the first screen modules in mind that came out but still needed some micro-soldering to finish them of at that time). In short, if you haven’t separated touchscreens/glass plates several times before … don’t even think about it. The above is only half the trouble to go through as the new touchscreen/glass needs to be attached to the LCD again with new LOCA glue afterwards. Again a job which requires a lot of expertise.
Dreetn -
I used this guide to replace a screen for my iPad Pro. The device powers on but now gets stuck in a boot loop. I took it to a local phone repair shop and they said they don’t do repairs on iPad Pros because they always get stuck in boot loops. I wish there was a warning on this guide telling people this so they don’t go to all the effort and spend money on a new screen just to get their iPad stuck in a boot loop.
Brandon, I don’t know of any specific ‘sensitivity’ that iPad Pro’s have towards repairing that would result in bootloops.
I think it is more likely that either
- The repair shop isn’t keen on repairing your device because parts are expensive and/or difficult to find (for instance motherboard parts). They just tell you a believable story to avoid having to say ‘Too risky’ or ‘Not worth our effort/time’.
- Something got damaged during the repair.
Another possibility, which you can easily put aside yourself, is software damage. Try a full restore (without data retention) with tools such as 3uTools. It’s free software. I advise using the iTunes restore method. You can first try a restore with ‘retain user’s data’ but success ratio is minimal there. Best is to go for a clean flash/restore.
Good luck!
Dreetn -
No matter how many times I have tried to apply the iOpener, or to use a dryer for 10 mins (iPad was super hot), I’m simply unable to lift the screen with the suction cup, even for a micron. Anything I could have missed ?
Hi Laurent, it sounds like you’re on the right track—continue gradually applying more heat until the adhesive softens a little. Unfortunately these screens are super hard to remove. Just be careful about applying too much heat at once in a small area as that could damage the screen.
While removing the screen I accidentally pulled the soldering from the daughterboard to the display cable. is their a way to fix this or is it an issue?
This was an awesome guide! It was really fun, but a lot of really careful work!! How could anybody do this repair and charge a reasonable rate for the labor? It took me soooo long.