はじめに
このガイドではiPad Pro 10.5インチの壊れたスクリーン(またディスプレイやフロントパネル部品)の取り替えをします。スクリーンはガラスのタッチパネルやその他の部品が液晶ディスプレイに取り付けられており、これら全体を一塊に取り替える必要があります。
ホームボタンの指紋センサーはiPadのロジックボードとペアになっています。修理後もTouch IDを機能させるたに、元あったホームボタンは捨てずに、下にある手順にそって新しいスクリーンに移植してください。
この修理では、割れたり、反応しなくなったタッチパネル並びに壊れた液晶画面を直せます。
iPadを再度組み立てる際に、部品をとりつけるための交換用の接着剤が必要になります
必要な工具と部品
-
-
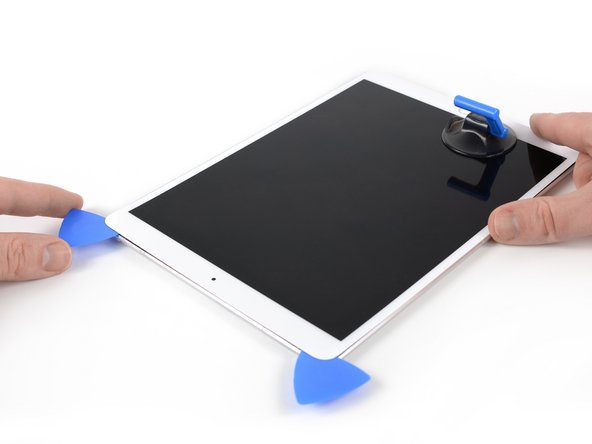
iPadのホームボタン横に吸盤カップをのせて、押し込んで密閉します。
-
オープニング作業をより簡単にするために考案したツール「リバースクランプ」を使用する場合は、このガイドに従ってください。
-
吸盤カップをしっかりと引き上げ、フロントパネルとリアケースの間にわずかな隙間を作ります。
-
十分な隙間を開けたら、開口ピックを隙間に差し込みます。
i used a proper suction tile puller (small one from DIY store used to hold bathroom tiles) to lift the screen off after heating around the edge using a heat gun. Be careful - It didn't damage anything. The tiny suction things that come with those iPhone kits are not strong enough for this. The one in picture might be good, but looks similar to the kits ones that have key ring.
The suction cup that comes with the iPad battery replacement is plenty large enough and strong enough.
CAUTION, do not push the picks in more than a the width of the replacement screen adhesive strips. You will damage the $200 screen, maybe break the glass. The screen is multiple layers and the picks can get in-between the layers if you push too far in. I got into trouble at the lower left corner. After getting the screen loose, I found that I only need a 2-3 millimeters on the sides and bottom, and four or five millimeters in the corners.
-
-
-
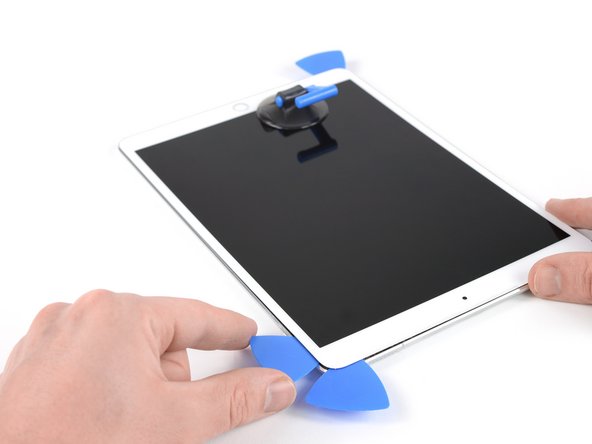
ディスプレイの縁に沿って、左下隅に向かってピックをスライドさせ、画面の下の接着剤を切り離します。
-
接着剤が再び着くのを防ぐため、ピックを一時的に置いておきます。
-
-
-
iPadの左端に約2分間、または快適に触れることができる程度にわずかに熱を加えてください。
-
必要に応じて、iOpenerを数秒または少し熱すぎて触れなくなるまで再加熱してください。iOpenerを加熱しすぎると破裂する恐れがありますので、ご注意ください。
-
iPadの左下隅に2つ目のピックを挿入します。
-
2つ目のピックをディスプレイの左側に沿ってスライドさせ、下の接着剤を切り離します。
-
接着剤が再び着くのを防ぐため、iPadの左上付近にピックを挿入したままにしてください。
-
-
-
iPadの最後の右端に約2分間、または快適に触れることができるほどわずかに熱くなるまで熱を加えてください。
-
iPadの右上に4つ目のピックを挿入します。
-
ピックを右下にスライドさせ、接着剤をカットします。
-
ピックを右下隅にスライドさせ、必要に応じてさらに熱を加え、下端に残っている接着剤を切りますが、ホームボタンに到達する前に止めます。
We must be very careful when we are prying left and right size bezel to peel off the screen as there very little gap between edges and LCD. Slightly inside push can crack LCD. We need to pay full care and raising edges very very slowly.
iRepairMan - 返信
-
-
-
iPad上部のフロントカメラ付近(ただし、直接は触れない)に5つ目のピックを差し込みます。
-
ピックをゆっくりとねじって、ディスプレイ上部をiPadから浮かせます。
-
必要に応じて、さらに熱を加えたり、ディスプレイが分離しないように残っている接着剤を切ったりしてください。
Be very gentle when twisting. My screen broke in this step. I would not twist it but try to remove glue further as there is a aluminium support of the screen in the wide area beneath the light sensors and there is glue on that also preventing in easy lifting the screen. Just be careful not to damage the light sensors and camera.
-
-
-
-
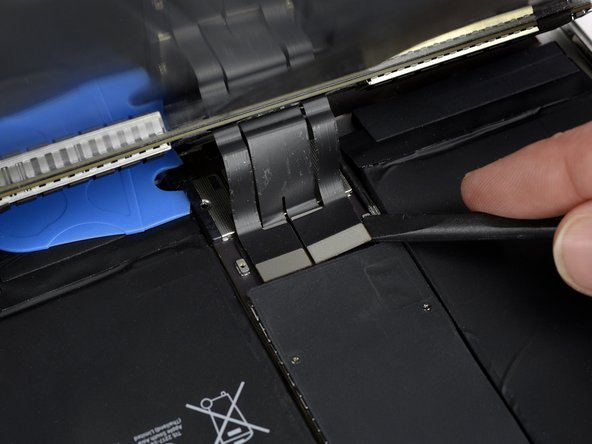
ディスプレイを上端から持ち上げ、フロントカメラとヘッドホンジャックの方向に注意深くスライドさせると、バッテリー電源コネクタを固定しているネジが下に見えてきます。
How do you go about getting to this battery connector as it is covered by a large metal shield above the logic board, if you do not disconnect the battery you risk frying the back light.
The metal shield is not relevant for this. You can leave it in place or remove it if it comes of. Once the screw of the plate is removed you will be able to lift the print a little bit and put someting between the battery connector and the board connector. The connector is beneath the print. Look further on to see a deck card is used for this.
-
-
This picture looks nothing like my A2152 battery connector. I can’t really tell what is happening here.
todd sorel - 返信
-
-
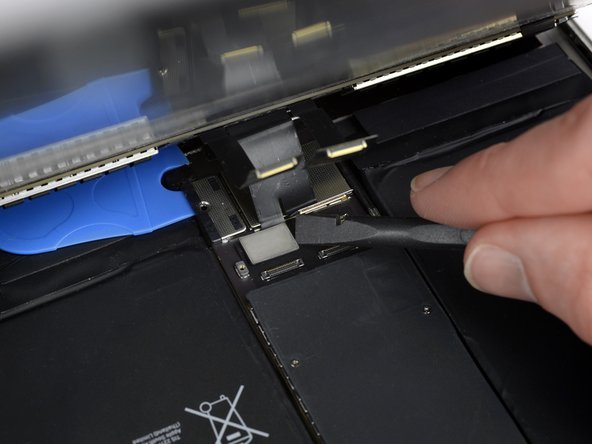
バッテリーを外すには、バッテリーブロッカーの片方の突起、または開口ピックの先端をバッテリーの電源コネクタの下にスライドさせ、電源回路を確実に遮断します。
-
バッテリーブロッカーはそのままにして作業を続けてください。
I found it very hard to fit something under the battery power connector. I did not have a battery blocker, so I tried a playing card. I was not able to slide it between the springs. The section of the battery power connector, above the cantilever springs, did not seem to want to give at all, like in the picture above. If other people had success, I would love to hear how.
I didn’t have success either, but i kept myself grounded, and avoided battery contact as much as possible.
I used a playing card cut to shape. I had to make a couple, to try a few times.. It does go in eventually. Not deep, but enough to break connection. You can test by trying to switch on iPad.
It took some time but I was able to get it under the back part and slide it forward.
You must disconnect the battery before plugging the new screen. I think i didn't break the circuit in first attempt and shorted the screen, the result was half of the screen didn't work. I used a playing card. Second attempt was successful with new screen.
I believe I have a good solution to this problem. I was dissatisfied with the thickness of the battery blocker, or even a thin guitar pick, for that matter; both required force and I feared bending the springs or leaving the connection intact.
What worked for me was cutting a small strip of non-conductive, static-proof film (the kind that RAM and other sensitive components come in). There was every reason to trust in its non-conductivity but just to be sure, I used a VOM to test; its resistance was out of the VOMs range, meaning that its conductivity was nil. I used a spudger to gently lift the logic board off of the battery contacts and slid the non-conductive strip in between; went without a hitch.
When reassembling, I laid the strip on the battery contacts, laid the logic board on top, installed it, connected the display panel and gently drew the slip out and installed the battery screw. Worked like a charm.
These are some extremely misleading set of instructions and picture. Much better if you have the battery discharged, so don't need to worry about blocking the connector. But DO NOT force anything in the through the socket and certainly do not try to bend up the soldered cover, as it appears to be happening in the picture. You will break the connector, most likely resulting in ipad shutting down every 3 minutes from the notorious "thermal sensor missing" panic system crash.
-
-
-
上部端からディスプレイをゆっくりと持ち上げます。リボンケーブルを引っ張らないようにご注意ください。
-
ディスプレイコネクタカバーのブラケットを固定している1.3mmプラスネジを2本外します。
-
ディスプレイコネクタのカバーブラケットを外します。
Here it is very precocious steps to do. Flx cables to connectors are small in size and we cannot lift the display vertically. Therefore, we may struggle to unscrew the metal shield. We need to use smaller size of philip screw driver or place vertically the display to create enough gap between philip screw driver and the cover bracket. Similarly, when we are replacing new display we need to be carefully connect four flex cable with connectors with logic board.
iRepairMan - 返信
agree, with re-assembly very tiny screws and awkward positioning, the back two cables pop off if not careful.
I did this step using just the tip of the PH000 screwdriver, it made it much easier to get my hands into the small space, the replacement screen from ifixit had tighter cables that I was not comfortable stretching out to go to a 90* angle to screw back on. Make sure your tip is magnetized for best results :)!
Meaning no disrespect for this excellent guide, I found this photo to be a bit misleading; at least in my case. It clearly shows about 90˚ between the case and the display. I tested the limits with the one I was repairing and could find no way to raise the display far enough to clear a screwdriver without jeopardizing the cables. I resorted to the same solution that Amber Wooldridge discovered; using a PH000 bit and hand-tightening. I had a tiny needle-nosed plier that I used to tighten them a bit (but very gently).
-
-
-
スパッジャーを使って、それらを慎重に持ち上げて、接続を外します。
I went to replace the LCD assembly on an ipad Air 3, and one of the flex cables on the new LCD assembly broke in half. The flex cables on the old assembly work well and are intact. Is it possible to transfer the old flex cable(s) to the new assembly, or can I solder the broken pieces of the new flex cable together? I have also contacted the part supplier about this and am awaiting a response.
-
-
-
ディスプレイを取り外します。
Definitely test your iPad’s functions before sealing it up. I needed to reopen the display to reconnect the display connectors in order to have the display functioning properly. As a result, the adhesive strips did not work as well and I needed to tape some of the edges closed with a small section of strong clear packing tape.
I stuck the adhesive to the chassis first. That was messy because the plastic that covers the adhesive seems to be for screen side first. So you end up exposing both sides and those collect dust. I now realise you're supposed to put the adhesive on screen first. Not sure if it would have made much difference in the outcome (mine screen is not stuck in some places).
I found this out too. I had two sealing kits and they were both meant to be fixed on the screen first. I did not managed to get the screen to stick with the body as well. Now used some B6000 glue in addition.
agrior -
-
-
-
ホームボタンブラケットを左側から順に持ち上げます。
-
平ケーブルを傷つけないようにしながら、慎重にブラケットをディスプレイから外します。
-
できる限り元あった接着剤を取り除き、アセトンや(90%以上の)高濃度イソプロピルアルコールで洗浄します。
-
ブラケットをhigh bond glueや接着剤、あるいはhigh-strength double-sided tapeを用いて固定します。必ずブラケットが正しい位置にあること確認してから接着してください。ホームボタンが押せなくなる危険があります。
You cannot use Tesa or double side tape under bracket. There is some greater technique or material we need to use. I tried super glue even, though, I really not work what original clicking sounds. It happens almost all digital home button related all iPad. We need to strive to find its accurate solution.
iRepairMan - 返信
What width/size Tesa tape (mm) do we require?
I ordered tesla tape without noticing the width and ended up with 2mm tape. I used three strips of it for this step, so 6mm would be perfect for the home button bracket. Having said that, the 2mm size is probably better if you need it for attaching the display, but I never needed it for that because I loved how the pre-cut adhesive strips in step 16 worked really well.
hdh607 -
-
-
-
スクリーンの表面側からホームボタンの穴を通して、指先でホームボタンを優しく押しますり。
-
ホームボタンを取り外します。
When we lift home button at very last stage, there is also ring/round plastic bracket that we need to peel off and re-attached to home button when transferring to the new display.
iRepairMan - 返信
Do you glue the plastic ring on both sides , So is it glued to the lcd but also to the home button ?
Thanks for the tutorial, but it ends way to soon. The instructions on installing the new home button are vague, and there is nothing about when to remove the battery blocker or what adhesive is acceptable to use to reattach the screen. Would be great to see this tutorial cover everything from start to finish.
The responsive click is present, but does not have any function on the screen. Is there any correlation between the click and functionality, or did I maybe destroy the cable ?
If it physically clicks but does not invoke any action then maybe the cable does not sit properly inside the ZIF-connector or the cable might be damaged. Try to re-connect and make sure it’s in the ZIF-connector all the way.
I'v transferred a home button to a new screen and stuck it down with b-7000 adhesive. When I go to test and put the screen in place, I push the button but it seems to not stay stuck to the new screen. What should I do? I also have a white plastic ring that was part of the button. Should I have left it on there or remove it?
I changed the LCD but now its completely dim.
What might be the cause?
Either the cable is not installed correctly or You have blown the backlit ic. You will have to send it for micro soldering to replace the chip. Always make sure you disconnect the battery before any repair is performed.
-


元あったパーツと新しいパーツを見比べてください。場合によっては、新しいパーツを組み込む前に、元のパーツから部品を移植したり、接着剤を取り除いたりする必要があります。
組み立ての際は、このガイドの手順を、逆から行なってください。
e-wasteはR2又はe-Stewards の認可済みのリサイクルセンターを通じて廃棄してください。.
思い通りに修理できませんでしたか? 下のリンクからトラブルシューティングヘルプを参照してみましょう。Answers community
元あったパーツと新しいパーツを見比べてください。場合によっては、新しいパーツを組み込む前に、元のパーツから部品を移植したり、接着剤を取り除いたりする必要があります。
組み立ての際は、このガイドの手順を、逆から行なってください。
e-wasteはR2又はe-Stewards の認可済みのリサイクルセンターを通じて廃棄してください。.
思い通りに修理できませんでしたか? 下のリンクからトラブルシューティングヘルプを参照してみましょう。Answers community
74 の人々がこのガイドを完成させました。
以下の翻訳者の皆さんにお礼を申し上げます:
100%
Ryota Saitoさんは世界中で修理する私たちを助けてくれています! あなたも貢献してみませんか?
翻訳を始める ›


18 件のコメント
Do you have any suggestions for replacement displays i need a good yet cheap one.
Yes! Thanks for a great teardown!
Thank you so much you made a difficult job a little easier.
if i have to replace my broken screen and put a new one (its funcional but broken), why is it necessary to uninstall the home button??
The home button is linked to the logic board. So when you have setup the Touch ID function you will have to use that home to keep the function. If you replace the home button you’ll loose Touch ID.
Worked as described, I used the iopener and blow dryer to get the old display off. Please note, you might need help replacing the display connector cover bracket, very small screws and awkward position.
For uninstalling a broken screen , that was so clear, Can any one pls provide the steps to reinstall a new screen for iPad Pro 10.5.
If you kindly include the steps by using the iPad Pro 10.5 adhesive strip provided by ifixit.
thanks in advance
Hi!
My iPad Pro 10.5 dies unexpectedly after a few minutes, This happened after changing the screen. I forgot to disconnect the battery when changing the screen
How do I fix it?
Ipad model: A1701
Can I just replace digitizer?
The screws in steps 13 were hard to rescrew. The screw driver appeared to be too large. When doing the side removal of the glue if the wedge goes to far it will destroy the LCD screen. Ideally including the reassembly steps will be beneficial. Unfortunately for my case I was left with two broken screens.