メインコンテンツにスキップ

このバージョンは誤った内容を含んでいる可能性があります。最新の承認済みスナップショットに切り替えてください。

必要な工具と部品

  1. , ホームボタンコントロールボード: 手順 1、 1の画像 1
    • ホームボタンコントロールボードをホームボタンマウンティングブラケットに固定している2.1mm #00プラスネジを2本外します。

  2. この手順は未翻訳です。 翻訳を手伝う。

    : 手順 2、 2の画像 1 : 手順 2、 2の画像 2
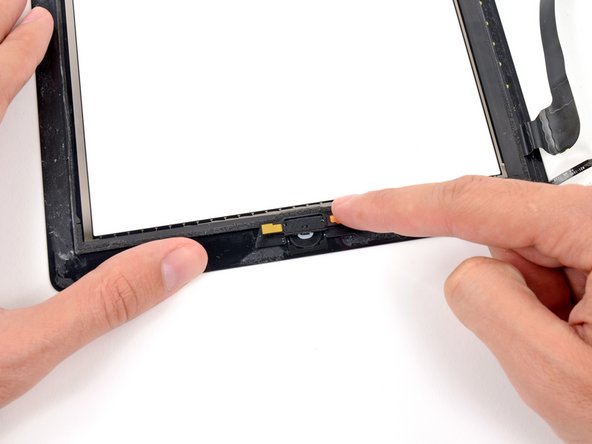
    • Wedge the flat edge of a plastic opening tool in between the right end of the home button control board and the home button mounting bracket.

    • Depress the plastic opening tool downwards to pry the adhesive securing the home button control board from the home button mounting bracket.

    • Repeat the procedure to release the adhesive underneath the left end of the home button control board.

  3. : 手順 3、 1の画像 1
    • ホームボタンマウンティングブラケットからホームボタンコントロールボードを持ち上げて外します。

  4. : 手順 4、 2の画像 1 : 手順 4、 2の画像 2
    • スパッジャーの平面側先端を使って、フロントパネルアセンブリの右下角から古い接着剤を削ぎ取ります。

    • 必要であれば、ピンセットを使って、古い接着剤を慎重に剥がします。

  5. この手順は未翻訳です。 翻訳を手伝う。

    : 手順 5、 2の画像 1 : 手順 5、 2の画像 2
    • Gently place the home button control board on top of the home button mounting bracket.

    • Make sure the home button control board is lined up with the bottom of the home button mounting bracket.

  6. この手順は未翻訳です。 翻訳を手伝う。

    : 手順 6、 1の画像 1
    • Insert the two 2.1 mm Phillips #00 Phillips screws back into the home button control board to secure it against the home button mounting bracket.

  7. この手順は未翻訳です。 翻訳を手伝う。

    : 手順 7、 3の画像 1 : 手順 7、 3の画像 2 : 手順 7、 3の画像 3
    • In the following steps, you will be placing the remaining pieces of adhesive on the front panel.

    • Do not peel the clear backing off the strips just yet.

    • Place the bridge shaped adhesive strip between the top edge of the inner frame of the front panel and the camera mounting bracket.

    • Smooth the strip down from the center out, taking care to not trap any air bubbles between the strip and the front panel.

  8. この手順は未翻訳です。 翻訳を手伝う。

    : 手順 8、 2の画像 1 : 手順 8、 2の画像 2
    • Place the elongated C shaped adhesive strip on the right side of the front panel.

  9. この手順は未翻訳です。 翻訳を手伝う。

    : 手順 9、 2の画像 1 : 手順 9、 2の画像 2
    • It is recommened to lift the home button ribbon cable aside while placing the next adhesive strip.

    • Place the straight, medium length adhesive strip on the bottom right side of the front panel, underneath the home button ribbon cable.

  10. この手順は未翻訳です。 翻訳を手伝う。

    : 手順 10、 2の画像 1 : 手順 10、 2の画像 2
    • Place the tabbed rectangular adhesive strip on the bottom right side of the front panel.

  11. この手順は未翻訳です。 翻訳を手伝う。

    : 手順 11、 2の画像 1 : 手順 11、 2の画像 2
    • Place the long L-shaped adhesive strip on the bottom left corner of the front panel.

  12. この手順は未翻訳です。 翻訳を手伝う。

    : 手順 12、 2の画像 1 : 手順 12、 2の画像 2
    • Place the short rectangular shaped adhesive strip on the top left side of the front panel.

  13. この手順は未翻訳です。 翻訳を手伝う。

    : 手順 13、 2の画像 1 : 手順 13、 2の画像 2
    • Place the last, short L-shaped adhesive strip on the top left corner of the front panel.

  14. この手順は未翻訳です。 翻訳を手伝う。

    : 手順 14、 2の画像 1 : 手順 14、 2の画像 2
    • Use a pair of tweezers to peel the clear backing up off the adhesive strip directly underneath the home button ribbon cable.

    • Lay the home button ribbon cable down on the adhesive strip and smooth the cable down from the center out, taking care to not trap any air bubbles between the strip and the front panel.

    • Do not peel the clear backing off the strips just yet.

  15. この手順は未翻訳です。 翻訳を手伝う。

    : 手順 15、 1の画像 1
    • Use a dry microfiber cloth to clean the LCD and inside of the front panel glass. You may want to use canned air or an air compressor to blow away and dust.

    • Use a pair of tweezers to peel the clear backing up off each adhesive strip.

    • Close the front panel down onto the iPad, careful to place it within the plastic bezel, and careful not to get any dirt or fingerprints between the glass and LCD.

    • To ensure a good seal, place the iPad face down on a padded envelope or cloth and pile a couple of books above it to weigh the screen down. Leave it like this for a few hours before using.

ゴール

8 の人々がこのガイドを完成させました。

作成者

2人の作成者と共同で作成されました。

Andrew Optimus Goldheart

メンバー登録日: 10/17/09

502,993 ポイント

407のガイドは作成済み

チーム

iFixit iFixit人のメンバー

Staff

135 メンバー

17,182のガイドは作成済み

0 件のコメント

コメントを追加

統計データ:

過去 24時間: 3

過去 7 日: 11

過去 30 日: 19

今までの合計 4,363