メインコンテンツにスキップ

iPad 3 4G Wi-Fi Antenna Replacement

必要条件のみ
この修理ガイドは、他のガイドの前提条件として使用されます。それ自体は不完全で、単独で使用されることはありません。

必要な工具と部品

  1. iPad 3 4G Wi-Fi Antenna Replacement, Wi-Fi Antenna: 手順 1、 1の画像 1
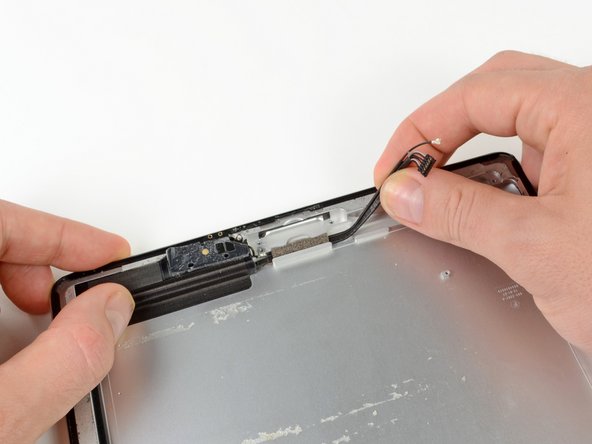
    • Remove the following screws securing the Wi-Fi antenna to the aluminum frame.

    • Two 1.75 mm Phillips #00 (small head)

    • One 4.15 mm Phillips #00

    • One 1.8 mm Phillips #00 (wide head)

  2. iPad 3 4G Wi-Fi Antenna Replacement: 手順 2、 2の画像 1 iPad 3 4G Wi-Fi Antenna Replacement: 手順 2、 2の画像 2
    • Use the flat end of a spudger to loosen the foam adhesive holding the Wi-FI antenna to the speaker assembly.

  3. iPad 3 4G Wi-Fi Antenna Replacement: 手順 3、 2の画像 1 iPad 3 4G Wi-Fi Antenna Replacement: 手順 3、 2の画像 2
    • Firmly grasp the Wi-Fi antenna and speaker cable together.

    • Carefully, pull the cables off of the aluminum frame.

  4. iPad 3 4G Wi-Fi Antenna Replacement: 手順 4、 3の画像 1 iPad 3 4G Wi-Fi Antenna Replacement: 手順 4、 3の画像 2 iPad 3 4G Wi-Fi Antenna Replacement: 手順 4、 3の画像 3
    • Separate the speaker cable from the Wi-Fi antenna cable.

    • Remove the Wi-Fi cable from the iPad.

終わりに

To reassemble your device, follow these instructions in reverse order.

作成者

3人の作成者と共同で作成されました。

Brett Hartt

メンバー登録日: 04/12/10

127,897 ポイント

143のガイドは作成済み

チーム

iFixit iFixit人のメンバー

Staff

135 メンバー

16,817のガイドは作成済み

0 件のコメント

コメントを追加

統計データ:

過去 24時間: 0

過去 7 日: 0

過去 30 日: 0

今までの合計 82