この修理ガイドは変更されています。最新の未承認バージョンに切り替えます。
はじめに
flexible cable as a replacement power button. an open and ipad 2. and removed the LCD panel and digital.
必要な工具と部品
-
-
Once opened, proceed to remove the rubber cover that covers the rear facing camera and the power button. Just pull out the rubber piece shown. There are no screws or glue.
-
-
-
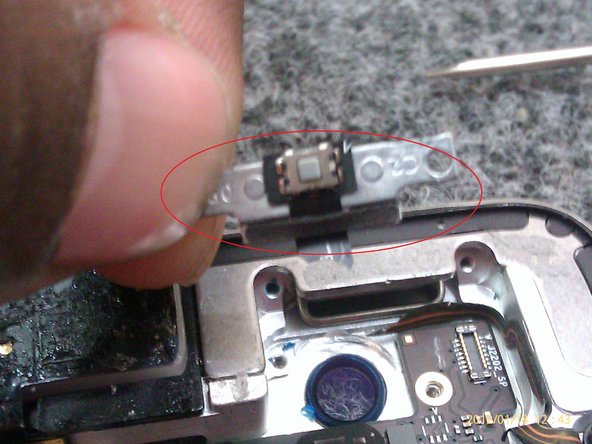
Some models have a small GSM flex cable (Shown in the 1st picture, circled in red). There is a piece of tape covering it and will need to be removed. Then underneath the tape, there is a small tab, which is closest to the LCD screen. Lift gently on this tab with a smudger tool. In a later step, the flex cable will be removed from the board.
-
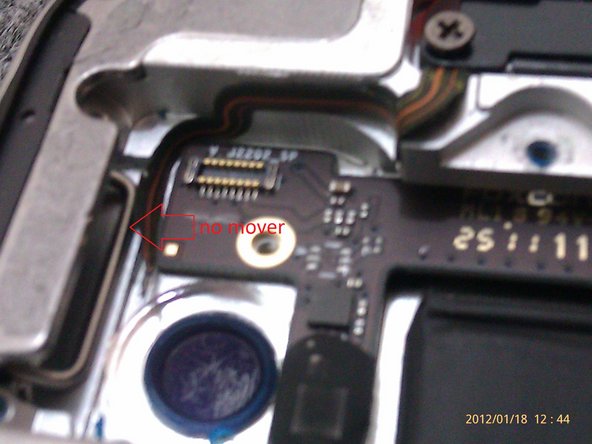
Remove the screws from the metal plate on the power button, and gently detach the connector where indicated. During the removal, the metal cover and the rear facing camera may come out together.
-
-
-
You now can access the power button.
-
Remove the 2 screws that secure the metal bracket and then carefully remove the metal bracket with the power button on the ribbon cable.
-
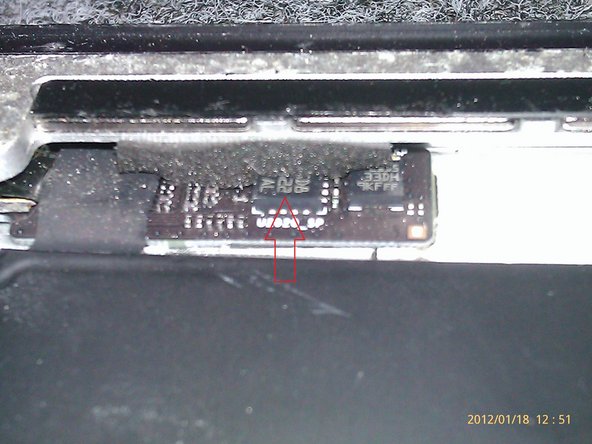
Note: As shown in the 3rd picture, It is important that the clip connected to the external plastic power button does not get removed completely. It is tricky to put this plastic button back into the hole.
-
-
-
-
Remove the 2 screws from the black metal part which covers the mute switch. Also remove the 1 screw, which is attached to the silver metal piece.
-
We remove the black metal part to release the mute switch and volume buttons, which are attached to another silver metal piece.
-
Note for reinstallation: After screwing back the metal pieces, perform a quick check that the buttons work properly. For the mute button make sure that the exterior and interior switches are sliding together. For the volume buttons, check that the buttons make a clicking noise. If the screws are too tight, then the volume buttons can be stuck.
-
Note: If the volume buttons were stuck, just loosening the screw on the silver metal piece may fix the problem. The whole flex assembly may not need to be replaced.
-
-
-
Before removing the board, be very careful because the board is glued to the rear chassis. Use a spluger at the points indicated by the arrow to loosen the adhesive connecting the board to the chassis.
-
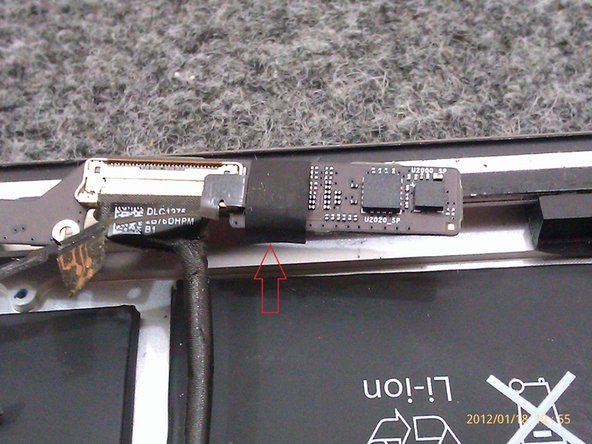
Once the board is free of the chassis, then carefully remove the tape as pointed to by the arrow. There will be a connector to be removed from the board with a spluger.
-


To reassemble your device, follow these instructions in reverse order.
To reassemble your device, follow these instructions in reverse order.
19 の人々がこのガイドを完成させました。
11 件のコメント
Thanks for the hi res pictures. I couldn't figure out how to reassemble the power button, but with your pictures, it was easy!
Thank you for your thank for that we are colleagues,
any questions, we are here.
how did you disconnect the flex cable from the places that it was attached when it was taken out? do you simply tear the entire cable off slowly at all places it is glued down or is it clipped down somehow? also for putting the new flex cable down do you just use loctite to keep the cable down or is there a specific way to make the connection such as soldering? THANKS A BUNCH!
I recommend you take it off slowly, especially with so much patience to know and you make it easier when mounting.
the cable will only conectdo the board. that is covered by a strip of black tape.
Thanks Gautam for Questions.