はじめに
Rüste den 27-Zoll-Apple iMac von Mitte 2010 mit einen Core-i3-Prozessor mit 3,2 GHz (Dual Core) auf einen Core-i7-Prozessor mit 2,93 GHz (Quad-Core) auf.
Ich habe diese Anleitung für die Demontage und Montage verwendet.
http://www.btobey.com/learn/imac-ssd-ins...
Außerdem wurde ein 3-TB-SATA-Laufwerk und 32 GB RAM hinzugefügt, um dieses System unter Lion 10.7 optimal zu nutzen.
- Update: Das 3-TB-SATA-Laufwerk wurde entfernt und durch eine 512-GB-SSD-Festplatte ersetzt und auf Mountain Lion 10.8 aktualisiert.
- Wenn du die HD aufrüstest oder änderst, musst du die HDDFanControl-Software kaufen, um den HDD-Lüfter zu steuern, der andernfalls mit voller Geschwindigkeit läuft.
- April 2013 - 1 Jahr später: Dieses System ist absolut stabil ohne Abstürze, keine Kernel-Paniken und kein Einfrieren!
- April 2014 - 2 Jahre später: OS X 10.9 Mavericks kann jetzt ohne Probleme erfolgreich ausgeführt werden. Das System ist weiterhin schnell - aber im Vergleich zu Sandy-Bridge-, Ivy-Bridge- und Haswell-Architekturen fängt es an, sein Alter zu zeigen! Neuere Apps beginnen überall zu knarren und der Beachball ist mittlerweile ein ständiger Begleiter.
- April 2015 - 3 Jahre später. Yosemite 10.10.3. Kontinuität funktioniert, Handoff jedoch nicht (es fehlt die integrierte Bluetooth LE v4.0). Nicht so schnell wie mein Haswell Macbook Pro oder 2010 Xeon 12 Proc Mac Pro, aber immer noch solide. Mit diesen einfachen Mods habe ich jahrelang zusätzlichen Service aus dieser "veralteten" Maschine gewonnen!
- Mai 2016 - 4 Jahre später. El Capitan 10.11.5 läuft. Nur Handoff funktioniert nicht (siehe oben), aber alles andere ist absolut solide. Die neue Notepad-App rockt wie eine stabile Version von Apple Mail, und jetzt, da das Greuel "discoveryd" tot und der bewährte "mDNS-Responder" zurückgekehrt ist, ist das Networking wieder herausragend. Das System fasziniert weiterhin mit seiner Langlebigkeit.
- September 2018 - Es ist 6 Jahre her, seit ich das Upgrade durchgeführt habe! Der Computer läuft auf Mojave 10.14 mit APFS, dank des Dosdude Mojave Patchers. Bitte beachte - diese 2010 eingebaute iMac (11,3) -Videokarte ist * NICHT * Metal-kompatibel. Grafikbeschleunigung ist daher in Mojave deaktiviert. Dadurch wird der iMac-Bildschirm träge, Fotos werden schwarz und andere Grafikanomalien, aber alles andere ist hervorragend.
*Installiert NICHT Mojave oder Catalina auf dem System. Es wird kaum funktionieren und die Nutzererfahrung wird grauenhaft.
- März 2019 - Ich habe Mojave 10.14 nicht mehr verwendet. Die langsame GPU macht es völlig unbrauchbar. Ich bin zurück zu High Sierra 10.13 mit APFS, 1 TB interner SSD und 32 GB RAM. Dies scheint meine optimale Konfiguration für den iMac zu sein.
必要な工具と部品
-
-
Fange an: Ordne dein Werkzeug, Ersatzteile, Antistatik-Band und Handschuhe (Handschuhe für das Glas und das LCD)
-
Entferne die Glasscheibe
-
Dann das LCD. Bei iFixit findest du dafür eine Schritt für Schritt Anleitung.
-
-
-
Core i7 2.93GHz Quad Core Prozessor, Arctic Silver Wärmeleitpaste und iFixit + OWC Werkzeug
-
Der Prozessor ist ein Intel Core i7 870 2.93GHz 8MB LGA 1156 Quad Core Processor mit 95W TDP. Er wurde gebraucht bei ebay gekauft.
-
-
-
Entferne die Festplatte, Superdrive und die Hauptplatine. Bei iFixit findest du dazu sehr gute Anleitungen.
-
Um die Hauptplatine zu entfernen folgte ich dieser Anleitung.
-
In dieser Anleitung ist allerdings nicht erwähnt, dass du vorher den Infrarotsensor auf der Rückseite des vorderen Apple-Logos entfernen musst, bevor die Hauptplatine heraus kann.
-
-
-
-
Tschüss Core i3 und Hallo Core i7!
-
Achte auf den Pfeil auf dem Prozessor (unten links im Bild). Der neue Prozessor muss genauso wieder eingesetzt werden.
-
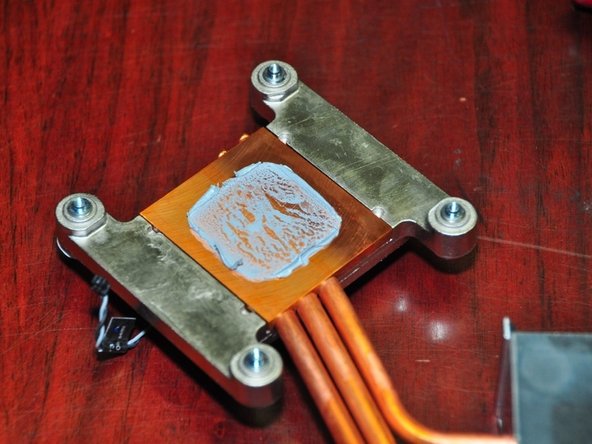
Zum Auftragen der neuen Kühlpaste ziehe etwas Plastikfolie über deine Finger. Verstreiche gleichmäßig über den Prozessor. Hierzu gibt es eine gute Anleitung von iFixit.
-
Und jetzt wieder alles zusammenbauen. Erfreue dich an deiner neuen Rakete!
-
-
-
Mehr als sechs Jahre später - nun mit Mojave 10.14! Der Dark Mode lohnt sich.
-
Die 2010er iMac (11,3) Videokarte ist *NICHT* Metal-kompatibel. Deswegen ist die Videobeschleunigung für Mojave deaktiviert. Das macht die Bidschirmrate des iMacs zähflüssig, Fotos bleiben schwarz und andere Anomalitäten bei Grafikprozessen. Alles andere läuft aber wunderbar.
-
Wie auch immer ... Installiert nicht Mojave oder Catalina auf dem System. DosDude1 schriebt hierzu: "Radeon HD Grafikarten der 5000'er und 6000'er Baureihe werden zur Zeit, und vermutlich nie, von Mojave oder späteren OS-Versionen unterstützt.
-
Nach der Installation von Mojave werden die Farben invertiert sein. Um das zu ändern, gehe zu System/Library/Extensions und schiebe diese Datei in den Papierkorb: AMDRadeonX3000.kext. Starte dann den Computer neu.
-


Folge dieser Anleitung in umgekehrter Reihenfolge, um dein Gerät wieder zusammenzubauen.
Folge dieser Anleitung in umgekehrter Reihenfolge, um dein Gerät wieder zusammenzubauen.
107 の人々がこのガイドを完成させました。


243 件のコメント
Ok a word of caution about doing this. I installed an i7 in my 2010 27" i3 iMac and the system works, it reports the correct stats for the i7 but the cpu fan runs at high speed from boot. Annoying! I've researched a number of forums and found no way to resolve this, I also know there are a number of people with the same problem. So either I screwed up my logic board or it just doesn't like the i7 processor. It's the correct processor that people have used the i7 870. I'm at a loss and don't want to pull it out because it just runs so much faster for video editing but using the machine as an audio workstation is now impossible because of the noise from the fan. Also be extremely careful with the LCD screen. just having your shirt brush against it leaves marks and you can't clean it. If you think gloves will solve this you are wrong. DO NOT touch the lcd and be extremely careful with the connectors. If anyone has any ideas about the fan speed fix please let me know!
Carl Geers - 返信
Also, I assume that you are using this processor?
Intel Core i7 870 2.93GHz 8MB LGA 1156 Quad Core Processor 95W
If you upgrade or change the Apple HD, you will need to buy HDDFanControl software to control the HDD fan which will run at full speed otherwise. I also use smcFanControl to monitor and control the other fans in the system.
As with any modification, your mileage may vary. This is a "Medium" difficulty mod and not recommended for novices to the hobby. I experienced none of the issues your have experienced.
I upgraded to Mountain Lion 10.8 when it was released to the Dev community with zero issues - currently at 10.8.2; I use this machine 'in anger' every day.
I did these mods 5 months ago, and this system has been absolutely ROCK SOLID with no crashes, no kernel panics and no freezes!
If you do the CPU replacement and afterwards the optical drive fan and cpu fan are running at max speed (very loud) then you more than likely didn't plug in the CPU temp sensor. The guide here doesn't talk about it so you can easily forget it! The connector is on the other side of the board, which is different from all the other temperature connectors and not on the same side as the heatsink screws either.
I did this and the computer ran with noisy fans. I used a fan control app to quiet it down, but it was still loud on startup until login. More importantly, the performance without the CPU temp sensor connected was terrible. It was slower than the original i5 CPU. HD videos would stutter and benchmarks gave very low scores.
Make sure you plug in the CPU temperature sensor after you put the heatsink on.
mikk -
download ssd fan control, this program let you adjust the fan speeds.