メインコンテンツにスキップ

iMac Intel 27" EMC 2546 RAM Replacement

必要な工具と部品

  1. iMac Intel 27" EMC 2546 RAM Replacement, RAM: 手順 1、 2の画像 1 iMac Intel 27" EMC 2546 RAM Replacement, RAM: 手順 1、 2の画像 2
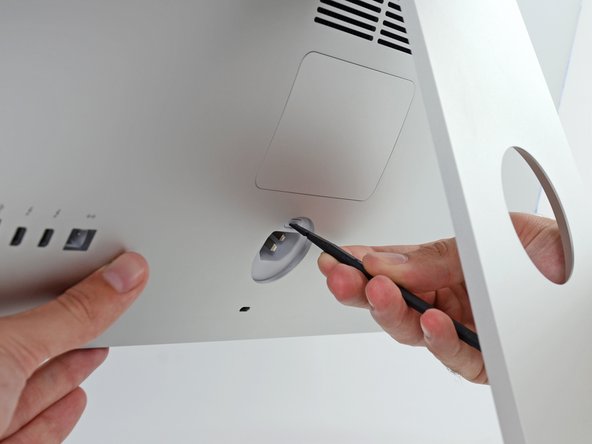
    • While holding the display steady, use the flat end of a spudger to press in on the RAM door release button, located just above the power port.

    • You may have to press fairly hard—keep at it until the bottom of the door pops out about 0.25" from the rear of the iMac.

  2. iMac Intel 27" EMC 2546 RAM Replacement: 手順 2、 3の画像 1 iMac Intel 27" EMC 2546 RAM Replacement: 手順 2、 3の画像 2 iMac Intel 27" EMC 2546 RAM Replacement: 手順 2、 3の画像 3
    • Pull the RAM access door off the back of the iMac.

  3. iMac Intel 27" EMC 2546 RAM Replacement: 手順 3、 3の画像 1 iMac Intel 27" EMC 2546 RAM Replacement: 手順 3、 3の画像 2 iMac Intel 27" EMC 2546 RAM Replacement: 手順 3、 3の画像 3
    • The RAM tray is locked into its upright position with two grey tabs.

    • Use your thumbs or index fingers to unlock the tray by pushing the tabs outward, away from the RAM.

    • Pull the tabs out and down, swinging the RAM tray down to a near-horizontal position.

  4. iMac Intel 27" EMC 2546 RAM Replacement: 手順 4、 3の画像 1 iMac Intel 27" EMC 2546 RAM Replacement: 手順 4、 3の画像 2 iMac Intel 27" EMC 2546 RAM Replacement: 手順 4、 3の画像 3
    • Remove a stick of RAM by grabbing it with two hands and pulling straight out of the RAM tray.

    • RAM modules are keyed so that they can only be installed in the proper orientation. Note where the shorter section of contacts is when removing, and reinstalling, your RAM.

    • To install a new module, insert the module into the desired slot in the tray and press it firmly in place. Push the tray back up until it locks in place.

    • Re-insert the RAM access door back into its place.

終わりに

To reassemble your device, follow these instructions in reverse order.

60 の人々がこのガイドを完成させました。

作成者

9人の作成者と共同で作成されました。

Andrew Optimus Goldheart

メンバー登録日: 10/17/09

502,755 ポイント

407のガイドは作成済み

チーム

iFixit iFixit人のメンバー

Staff

135 メンバー

16,757のガイドは作成済み

3 件のコメント

If you have two original RAM sticks, they're installed in alternating slots, so there's no need to move anything around to install two more - just use the empty slots.

matt - 返信

Ich habe diese Anleitung genutzt bei meinem 27“ late 2013 Mac. Zu den vorhandenen Speichern von 2x4GB habe ich in die leeren Slots je einen 8GB Speicher eingesetzt. Das ging problemlos so wie beschrieben. Habe kein Werkzeug gebraucht. Die Taste zum Öffnen konnte ich mit dem Daumennagel hineindrücken. Der gesamte Speicher wird mit 24GB angezeigt. Vielen Dank für diese Hilfe!

Nedra - 返信

Hello. My Imac (27-inch, Late 2012) has the original memory (2x4GB Elpida) in slots 1 and 2. When trying to install in slots 1+3, 1+4, 2+3, 2+4 it beeps three times and the Mac does not start. Replacing the original memory in slots 1+2 with new memory (2x8GB) is successful. Can not add memory to slots 3 and 4 (old memory or new). Please advise where to look for the problem.
Олег Б. - 返信

コメントを追加

統計データ:

過去 24時間: 2

過去 7 日: 57

過去 30 日: 153

今までの合計 47,767