メインコンテンツにスキップ

iMac Intel 27" EMC 2429 Display Replacement

必要な工具と部品

  1. iMac Intel 27" EMC 2429 Display Replacement, Glass Panel: 手順 1、 3の画像 1 iMac Intel 27" EMC 2429 Display Replacement, Glass Panel: 手順 1、 3の画像 2 iMac Intel 27" EMC 2429 Display Replacement, Glass Panel: 手順 1、 3の画像 3
    この手順で使用する道具:
    Heavy-Duty Suction Cups (Pair)
    $14.95
    購入する
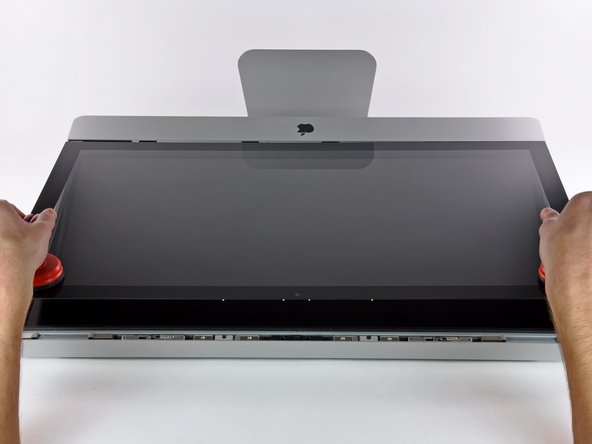
    • Stick a heavy-duty suction cup near each of the two top corners of the glass panel.

    • To attach the suction cups, first position the suction cup with the movable handle parallel to the face of the glass panel (as indicated in the second picture).

    • While lightly holding the suction cup against the glass, raise the movable handle until it is parallel with the other handle (as indicated by the third picture).

    • If your suction cups refuse to stick, try cleaning both the glass panel and the suction cup with a damp soft, lint-free cloth. (Dampen with distilled water, and if needed, an equal ratio of distilled water and white vinegar for best results.)

    • Do not use the suction cups to carry the display glass because if one of them fails to stick, you could drop the screen and break it.

    • The original iMac box makes a good place to store the glass panel. Otherwise, a padded horizontal surface, like a towel on a desk, will do nicely.

  2. iMac Intel 27" EMC 2429 Display Replacement: 手順 2、 3の画像 1 iMac Intel 27" EMC 2429 Display Replacement: 手順 2、 3の画像 2 iMac Intel 27" EMC 2429 Display Replacement: 手順 2、 3の画像 3
    • Gently lift the glass panel perpendicular to the face of the LCD, enough to clear the steel mounting pins attached along the underside of the top edge of the glass panel.

    • Pull the glass panel away from the lower edge of the iMac and carefully set it aside.

    • Don't use the suction cups to carry the glass panel—if either one loses its grip, the panel could fall and break.

    • After setting the glass panel down safely, be sure to release the suction cups, as the suction force over time can crack the glass.

    • During reinstallation, be sure to meticulously clean the inside of the glass panel and the face of the LCD as any dust or fingerprints trapped inside will be annoyingly visible when the machine is turned on.

  3. iMac Intel 27" EMC 2429 Display Replacement, Display: 手順 3、 1の画像 1
    • Remove the eight T10 Torx screws securing the LCD to the outer case.

    • Be careful not to touch the display as the oil from your fingers may leave a residue that can be difficult to remove.

    • If necessary, peel the EMI gaskets located near the top center edge of the display assembly.

  4. iMac Intel 27" EMC 2429 Display Replacement, Display: 手順 4、 3の画像 1 iMac Intel 27" EMC 2429 Display Replacement, Display: 手順 4、 3の画像 2 iMac Intel 27" EMC 2429 Display Replacement, Display: 手順 4、 3の画像 3
    • Carefully lay the iMac stand-side down on a flat surface.

    • Due to tight tolerances, you will have to use a thin hooked tool to lift the display out of the outer case. As seen in the first picture, we made one out of a bent paperclip. A pair of angled tweezers can also work well.

    • Use a thin hooked tool to lift one side of the top edge of the display by its steel outer frame.

    • After lifting the top edge of the display on one side, hold it out of the outer case while you use a hooked tool to lift the other side.

    • Raise and hold the display high enough to access the cables.

    • Do not lift the top edge of the display out of the outer case too far, as several short ribbon cables still connect the two components.

  5. iMac Intel 27" EMC 2429 Display Replacement: 手順 5、 1の画像 1
    • Disconnect the vertical sync cable in the upper left corner of the screen. Use the tip of a spudger to push on the connector's side tabs and gently walk it out of its socket.

  6. iMac Intel 27" EMC 2429 Display Replacement: 手順 6、 1の画像 1
    • This step brings your hands close to the exposed rear of the power supply. To avoid a high-voltage shock from the many large capacitors attached to the board, do NOT touch the rear of the power supply.

    • Disconnect the LED backlight driver cable with your hand by pressing the tab down and sliding it towards the bottom of the display.

  7. iMac Intel 27" EMC 2429 Display Replacement: 手順 7、 2の画像 1 iMac Intel 27" EMC 2429 Display Replacement: 手順 7、 2の画像 2
    • Pull the black tab straight up to disconnect the latch on the display data cable ZIF connector.

    • Do not pull up too hard or you will damage the connector and socket.

    • Continue to pull the black tab up toward the top of the device, to detach the display data cable.

  8. iMac Intel 27" EMC 2429 Display Replacement: 手順 8、 1の画像 1
    • Use the tip of a spudger to disconnect the display power cable next to the display data cable.

  9. iMac Intel 27" EMC 2429 Display Replacement: 手順 9、 1の画像 1
    • Carefully pull the display toward the top edge of your iMac and lift it out of the iMac case.

  10. iMac Intel 27" EMC 2429 Display Replacement: 手順 10、 1の画像 1
    • Lay the display face down on a flat, soft surface.

    • If you are replacing the display panel, you will need to transfer additional components from the old panel to the new one. Compare the back of the old display with the replacement display. Note all cables, sensors, and foam cushioning that are missing from the new display.

    • If there is a wire or cable underneath adhesive tape, always pull the tape off first. Do not pull on the cable directly.

    • If the cable is glued to the chassis, use a heated iOpener or a hair dryer to soften the adhesive first. You can then slide an opening pick underneath the cable to loosen it. Never pull on the delicate connectors.

    • Slide an opening pick underneath the foam cushion pieces to separate them from the display, and gently pull them off. You may need some double sided tape to re-attach them to the new display.

終わりに

To reassemble your device, follow these instructions in reverse order.

44 の人々がこのガイドを完成させました。

作成者

12人の作成者と共同で作成されました。

Phillip Takahashi

メンバー登録日: 08/22/11

86,632 ポイント

87のガイドは作成済み

13 件のコメント

For starters, thanks for this great tutorial!

I have a small question though.

What is meant by "Carefully lay the iMac stand-side down on a flat surface."

If I lay the iMac on my desk, the mount is preventing it from going completely flat.

I find the 27" quite heavy to lift and was wondering if I was doing something wrong.

Anybody have any tricks to lift the LCD without too much lifting?

Thanks!

Jeroen Klaassen - 返信

Where to buy a replacement lcd panel for a 2011 imac. Or jul.st the led with the conectors

Juanc - 返信

BUYER BEWARE!!

Good review if you were provided all the necessary connector cables on your replacement part. I bought the replacement LCD online from ifixit.com and it’s missing all connectors except the LED Backdriver cable.

This is what I pulled off my iMac.

This is what I was shipped by ifixit.

Even missing foam cushioning that protects inside components from the back of the LCD. If you’re not going to include those connectors in shipped parts, then you need to include how to remove them from your old LCD and transfer them to the new one. Thanks for having me tear down my iMac for nothing. At least I could use it previously with an external monitor. Now I have to put it back together just to be able to do that again.

cdowney - 返信

Hi cdowney! I’m sorry to hear about your experience. We try to let you know on the product page which components our parts come with, as stated in the product description: “The LVDS cable and temperature sensor are not included in the assembly and will need to be transferred from your original display.” This guide may not be 100% complete for the specific part we sell right now, parts often change based on source and time after original release, and can vary between providers. We try to keep up with changes but aren’t always successful.

That said, the cables on the old display are removable and can be fairly easily transferred to your new display. Simply peel up the black tape and disconnect the cables, and plug them into the new display. The foam pieces are not critical, but can also be transferred to the new display, the adhesive should enable re-sticking with no issue. If you have trouble, don’t hesitate to reach out to us!

Sam Goldheart -

here, have some wine

altomic -

コメントを追加

統計データ:

過去 24時間: 8

過去 7 日: 58

過去 30 日: 313

今までの合計 88,501