はじめに
このガイドでは、2017年製のiMac 4Kに搭載されたロジックボードを取り出してRAMを交換/取り外す手順を扱っています。
ガイド中の画像には、2015年製のiMacを使用しているため、ビジュアルの違いが若干あります。しかし、このような違いは修理の手順には影響しません。
このガイドは潜在的な危険性があると記しています。なぜなら大きなコンデンサを含む電源装置を扱わないといけないからです。コンデンサを放電するためにiMacのプラグを抜き、最低でも10秒間電源を押したままにしてください。ボードを持つときは端を持ち、表面のコンポーネントには絶対に触らないでください。
必要な工具と部品
-
-
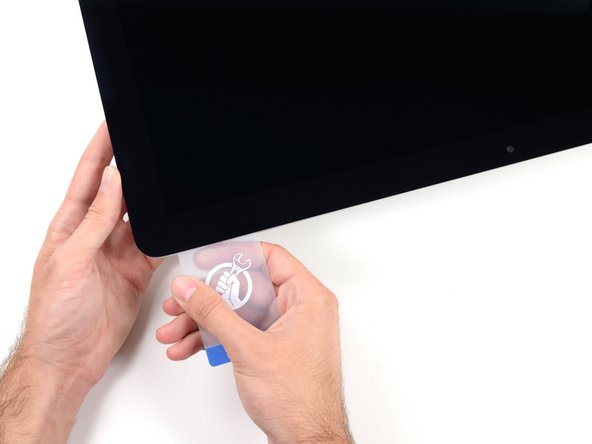
iMac右側の上部から、ディスプレイとフレームの間にプラスチックカードを差し込みます。
So sorry. Thanks for that caution.
Using suction cups (the ones that were made for removing the magnetic front glass on the 2011 and earlier iMacs) work well too. Place one in each top corner, while the Mac is lying face up on a table, and gently pull and it will separate the display from the main body. You might need to do a little more slicing around the edges if you did not get all the way through the first time with the roller. Then you can lift the display up at an angle to disconnect the cables.
This was a great idea, worked well for me. Thanks!
Florin -
-
-
-
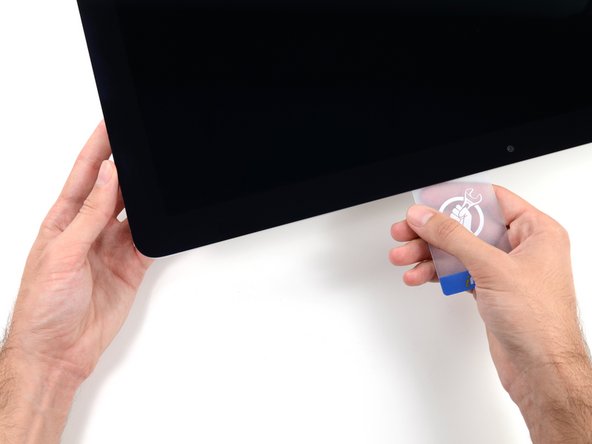
コーナー付近に差し込んだ2枚のプラスチックカードを手に取り、ディスプレイとケースの間の隙間を広げるようにカードを外側に向けてツイストします。
-
フレームからディスプレイ上部を持ち上げます。
-
-
The roller tool for slicing open the display works great for this step. Get in there like using the card and roll across the bottom to slice through the remaining adhesive.
-
-
-
ディスプレイをフレームから持ち上げて、iMacから外します。
-
片一方をゆっくりと持ち上げて、接着剤を剥がしながら外してください。
-
再組み立ての際は、古い接着剤の残りを綺麗に拭き取り、接着ストリップの使用方法を参照してください。iMac Intel 21.5インチ EMC 2544 の接着ストリップの交換ガイドです。
After removing the display, I also removed the 3 screws for the processor fan, disconnected the power connector for it and set the fan shroud aside. Disconnecting the remaining cable (similar style to 1 of the cables for the display) that is in the way of the RAM chips is all that's left to do. I was then able to access and quickly remove the two Apple-provided RAM chips, and replace them with 3rd party RAM. Turning the iMac on its side, so that it's in a position where you're physically putting the RAM chips DOWNWARD into their respective slots is the best way to go about uninstalling and reinstalling the chips. Using a narrow but long'ish plastic spudger tool is the best way to defeat the spring-tabs which hold the RAM chips in place. After removing the LCD display, changing the RAM is about a 10 minute process!! And I'd SURE prefer not to remove all the parts and risk damage to the iMac via the standard procedure listed. As per usual, take your time and work gently :-)
Teardown the whole machine just to change RAM? While preparing to comment on this procedure I just noticed the comment made by Mitch K above. I ran pretty much the same procedure that he describes this afternoon (steps 1-23, 43-45, and step 55). Then I swapped out the original 2x4GB RAM chips for 2x8GB chips by reaching behind the logic board, releasing the spring retaining clips one chip at a time (starting with the chip further away from the logic board), pivoting the RAM towards the back of the machine, and then carefully sliding it out of the slot. I easily slid in the new chips and then pivoted them to lock them down. No hassle, no time lost. As Mitch K states above, not only is this “shortcut” method much quicker and easier, but it provides less risk of damaging cables, sockets and other delicate components during a total teardown. Why mess with the power supply board just to change RAM? I do not advise to follow the current iFixit.com procedure written by Sam Lionheart, regardless of user skill-level.
THAT sounds one !&&* of a lot easier than the full tear down. I wonder if there’s a video of the process described by Mitch K? Adding that to these verbal instructions would really help relieve the apprehension and anxiety around the process! I do sometimes find the additional warnings, though appreciated from a “safety first” perspective, are somewhat overstated. It’s been a very long time since I shorted out RAM, or fried a PCB, or broke a connector, regardless of how finicky, fragile or awkwardly designed and positioned. I may have WANTED to break something, and the air might be blue for a few seconds, but inevitably, things go back together, the start button gets pressed, the startup chime sounds, and we’re in business. Practice DOES make as close to perfect we are likely to get.
Mitch has the exact method that works a treat. You don’t need to follow steps 24-37 and also 40-63. Step 51 is the step to remove the camera cable and is needed. Steps 38 and 39 are for the Fan. That is all that is needed. Done quite a few like this.
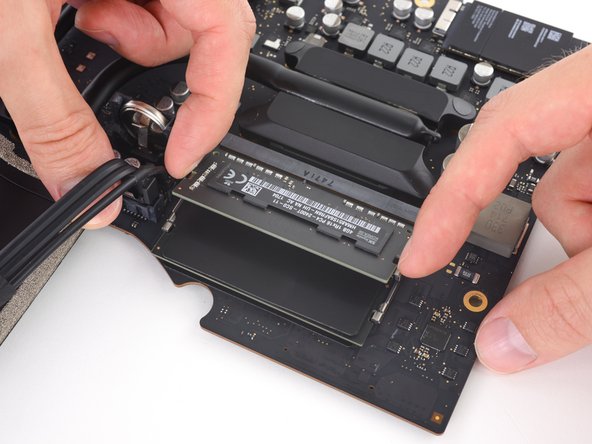
Be careful not to drop the RAM down the back of the logic board!
By NOT removing all the other stuff you can avoid either damaging it or forgetting to plug in a cable.
I just trued this shortcut and it was not successful. I was not able to seat both RAM chips with this shortcut, and managed to slightly damage one of the retainer clips. I simply could not manipulate the chips into and out of the slots effectively without taking everything apart as described in the full set of steps.. I ended up retracing my steps and following the entire procedure, carefully, and that worked without incident. So, bottomline, it is definitely more work to follow all the steps but from my experience, it is decidedly safer. Your mileage may, of course, vary. It was successful in the end, and I swapped out the hard drive with an ssd during the same procedure and my machine is very, very much faster.
I have completed by following the Mitch K post and it is much easier than stripping down the whole thing, just be aware that to remove and replace the ram chips means working in a tight space, you need slim fingers and don’t be tempted to use force, take your time.
Well, I have slim fingers, but they are 60 years old, and they don’t work like they used to! LOL.
Agree with Mitch K’s procedure. The only added tip I would throw in is to use two 45 degree tweezers with their plastic covers still installed to easily pop loose the RAM. I couldn’t get the plastic spudger tool to work myself, but the tweezers easily reach the RAM clips. Just make sure the plastic covers are installed and you won’t be in danger of scratching or shorting anything out.
So thankful I discovered these comments. Saved me a TON of time! Thank you!!
These comments were very useful. Thank you. I just needed to modify a pair of tweezers to allow me to seat the new RAM more easily. The ifixit screwdriver wasn't able to turn some of the screws as they were installed too tightly, and I didn't want to wait to order and reveive a pair of right angled Torx screwdrivers that would give me more leverage to get those boards off.
-
-
-
下部にあるサポートブラケットを固定している5本のプラスネジを取り外します。
-
4本の3.2ミリねじ
-
1本の1.7ミリねじ
2 notes for reassembly, carful with screws not to strip the heads as they are really really small, make note to cut a gap in the the adhesive over the whole for the microphone.
I managed to strip the head of one of the screws when putting it back in. So be carful with them when putting in / taking out. If you strip it on the way out you will need to take a fine drill and rill it out. Going back in, well as long as you never need to strip it down again not a problem.
The second problem is a real pain, you need to make sure to cut a gap in the adhesive just to the right of Center at the button to allow for the microphone opening. If you don’t, the adhesive tape will stop any real pick up on the Mic, so you just need to cut a small gap in it before putting on the screen. Unfortunately I didn’t find this out (or do my checked before sticking it all back down, so have to pull screen back off and reapply new adhesive
witha cut out in it at an other time.Refer her for more info on the mic / adhesive work around —> Muffled Microphone - iMac 21.5" (mid 2017) - Following Adhesive Strips
-
-
-
iMacにハードドライブブラケットを固定しているT10トルクスネジを外します。
-
21 mm ネジー2本
-
9 mmネジー1本
-
27 mmネジー1本
At step 26, when reassembling, it's super easy to over-tighten the 9mm screw and strip the brass ferrule out of its hole in the plastic bracket (%#*@).
Mine has 4 different length screws, the two red colored 21mm screws in this guide are actually two differ lengths
buongiorno, l'imac del 2019, non monta alcuna ssd, ma monta una m2 direttamente sulla scheda madre!
pertanto nella guida andrebbe aggiunto il cavo sata con sensore temperatura da aggiungere sulla scheda madre, per poter collegare un nuovo hd ssd altrimenti rimarrete come me bloccati con un imac aperto e non assemblato, in attesa di ricevere il cavo acquistato su internet da amazon o terze parti.
vi consiglio inoltre di aggiungere una foto reale del ò'imac 2019 nella guida in cui manca l'ssd, renderà subito la problematica che avranno in molti!
Hi, mine doesn’t HAVE an HD/SSD to remove, the bay is empty (yes it was fully working yesterday. So what do we do ? I see someone else with the sane issue above….
-
-
-
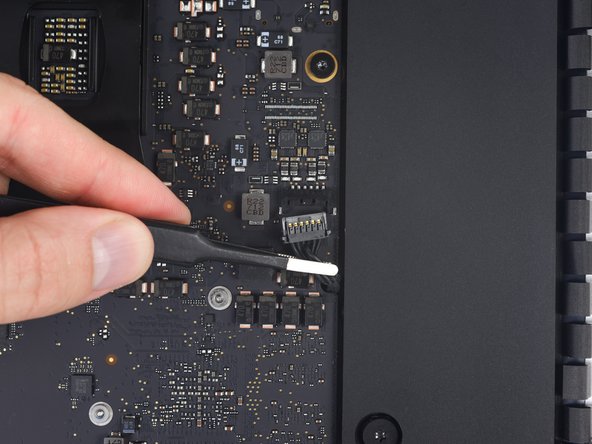
スパッジャーの先端を使って、パワーボタンケーブルコネクタの両側を抑えて、丁寧にソケットから外します。
I would advise that before removing the PSU unit and all other components from the bottom of the case that you remove the 5 screws at the bottom of the display which hold an insulation strip in place.
The guide shows this piece removed, but does not tell you how to remove it.
There will be 5, small J1000 screws. The middle one, which goes over Apple Logo is the shorter one of the 5, all others are the same length. Once this piece is gone removing the components is much easier, and chance of damage lessened.
Added to the guide. Thanks for the tip!
No need to remove power board and logic board and all other components, just remove the fan and it is quite "easily" accessable to change the RAM. Just need to use the tools to remove the old RAM and carefully install the new RAM.
I just did it without removing the logic or power board
could you elaborate a little more, I would love to skip the rest of these steps. How did you accomplish this?
ej P -
Oleksandr Trokhymchuk,
Thank you! You just saved me so much time! I wouldn’t call this “easy” but it saved me a lot of time and effort.
ej P: remove the fan assembly first. Then remove the connector that runs from the iSight camera to the logic board on the left.
the RAM is located right near that cable. It’s tricky to remove but you can pop open the connectors with a black nylon stick and the RAM chip will pop up at 45 degrees. Make a mental note on which way you will need to install the new ram as it’s tough to see. For the Crucial memory I got it was label side facing away you (facing towards rear metal enclosure).
the second chip has a plastic adhesive piece on it that you should probably attach to the new ram.
remove both chips then install the new ram in sequence from the board out.
In the photo for Step 28, the power button cable connector is placed around the power board screw hole on the top left of the power board.
However, on the iMac I upgraded, the power button cable connector was “fed” through the power power screw hole on the top left of the power board. The cable was too short to run around and below the hole.
Hence, I had to ensure the cable was “fed” through the hole during re-assembly and the screw carefully screwed back through the hole.
I guess every iMac is assembly just a bit differently, just to make repairs that much more fun.
Tim Telcik - 返信
This is not correct and may have been assembled incorrectly during a previous repair.
Just replaced the hard drive and RAM with SSD and 16GB respectively and did NOT remove the power supply or logic board. Tricky is a word to describe putting the RAM in without removing the logic board. You work in the dark with little room to get your fingers in between the logic board and the back of the case. I put the first RAM chip in without a problem (the one next to the logic board), but the second to four tries and dropped it behind the logic board three times before finally getting it to position correctly. Just impossible to see and must work but feel. Still it was faster than removing all the components… though did remove the fan (needed cleaning anyway). All in all I can’t say enough about the help the guide was through the upgrade ! Thanks !
I found this connector to be very tight and was afraid of breaking it off. I just kept slowly working on it—it did eventually come out.
I did try to sneak the RAM in without removing the logic board but my fingers were too big. I found it too difficult and just continued on with this guide.
I was not able to install the memory without removing all the components. My fingers are too big and I could barely get in that tight spot to swap out the memory. The hardest part about the power supply is that one connector under the chin next to the Apple logo. Once it is out, you are home free because it is so easy to plug it back in when you are putting it all back together again. Ridiculous that Apple did not put a simple access door behind those memory slots because they are on the backside of the Mac! They did an access door on the PowerBooks and it did not ruin the appearance. They could have designed a cool looking pop out door that only had a thin seam around it so it would still look good. Then you could remove the access door to upgrade the memory easily.
Does anyone know if this is the same situation as in the 2017 model? I just changed RAM in the 2017 version and also skipped taking out the logic board. I just bent a pair of tweezers and put some tape around the tips to make them less scratchy and used them to place the RAM modules into the slots. Worked supereasy and much much quicker than performing the complete tear down of the whole machine.
Nils Witte - 返信
This step is impossible!
@wizdomonwheels, I don’t see how I can get the RAM shield off of the logic board to access the RAM without removing the logic board. What am I missing?? I’m guessing that those of you that are suggesting this technique are working on older iMac models that don’t have the RAM shield.
Yes, you are correct. It is likely the various steps are a bit different on each model. If I recall I was likely working on a 2015 or older system. If there’s a shield in the way, I can’t think of a way you could get around it without pulling the logic board.
-
-
-
リアエンクロージャーにパワーサプライを固定している7.2 mm T10トルクスネジを2本、外します。
-
再組み立ての際は、ボード裏の電源ボタンワイヤを切断しないようにご注意ください。
In my case, the left side corner of the PS was caught against the Lower Support Bracket, and I had to remove the LSB in order to get the PS freed and out.
I think the author Walter Galan should put this in the main section of his instructions. I have TWO identical iMac 14,1 / i5 2.7GHz / 21 Inch Late 2013 / Order ME086LL/A. They both required removing the LSB. Thank you very much Walter Galan & others for your contributions.
Those screws were definitely not T10 but T9 on my unit
Those screws were T8 on my unit.
c'est du torx 08
-
-
-
パワーサプライを前側に倒します。
When replacing the PSU (on the re-build) take care not to trap the power button cable behind it - I did...
-
-
-
パワーサプライをわずかに引き上げて、リアエンクロージャーから取り出します。
-
パワーサプライを反時計回りに回転させて、向かって右側を左側より約2㎝程度高く上げてください。
In my case, the left side corner of the PS was caught against the Lower Support Bracket, and I had to remove the LSB in order to get the PS freed and out.
I think the author Walter Galan should put this in the main section of his instructions. I have TWO identical iMac 14,1 / i5 2.7GHz / 21 Inch Late 2013 / Order ME086LL/A. They both required removing the LSB. Thank you very much Walter Galan & others for your contributions.
-
-
-
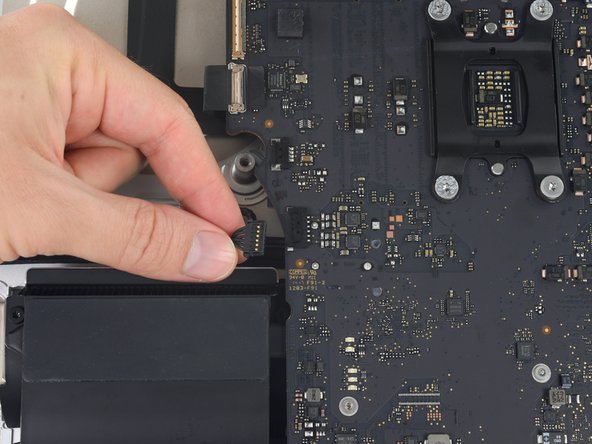
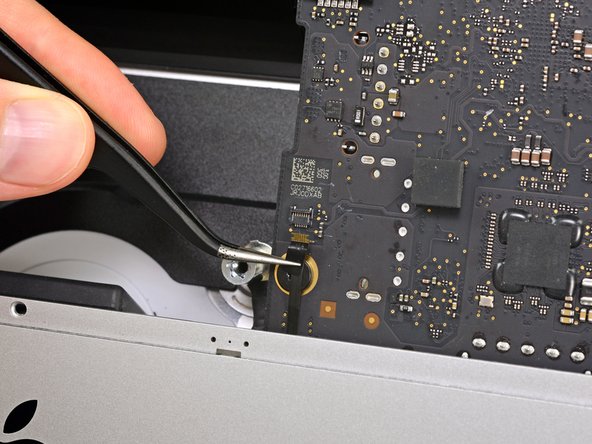
DCパワーケーブルコネクタの裏側にあるタブをつまんで、ロジックボード裏のソケットからまっすぐ引き抜きます。
when pulled the cable, even slightly, the actual female piece that connects to the logic board came off. am i screwed?
Repairing sockets that come off the logic board is possible, but very specialised work. Unless you have a magnifying lamp and the necessary desoldering and soldering skills, it will be difficult but not impossible.
I could not disconnect this cable without fear of breaking something (as previous posters did). I found that I could skip this and the next step by wrapping the power supply in a couple layers of a small towel (to prevent shorting with any other metal surfaces), and laying the power supply on the aluminum face of the iMac near the Apple logo. This got it out of the way enough to do what I needed on the logic board (changing PRAM battery) after completing removal of the other items in this guide.
-
-
-
スパッジャーの平面側先端を使って、ACインレットケーブルコネクタの側面にあるクリップを内側に押します。
-
リリース用のクリップをスパッジャーで押しながら、ACインレットケーブルを摘んで、ソケットからコネクタをまっすぐ引き出します。
I didn't disconnect the input cable to the power supply. Because I had the machine lying on its back throughout, I placed it on to the metal bit at the bottom of the machine instead (with a cloth to stop the metal getting scratched). The AC inlet cable was pretty tricky to get un-locked, and the PSU sat on the case fine. It didn't hinder anything else throughout the guide.
I thought from Dave’s comment that I could leave the power supply completely in place, but I was mistaken. In order to remove the hard drive assembly after you remove the center screw in it, you’ll need to at least unscrew it and the HD assembly will slip out. Like Dave said, you don’t need to unplug the AC or PSU, which I left hanging.
Getting power supply to the logic board unplugged is also tricky without unscrewing the two bottom screws. They didn’t make this part easy.
I would like to thanks Dave Hallett for his tip of not removing the AC inlet connector of the power supply. I simply wrapped the board in bubble wrap and taped to the iMac case, out of the way, thus giving access to the remaining disconnection procedures and preventing the board from scratching to the iMac case. It also made reassembly much simpler.
Yeah, that AC inlet plug was a nasty one to unplug, mainly because I was trying not to bump the solder joints on the PSU. After a few wiggles and pulls while manipulating the spudger tool to release the clip, it finally unplugged. Made it easier by removing the PSU completely so you don’t have to worry about it. Don’t worry, plugging it back in is a breeze!
With the right tool this plug comes out very easily. Forget about your tiny computer tools, go to the garage and grab a regular old needle nose pliers. Grab the clip and the plug at the same time. The plug will come right out.
Carin Ann— The most helpful comment on this procedure. After reading what you wrote I maneuvered the board, grabbed the clip with my left hand (a little awkward because of the cooling enclosure), squeezed the front of the plug, and got it out.
-
-
-
ファンとリアエンクロージャーを固定している10mmT10トルクスネジを3本外します。
In this photo the hard drive brackets and tray are fully assembled. But, you’ve just dismantled about half of it already in early steps. This photo is apt to confuse you a bit when you’re doing everything in reverse order.
Another way to say what Tim said above:
For reassembly, this picture, showing the hard drive brackets back in place, is misleading. Leave them off still.
IF, at this stage, you reinstall the hard drive brackets, when you get to the time to reinstall the power supply, you will have to backtrack and take the brackets off.
Tech Medic - 返信
-
-
-
iMacからファンを取り外します。
For reassembly, this picture, showing the hard drive brackets back in place, is misleading. Leave them off still.
IF, at this stage, you reinstall the hard drive brackets, when you get to the time to reinstall the power supply, you will have to backtrack and take the brackets off.
Tech Medic - 返信
-
-
-
ロジックボードに一番近い端からハードドライブを持ち上げて、角からわずかに引き出します。
The newer drives have rubber ends and an adhesive side, be careful removing them if replacing the drive and be sure they are securely pushed back into the holder
-
-
-
スパッジャーを使って、大型のプラスチックコネクタをゆっくりと押しながらハードドライブから離して、単一のSATA電源とデータコンボケーブルを外します。
When reconnecting the SATA cable, there is nothing to make the connector hold still, and it is hard to reach, so it took several tries. I ended up taking off the rubber baby buggy bumpers to get more room, and then jamming them back on after getting the SATA connector snugged up.
If by rubber baby buggy bumper, you mean left speaker, then yes, I agree. Reinstall the hard drive before the left speaker.
Kudo to @jerrid_foiles! I was going crazy trying to attach the SATA cable until I took the two screws out of the left speaker and slid the top end of it aside by about 3/4 inch. Make the whole process SO MUCH easier!!
We solved this by removing the hard drive tray screw, then inserting the cable into the SATA hard drive. Then hold the hard drive a bit out of the way to insert the 7.3mm hard drive tray screw.
Agree with this method, found it an impossible task to reconnect the SATA connector until removed the tray screw, then it was relatively easy to reconnect and then replace the tray screw.
Also agree with this method!
-
-
-
ハードドライブのアセンブリをiMacから取り出します。
When reassembling, I found it easier to loosen the HD tray screw from Step 48 and pull the tray outwards from the left side in order to plug the SATA cable in more easily.
Thanks! I, too, had a hard time reconnecting the SATA cable.
I found this helpful too!
Anwar -
I did loosen the speaker so I could get a tool behind the SATA cable to push it on to the SSD drive. Otherwise hard to align cable.
I found the easiest way to connect the SATA cable was to not screw the plastic hard drive tray down until you plug the drive in. That way you can easily push the connector in and due to the cable you’ve got some wiggle room. You can position the tray then just lift one end of the drive up and secure the screw. Then just push the drive down.
This was the step that I had the most trouble with. I’m used to replacing a hard drive in a MacBook Pro, where the “plug” that you plug the drive into is a rigid thing that you can firmly press the hard drive into.
With the iMac, the plug is situated on the end of a non-rigid cord, so the plug moves back when you try to snap a drive into it. Also, those two rubber gasket things that you adhere to the side of the drive really make it difficult to maneuver the now-overly-chubby drive towards the plug.
After must frustration/concern, what I ended up doing was temporarily removing the rubber gasket things, using the “spudger” as kind of a lever behind the “plug on a cord” so that it didn’t move as much, and then pushed the gasket-less SSD into the plug.
Once I got it connected, I put the rubber gaskets back on the sides of the SSD and kind of coaxed it down into place, using the pointy end of the spudger to get the chubby corner pieces to “sit” correctly in the rigid plastic tray that the SSD kind of rests in.
-
-
-
リアエンクロージャーにハードドライブトレイを固定している7.3 mm T8トルクスネジを外します。
it`s a t10 screw..! ;)
I found it easier to connect SATA cable before fixing tray.
-
-
-
ハードドライブトレイを取り出します。
I am following these procedures for the following: iMac Retina 4K - 21.5" - 3GHz Quad Core - Radeon Pro 555 2GB - 4GB/4GB (8GB total - 2 slots) 2400MHz DDR4 SO-DIMM - Mid 2017 - Model: MNDY2LL/A - iMac18,2 - A1418 - 3069. In my case, the SATA cable is clipped into the bottom of the hard drive tray. Pull the hard drive tray up slightly and angle to reveal clips. SATA cable pops out from the side of each clip.
-
-
-
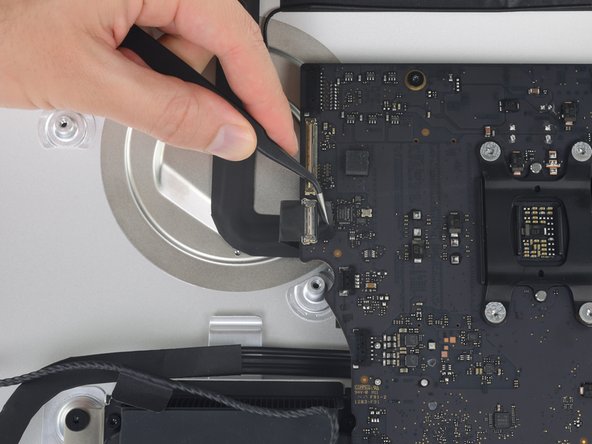
ロジックボード上のソケットから右側スピーカーケーブルのコネクタを丁寧に引き抜きます。
Please, please, please…Please! Make sure you fix this cable somewhere where you can get to it when you put the mother board back in. it is a pain to screw it down and realize that it’s under the motherboard. Learn from my pain.
I did not learn from your pain @lebarron durant, but I’m going to read every single comment next time!!
-
-
-
ロジックボード上のソケットから左側スピーカーケーブルをまっすぐ慎重に引き抜きます。
I had to pinch the 2 sides of the left speaker cable while pulling down. I didn’t have to do this with the right speaker it came out with no problem. The left was a little tougher, but you have more clearance and can use your fingers on the left speaker cable.
-
-
-
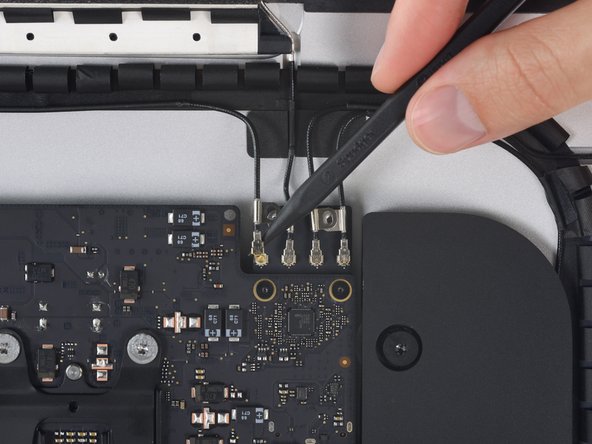
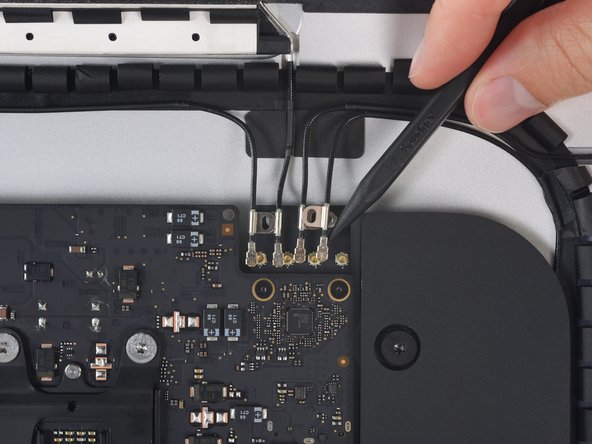
排気ダクトとリアエンクロージャーを固定している、次のT8トルクスネジを外します。
-
6.2 mmネジー2本
-
4.7 mmネジー2本
At least in the 2017 iMac both of the red screws are missing – removing the orange ones was enough.
-
-
-
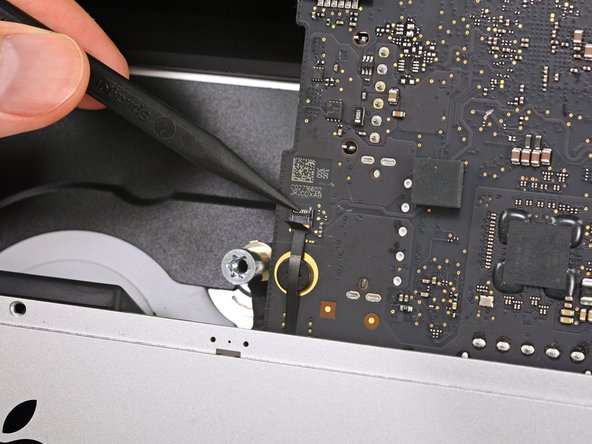
マイク用ZIFコネクタのラッチを裏返して、ケーブルをロジックボードのソケットから引き抜きます。
My microphone stopped working after I put everything back together very very carefully. I am unsure whether or not I inserted the cable back incorrectly or damaged the cable. I did not find out the mic stopped working until I put everything back together and installed the operating system, so BE EXTRA CAREFUL with the cable! Hope this helps someone!!!
-
-
-
リアエンクロージャーにロジックボードを固定している 7.3 mm T8トルクスネジを4本外します。
-
-
-
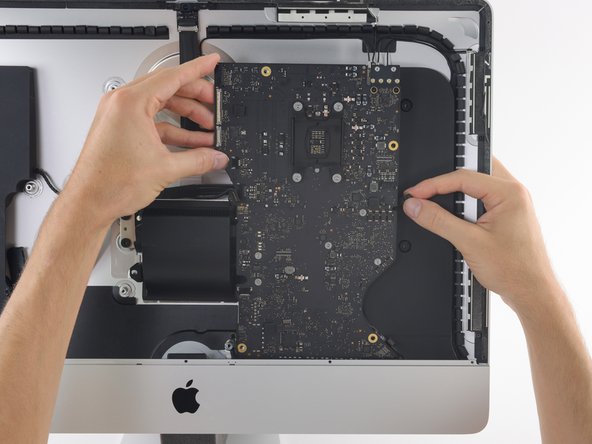
ロジックボードをiMacからまっすぐ持ち上げて取り出します。
At step 60, when reinstalling the logic board, check to make sure the I/O ports are flush with the back of the case. It’s easy to end up with a small gap, and if you do, you won’t be able to fully insert USB-C connectors.
I’d like to second this. Screw in the four logic board screws very loosley. Then make sure all the cables are where they should be. Then push the bottom of the board back until you feel it snap into place. Then tighten the four screws. At this point, before going any further, test out all the ports with some plugs to make sure everything goes in nice and easy.
Especially the USB-C's, these are the most delicate ones...
-
-
-
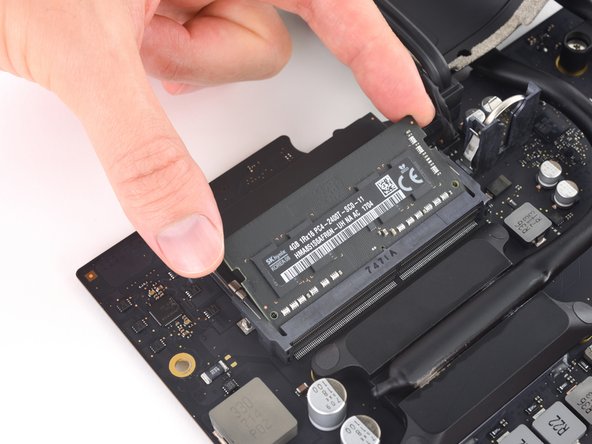
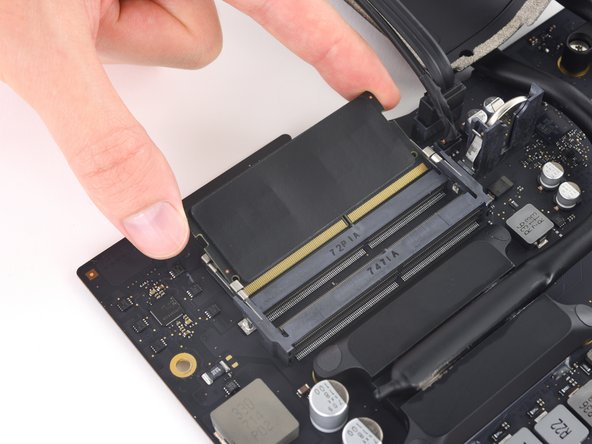
下側のスロットにロジックボードをインストールする前に、オリジナルのRAMスティックからサーマルパッドを剥がして交換用のRAMに移植します。
Wird das Display beim späteren Zusammenbau nicht frisch verklebt? Beispielsweise mit Klebestreifen?
-


iMacを組み立て直すには、これらの手順と逆の順序に従ってください。
iMacを組み立て直すには、これらの手順と逆の順序に従ってください。
146 の人々がこのガイドを完成させました。
以下の翻訳者の皆さんにお礼を申し上げます:
100%


これらの翻訳者の方々は世界を修理する私たちのサポートをしてくれています。 あなたも貢献してみませんか?
翻訳を始める ›

77 件のコメント
An excellent guide - many thanks. The logic board was tricksy to get out - the card reader was jamming on the casing, but it came out with care. It's easy to trap the microphone cable and the power button cables when re-assembling, so they're worth looking out for. Successfully replaced the RAM and installed an SSD at the same time - many thanks.
Can a SSD or fusion drive be put in the place where the normal hard drive was?
An ssd can yes - that's what I did at the same time as upgrading the ram. As long as it's a 2.5" ssd it should be fine. The Samsung ssd I used was a but thinner than the hard drive that came out but that doesn't affect anything really. You'll need to either have a bootable clone of your drive, or install Sierra from a USB stick you've already prepared (which is what I did).
A Fusion drive is the terminology used by Apple when the use a board soldered 120ish Gb storage and a standard 1Tb 2.5 inch drive, and bind them together, if you throw in a 1Tb SSD in place of the existing standard hard drive you end up with 2 drives when you begin installation, you can find the instructions to merge the onboard and the new SSD back together again, and boy does it transform these machines, absolute pig with a factory fusion setup.
I also upgraded my hard-drive to a 512 GB Samsung SSD successfully along with installing the 32 GB of RAM. The guide was great, but I have a two comments.
1) The screws that hold the antenna connectors (Step 52) are were very tightly screwed into the board, and it is easy to strip the head of the screw. I stripped one of the screws… Luckily, it was easy to just pull up on the bluetooth/AirPort card and slide it out from its slot on the main board. Thus, an option to removing all the antenna wires, is to just pull the bluetooth/Airport card out. It was quite easy to slip back into the correct spot when reassembling as well.
2) It was only after I completed the repair that I realized that the top of the nice screwdriver provided in the repair kit contained more hidden bits!
Brad Doble - 返信
To reassemble, do you need to buy new adhesive or can you reuse what’s there?
You have to buy replacement tape. It is a double sided foam tape that won’t hold again. Many times it rips apart a bit during disassembly.
Guys I can’t find the replacement tape anywhere online, what am I missing, I don’t want a whole repair kit, just the tape. Thanks.
Take a look under Parts at the top of this page.
Just select part only, instead of the kit option [リンクされた製品が存在しない、もしくは無効: IF173-005-2]
There’s one SATA port, but no other options to connect a second hard drive as far as I can tell. You can connect an external hard drive, but I think that’s about it.
I’ve done a lot of testing with this. Get yourself a USB SSD that is USB3.1 second generation. You’ll know it’s correct because it’ll have the USB C connector ON the external casing itself. Or get a USBC 3.1 second generation SATA Dock. you can put ssd’s in that. when you connect a USBC to the thunderbolt 3 connection on the back of the iMac, you’ll get transfer speeds just as fast or close to that of SATA internal anyway.
This is the parts list i used to get 450-500mb read/write via external:
http://a.co/gTIoPc3 <— ssd external
http://a.co/8KkCiZv <— 6" inch USBC cable.
http://a.co/7lr5lgw <— sticky velcro to keep the external SSD attached to the back of the imac, keeping it discreet and hidden.
Longer USBC cables may (or may not. There’s no need for a long cable in this case anyway) degrade potential transfer speed. I’ve heard people use both arguments. Longer cables will and will not slow things down. Keep it short. It’s cleaner and easier to hide anyway!
Benjamin -
http://a.co/aXk2Ttp <— optional alternative to a external SSD hdd. This will house an ‘internal’ hard drive.
Benjamin -
The warranty sticker for the RAM in the kit provided by iFixit challenged my ability to put the thermal padding in the right place, because it went over the sticker. I was worried that the padding would hurt the sticker and invalidate the warranty.
I took a picture of the RAM installed before putting the padding on for reference.
On behalf of everyone at iFixit, please feel free to rip those warranty stickers right off—they’re stupid and carry no legal weight whatsoever. Your warranty is good with us, sticker or not. In the meantime, we’re working with our suppliers to get those warranty stickers out of circulation for good.
Hi. After i followed your step. Done perfectly
but my thunderbold 3 did not work
any recommendation ?
best regard
Check to make sure the I/O ports are flush with the back of the case. It’s easy to end up with a small gap, and if you do, you won’t be able to fully insert USB-C connectors, and the Thunderbolt ports won’t work.
Thank you so much guys! The tutorial is amazing. I`m from Brazil (sorry for the bad english) and the Apple computers are so EXPENSIVE here! Because this I just can bought the iMac 4K entry, of 3.0GHz CPU. But for my work, the Mac had some problems and keep very slow sometimes. I looked for the Support of here, and then said the maximum upgradable RAM was just 16GB RAM… Thanx iFixit for sharing this amazing content.
Now I just have two doubts:
- They you shipped to Brazil?
- How I will close the iMac? hahah, doesn`t have this tutorial? Or it`s easy?
Hi ewerton.rodriguess! Brazil is included in our international shipping list. Once you reach the end of the guide the steps are mostly reversible, so you follow the guide backward. Then once the display is ready to be replaced, follow the note about reapplying adhesive: “After the adhesive is cut, it cannot be used to re-seal the display in place. Follow this guide to replace the adhesive strips that secure the display to the rear enclosure.”
I just bought this model and am considering doing it myself or having someone else a dealer do it for 240. Can anyone speak about the difficult if pulling cables out, for the most part I’m worried the most about pulling to hard and damaging a cable.
If I remember correctly, I had the most difficulty with the power supply connectors. They require more force than most of the others. The most important thing is to pay close attention to which direction each connector must be pulled to disconnect it. Study the pictures closely and make sure you have the right tool for each step. Having an extra spudger is very handy.
Have you ever done anything like this before? Experience helps a lot because you learn to recognize the different types of connector. This informs not only the direction the cable should be pulled, but which part is the cable and which part is the socket.
If you’re not confident, it might be worth paying for the labor to have someone with experience do the job. If you ruin the logic board, it will cost a lot more than $240 to repair or replace.
Hi,
Can i use 8GB Memory which originally came with the machine and also 16GB crucial Memory together. Will the machine work fine or there will be issues in the performance or some other issues like, restarting or shutting down automatically.
Actually it can be. (I suggest you using the same capacity is better. Because the problem is unknown) But remembe that, the pin and process freq. need to be the same.
阿威Wei -
Does anyone have a suggestion for a fast 1TB internal SSD I could do at the same time I’m adding RAM? The hard drive upgrade kit on ifixit seems generic with no separate link to order the drive (at least that I could fine).
Lately I’ve been installing Crucial MX500 SSDs and so far, so good.
would this void a warranty of apple care guys???
Hi, i tried to replace the RAM and install an ssd. After the repair it does not boot. The fan starts, i see led’s 1&2 turn green, but that’s it. No sound from booting and a black screen.
I also tried to start from a external bootable hard drive using the option button, but same result.
Any thoughts?
gr Alex
I found it. It put the old RAM and hard disk back. Everything was working fine again. Then replaced the hard disk again for the ssd. Still working fine. Then i replaced the old RAM for the new ones and then i had the same problem. Turned out to be a set of defect RAM memory cards.
Used this to add RAM and a Samsung SSD into my iMac, using all the tools from iFixit I had absolutely no issues at all. Wonderful and detailed guide on how to really give your iMac a kick. Very impressed by the quality of the tools, the RAM and the wedge to keep it from moving. Was able to start the teardown and then turn the machine back on in a little over an hour, most time consuming part was removing the old tape from the case and backside of the glass to then replace. Extremely satisfied with everything
Absolutely brilliant guide, as usual. Thank you for your hard work, Evan.
But seriously, folks, am I the only one that thinks this is the absolute stupidest design ever? Sixty-four steps and a nearly complete disassembly to add one stick of RAM…and another 60+ steps to put it all back together again, not to mention having to buy additional parts like the thermal pad and foam mounting tape? Really, Apple? What drug-addled sadist dreamed up this nightmare?
Oh, wait a minute. I almost forgot Apple’s primary obligation is to its stockholders, not its legions of loyal addicts, er, users. This is a prime example of taking something so basic and simple a monkey could do it, blindfolded and in its sleep, and complicating it beyond recognition to generate more revenue for the almighty fruit. Jobs is obviously still controlling the form-over-function mantra from beyond the grave with this latest descent into the depths of absurdity. Great job, design team!
You don’t need to remove the power supply, harddrive or logic board to do a RAM upgrade on these machines.
Skip steps 24-37.
You just need to remove the fan. With the fan removed, you can access the RAM and its release tabs sufficiently to remove the RAM and install new RAM.
Also skip steps 41-61
The steps 62-64 are useful above to show you exactly whats going on on the logic board, but you really do NOT need to remove the whole board.
It is a little tricker with the limited space, but you are far less likely to damage other parts of the machine if they are not removed.
I suggest putting the iMac vertically on its side (ideally with someone else holding it), so that when inserting the RAM, it stays in the slot as you clip it back into the socket.
This goes from a 2.5hr repair to less than an hour.
That is correct!!
Just did it that way, took me about 1h to change RAM and HDD.
Thank you for the hint!
Der Sam -
I can confirm that this method works great. Thanks for the tip! I am now using CMSX32GX4M2A2666C18 and MZ-76E1T0B/EU and wow what a diffrence! Like a new machine! Don’t forget to make a bootable stick with Memtest86 to check that the RAM is ok.
Jonas -
Just as I read in these comments from Charlie and a couple others you can indeed change the RAM out with only the screen and then the fan removed, the fan has three T8 and a small connector as in the guide.
with the iMac on a pillow, a head torch and a spudger, out came the old ram, swopped the thermal pad and in went my new crucial RAM.
it’s terribly fiddly but even my old hands managed it.
This on a iMac 18,2 mid 2017 4K 21.5, really pleased saved all the connections being removed. Go slow and rotate the iMac to help and it’s just a case of nudging the RAM into place and lowering back to the clips.
Wish I had read this before reassembly Muffled Microphone - iMac 21.5" (mid 2017) - Following Adhesive Strips
Andrew, we just realized we forgot to update this guide with the latest display adhesive installation guide that accounts for that issue! iMac Intel 21.5インチ Retina 4K Display (2017) 接着ストリップの交換 I’m so sorry.
How much RAM works on this iMac? I heard something, that only 2x 8GB (16GB in total) would be possible? Or is 2x 16GB also an Option?
You can install 2x 16GB for a total of 32GB.
Bonjour
J’étais presque contente en tombant sur votre tuto, sauf que je me suis apercue que moi ce n’est pas un Intel, mais un iMac (Retina 4K, 21.5-inch, 2017). En fait, normalement, je ne peux pas l’upgrader. Mais pensez vous que je puisse quand même le faire en suivant ce tuto ?
Excellent guide, but missing the “extra steps” - like when you drop the top right exhaust vent screw into the void, and have to remove everything including the speakers to find it… LOL
I completed this under less than ideal working conditions, but still managed to get it all back together in 2.5 hrs for a first try. Not sure I’d been willing to attempt it without reading this guide, though!
Je pense qu’il est préférable de configurer son i Mac à l’achat
On comprend mieux le prix de ces machines
votre guide est néanmoins de grande utilité
Merci pour ce tutoriel qui ma permis de booster mon Imac avec 32 go de RAM.
J’ai pu découvrir que derrière la Roll Roys se cache la misère.
Bien à vous
I have a Mac (Retina 4K, 21.5-inch, 2017) 3.0 GHz Intel "Core i5" processor (7400). The Apple website says that with such a processor you can install only 16 Gb of RAM maximum, and for 3.4GHz quad-core Intel Core i5 (Turbo Boost up to 3.8GHz) you can install up to 32 Gb. In the comments they ask about how much you can install as much as possible and they are always answered - 32 Gb. Does this mean that the processor model is not important?
Yes, the processor model is not important. The 16GB maximum seems to be an artificial limitation set by Apple for marketing purposes.
Thanks a lot, roberttrevellyan! Now I can buy 32 Gb RAM with confidence
Lezhnev -
Installed Kingston HyperX Impact [HX424S14IBK2/32] 32Gb. Works great!
Lezhnev -
i have a 2015 4K 21.5 imac, what is the max ram it can be installed ? thanks !
This guide was great. I added a few comments under specific steps but my few tips are: (1) Use ifixit’s project tray or magnetic mat to hold all of the screws; (2) it’s an opportunity to upgrade the hard drive at the same time so plan out both by reviewing the hard drive upgrade guide as well; (3) have patience; (4) I spread out across my dining room table and pretty much used most of it so have a big surface area for this!
I have just installed the hard disk and memory following the instructions in the guide, and now that I start the iMac, there is nothing. Blank screen!! I can see the lights on the logic board and the heat sink fan is running but nothing else happens. Thinking there is something wrong with the RAM, reinstalled the original RAM, started up, nothing again. I will now try to put the original hard disk in it, and will see how I go. Any suggestions!
ramir amir - 返信
Excellent guide! I would like to ask if it is possible to leave one 4GB memory module in its place and change the other one to a 8GB module so in total I would have 12GB? Since I will be upgrading my iMac to SSD and I have a spare 8GB RAM module, it would make sense to add that the same time when I take off the screen due to SSD upgrade.
Technically it should work. It’s sub-optimal to have mismatched modules, but more memory that doesn’t match is usually better than less memory that is matched. However, since obtaining another 8GB module is relatively inexpensive, while opening up your iMac is somewhat risky, does it really makes sense to go to all that trouble and only replace one module?
una excelente guía, muy bien ilustrada y explicada
What an amazingly thorough guide. I felt confident as a complete novice who has prior never worked on computers. Thank you so much!
So I was replacing RAM and hard drive and cracked my display. It still worked when reassembled but the crack in the display bothered me and I went to replace it today. Everything went great until I went to test the display…nothing. My old display doesn’t work now either. (One quick note - I took a “B1” out and my new part was an “A1”)
Anyway, the first three LED’s on my logic board are fully lit, 4th is on but very dim, 5th not on at all. Any advice what to check next? Ribbon cable maybe?
I have (21.5 inch, mid 2017, 2.3 ghz) base model same as this but not 4k. How much max ram can I install in my iMac??
According to everymac.com, that model supports up to 16GB of RAM.
Excellent guide thank you, was going very well until I manged to break the microphone ribbon putting the logic board back in, I am struggling to find what fitting the ribbon goes in to. I have a piece of ribbon (with logic board fitting) on one end with and no sign of the other end and fitting.
Any advice would be welcome.
Chris 08/01/21
Bonjour,
Je trouve que de donner comme information de 1 à 3 heures le temps de la dépose et du remontage complet , est complément incohérent.
un minimum de 3 heures serait pertinent .
Cuando se coloquen los adhesivos para la pantalla, hay que tener cuidado de no obstruir los orificios del micrófono que se encuentran en el borde inferior a lado del tornillo central, de lo contrario no funcionará.
I have one: Apple iMac 2017 Screen 21.5 "intel Core i5 dual core 2.3 GHz (Turbo Boost up to 3.6 GHz) 8GB 1 TB Intel Iris Plus, has 02 memory slots, each with 4GB each. memory is: 8 GB 2133 MHz DDR4 integrated memory model: - Part number: MMQA2 (NOT RETINA) It is 2017. This model here: https: //support.apple.com/kb/SP758? location ... Can I install a 1 TB SSD with 32 GB of memory? I see that on the Apple website it says that the maximum I can put is a 256 GB SSD and 16 GB of memory. What do you think?
I think that on apple website they say you the max amount they sell, but tou shouldn’t have any problem upgrading for more, unless they have some hidden software trickery in place…
2 hours, this was perfect! Upgraded RAM from 8GB to 32GB, and replaced the Fusion drive with a 1TB SSD. Thank you guys!
No menciona que memorias ram son compatibles para la mac
They are standard RAM sticks, so i guess more or less any stick will work
iMac 2017 - 21 inch and 27 inch both have the same RAM right?
The upgrades offered here on iFixit for the 2017 21.5” and 27” Retina iMacs both have PC4-19200 modules.
I wasn't aware how complex the internals of my 2017 iMac were. But the hard drive isn't as fast as it once was, so either way I'm finding the ram to order now. The screen scares me the most.
Arrivé au bout, mauvais choix de RAM
GRRRRtout à recommencer
Très bon tuto, patience et minutie indispensables
Merci
Un excellent tuto.
Nous avons suivi à la lettre et tout réussi bien que nous soyons débutantes.
Nous avons mis plus de temps car au remontage une vis est tombée sous la carte mère. Il a fallu recommencer les étapes que nous venions de faire. Soit plutôt 4h avec les essais.
Pour réussir, quelques conseils :
- prendre son temps et ne pas se précipiter,
- tout noter et poser les vis sur un papier avec le numéro de l’étape
Reste maintenant à savoir si le iMac sera réellement plus rapide !
Un immense merci au(x) rédacteur(s)
I have (21.5 inch, mid 2017, 2.3 ghz) base model same as this but not 4k. How much max ram can I install in my iMac??
Narendra Verma - 返信
This guide contains many extra steps for what should be a straight forward, simple parts replacement without disturbing more than the display, left hand speaker and removal of 4 logic board screws for play. Nothing else except for the left hand speaker wire & iSight cable from logic board, the lower support bracket and loosening the speaker so as to move it around a bit.
For the ram, I bent a pair of cheap tweezers long ago supplied with these replacement kits to the perfect angle for holding, locating and inserting the ram into the slots under the logic bd after moving each retainer w/spudger and popping out the old. Pay attention to the orientation of the ram when removing/inserting the ram! An automotive mirror is handy along with a small flashlight for closeups. Once the ram is aligned properly substitute your fingers for the tweezers, ease it into the slot, push up & engage! Reinstall screws and all else. I have done this job successfully this way countless times. For a tweezers pic contact me!
Ross Elkins - 返信
Additionally, if a blade is present, I install the OSx system on the blade and everything else, apps and home folders on the new SSD. You get the very fast boot off of the blade and the full ssd for all else!
Ross Elkins - 返信