はじめに
このガイドの手順に従って、21.5インチ Retina 4K 2019 iMacのSATAハードドライブを交換もしくはアップグレードします。ドライブをアップグレードする場合、ファイルやオペレーションシステムを保存するために、現在使用中のハードドライブを複製して交換用ハードドライブに上書きします。
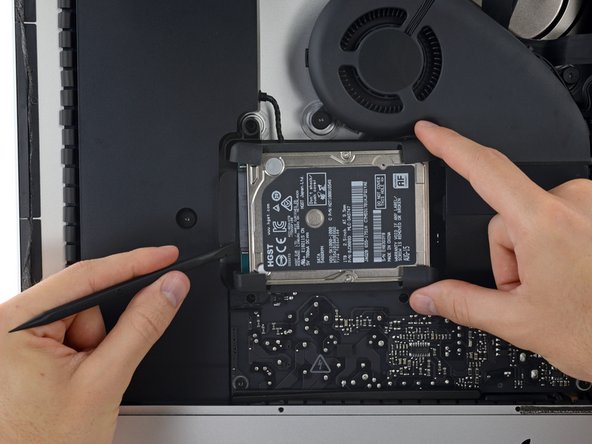
このガイドの複数の画像は、旧モデルiMacを使用しています。外観上の違いは多少ありますが、作業自体に影響はありません。
必要な工具と部品
-
-
ヒンジを外すと、iMacはバランスが取れなくなり、作業が難しくなります。iMac Service Wedgeがあれば修理作業は素早く、簡単ですが、なくても対応できます。
-
-
-
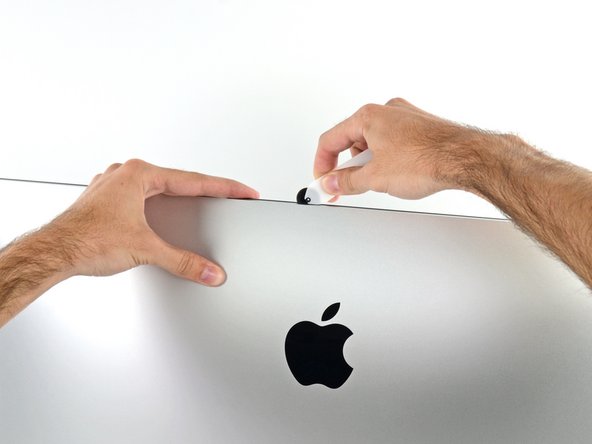
ピザカッターのようにツールを使いますー隙間に沿ってスライスしながら、フォーム製接着剤を切り込んでください。
-
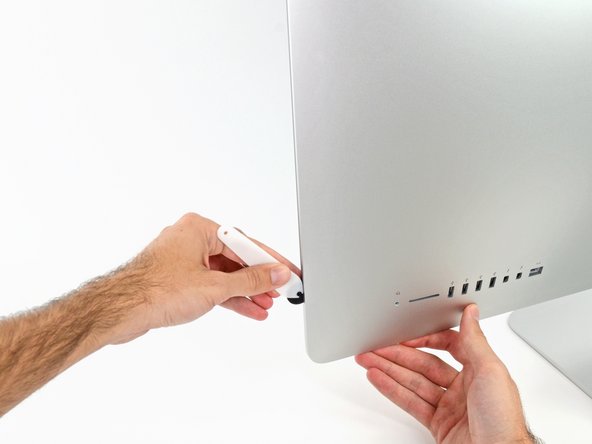
ツールをディスプレイの左側に沿って下側から上部に向けてスライスします。
-
-


オリジナルのパーツと交換用パーツをよく見比べてください。交換用パーツに付いていない残りのコンポーネントや接着シールなどは、インストールする前に新パーツに移植する必要があります。
このデバイスを再組み立てするには、インストラクションを逆の順番に従って作業を進めてください。'
e-wasteを処理する場合は、認可済みリサイクルセンターR2を通じて廃棄してください。
修理が上手く進みませんか?ベーシックなトラブルシューティングのページを参照するか、このモデルのアンサーコミュニティに尋ねてみましょう。
オリジナルのパーツと交換用パーツをよく見比べてください。交換用パーツに付いていない残りのコンポーネントや接着シールなどは、インストールする前に新パーツに移植する必要があります。
このデバイスを再組み立てするには、インストラクションを逆の順番に従って作業を進めてください。'
e-wasteを処理する場合は、認可済みリサイクルセンターR2を通じて廃棄してください。
修理が上手く進みませんか?ベーシックなトラブルシューティングのページを参照するか、このモデルのアンサーコミュニティに尋ねてみましょう。
25 の人々がこのガイドを完成させました。
以下の翻訳者の皆さんにお礼を申し上げます:
100%

Midori Doiさんは世界中で修理する私たちを助けてくれています! あなたも貢献してみませんか?
翻訳を始める ›

15 件のコメント
Great guide! I had a failing fusion drive and upgraded to an SSD and got the 64gb RAM maxxer kit while I was in there. everything went really smoothly and my computer is so much faster. My only mistake was that I didn’t clone the HDD before taking the imac apart. I had to put it all back together with the old drive, clone to the SSD, take it all apart again, replace the SSD, put it back together to verify that it was even gonna work, then take it all apart again to finish up the RAM upgrade. But… it’s all good. Thanks for the great guide!
You cannot replace a conventional “Hard drive” in this model iMac.
DO NOT attempt this upgrade until you understand two important facts:
1) The drive in your iMac MUST BE a ‘SSD’ or a ‘Fusion drive’. If it is a conventional HDD, stop. There is NO PCIe CONNECTOR inside to connect a new blade drive.
2) Click on the link in this iFixit for "clone your existing hard drive". All the more recent Apple CPU's are now classified as 'T2 secure chips'. Cloning is no longer straightforward, e.g. "Hold down Opt key during restart, etc." You have to bypass/disable certain security features on your iMac, and this is somewhat of a lengthy process. If you do not, when you try to boot from an external drive you will see nothing but a black screen.
Excellent step by step guide, thank you. I will definitely refer to this when I upgrade my 250G SSD which, BTW, is WAY too small. There's only 100G left, and only apps are Logic Pro X, Numbers/Keynote/Pages, iTunes & a few utilities... hardly any actual work
Thanks for the information given. One follow-up question having a SSD-only 2019 iMac: Is the 2.5" harddrive enclosure and Sata-Cable included in this one? I would like to a) upgrade the PCIe-SSD but also put in a slightly bigger 2.5" SSD in place of the - currently non-existent - harddrive. Knowing Apple I am pretty sure that they did not include the Harddrive enclosure in SSD-only 2019 iMacs - plus using proprietary Sata connectors probably >.<
The guide here mentions nothing of upgrading a blade ssd. If I open my imac and see a HDD can't I just swap it with a 2.5'SSD?
Your message is not clear. This guide is for a conventional drive upgrade for a Pre T2 2019 iMac.
This guide is also for an iMac that is Pre-T2, so your second point is not relevant either.
Sure, do not follow this guide if you wish to upgrade your SSD equiped iMac, or a 2020 iMac or iMac Pro.