メインコンテンツにスキップ

iMac Intel 20" EMC 2105 and 2118 Optical Drive Replacement

必要条件のみ
この修理ガイドは、他のガイドの前提条件として使用されます。それ自体は不完全で、単独で使用されることはありません。

必要な工具と部品

  1. iMac Intel 20" EMC 2105 and 2118 Optical Drive Replacement, Optical Drive: 手順 1、 1の画像 1
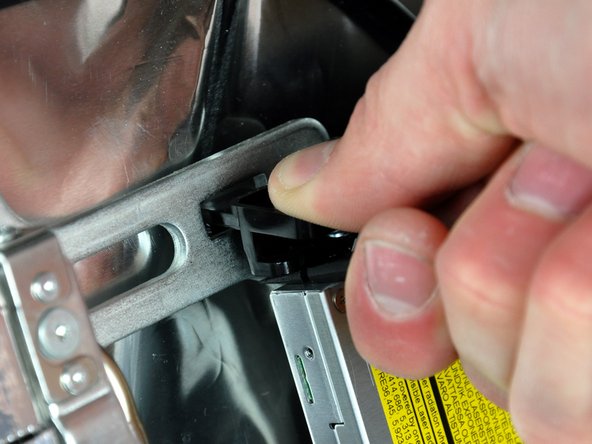
    • Disconnect the optical drive thermal sensor cable by pulling its connector away from the socket on the logic board.

    • Pull the connector parallel to the face of the logic board.

  2. iMac Intel 20" EMC 2105 and 2118 Optical Drive Replacement: 手順 2、 1の画像 1
    • Remove the two 3.6mm T6 Torx screws securing the optical drive ribbon cable connector to the logic board.

  3. iMac Intel 20" EMC 2105 and 2118 Optical Drive Replacement: 手順 3、 1の画像 1
    • Use the flat end of a spudger to pry the optical drive ribbon cable connector up off the logic board.

    • The connector is most easily removed when prying from the top or bottom of the connector.

    • Bend the optical drive ribbon cable back away from the logic board.

    • Be very careful when moving the optical drive ribbon cable as it is delicate and easily ripped.

  4. iMac Intel 20" EMC 2105 and 2118 Optical Drive Replacement: 手順 4、 2の画像 1 iMac Intel 20" EMC 2105 and 2118 Optical Drive Replacement: 手順 4、 2の画像 2
    • Apple's "engineers" didn't learn much about deflection and material stiffness when they went to "college", so this optical drive is particularly difficult to remove because the bracket flexes too much. The next few steps require some patience and a good amount of force.

    • Insert the flat end of a spudger into the gap between the optical drive and its bracket until it contacts the chassis.

    • Grab the spudger as close to the surface of the optical drive as you can, then depress the release tab with your thumb while pulling toward yourself.

    • The wedge shape of the spudger may cause it to slip out of the gap toward yourself. Be sure to press the spudger in toward the rear case while squeezing the release tab.

  5. iMac Intel 20" EMC 2105 and 2118 Optical Drive Replacement: 手順 5、 1の画像 1
    • Remove the two 6mm T10 Torx screws from the side of the optical drive.

    • It's a good idea to lay your iMac flat on a table before removing these screws to avoid them falling behind the logic board.

  6. iMac Intel 20" EMC 2105 and 2118 Optical Drive Replacement: 手順 6、 2の画像 1 iMac Intel 20" EMC 2105 and 2118 Optical Drive Replacement: 手順 6、 2の画像 2
    • Reach behind the chassis and use your finger to unclip the lower optical drive tab from the chassis.

  7. iMac Intel 20" EMC 2105 and 2118 Optical Drive Replacement: 手順 7、 2の画像 1 iMac Intel 20" EMC 2105 and 2118 Optical Drive Replacement: 手順 7、 2の画像 2
    • Maneuver the optical drive out of the rear case, minding the two plastic pins molded into the rear case near the open end of the optical drive that can break off.

終わりに

To reassemble your device, follow these instructions in reverse order.

作成者

4人の作成者と共同で作成されました。

Walter Galan

694,495 ポイント

1,203のガイドは作成済み

0 件のコメント

コメントを追加

統計データ:

過去 24時間: 0

過去 7 日: 0

過去 30 日: 0

今までの合計 2,907