この翻訳は、ソースガイドの最新の更新を反映していない可能性があります。 翻訳の更新に協力してください。 または ソースガイドを参照してください。
はじめに
ストレージ容量を増加するため、ハードドライブをアップグレードしましょう。
必要な工具と部品
-
この手順は未翻訳です。 翻訳を手伝う。
-
Loosen the two Phillips screws securing the access door to your iMac.
-
Remove the access door.
-
-
この手順は未翻訳です。 翻訳を手伝う。
-
Remove the following screws along the lower edge of your iMac:
-
Three 6 mm T8 Torx screws
-
One 8 mm T8 Torx screw (Right side of the RAM slot on 2105)
-
-
この手順は未翻訳です。 翻訳を手伝う。
-
Insert a plastic card up into the corner of the air vent slot near the top of the rear case.
-
Push the card toward the top of the iMac to release the front bezel latch.
-
Pull the front bezel away from the rear case.
-
Repeat this process for the other side of the front bezel.
-
If the bezel refuses to release, try lifting the lower edge of the front bezel slightly away from the rear case (detailed in the next few steps) and repeat the latch release process.
-
-
この手順は未翻訳です。 翻訳を手伝う。
-
Lay your iMac stand-side down on a flat surface.
-
To lift the front bezel off the iMac, simultaneously:
-
Use your thumbs to press in the RAM arms and hold the iMac down.
-
Use your index fingers to pull the small bridge of material on the front bezel toward yourself.
-
Pull the front bezel up with your index fingers.
-
Once the small bridge of material has cleared the RAM arms, lift the front bezel by its lower edge just enough to clear the bottom edge of the rear case.
-
-
-
この手順は未翻訳です。 翻訳を手伝う。
-
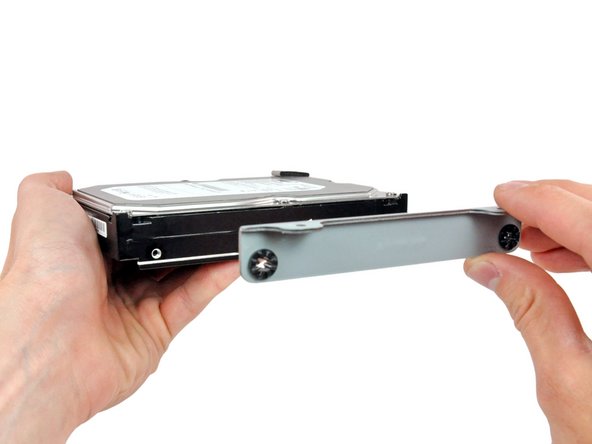
Remove the two 12 mm shouldered T8 Torx screws holding the hard drive bracket to the connector side of the hard drive.
-


デバイスを再度組み立てるには、この説明書の逆の順番で組み立ててください。
デバイスを再度組み立てるには、この説明書の逆の順番で組み立ててください。
343 の人々がこのガイドを完成させました。

19 件のコメント
I used this guide in conjunction with this video for reference that was really helpful: http://www.youtube.com/watch?v=ShY8zuT-w... (and part 2). Repair went really easy (just take it slow). Hardest part for me was pulling out the screen. The torx screws are pretty far in and the 26 piece kit I bought from here wasn't long enough to reach (the extension has a large round magnet on it that will not insert far enough because of limited space). Thankfully I had a torx at home that was longer for that specific size, so I was able to unscrew just enough with MY torx and use the magnetic one to grab the screw (absolutely necessary to have a magnetic version). Bought the Western Digital drive and found out that it would not format with the original OS Tiger disk. Only OS Snow Leopard's Disk Utility would read the HD properly and format for Mac. If buying the Western Digital, make sure you have a newer OS to install than Tiger. I read about possible problems with OS Leopard's Disk Utility and WD drives as well, but I cannot speak specifically for that.
Great guide! I can't think of anything to add. Read it over several times to take in all for the tips, they are helpful. I replaced my dead HD with a 120GB SSD (OCZ Vertex 3 VTX3-25SAT3-120G). It is working great with Snow Leopard. I had to use Trim Enabler but that seems to be working fine. The 2.5 to 3.5 drive adapter was too small to fit the apple attachment be the two sided tape mount seems very secure.
A small feedback from my iman. (Late 2006, early 2007 20" display 2.16 intel core 2 duo):
Just changed my hdd and everything worked out fine. Two things are important as I found out that they differed from this guide:
1. In order to release the front bezel latches the card must be not be inserted vertically as shown in the pictures but with a slight angle using the direction from inside towards the upper corner of the bezel. I saw this in the following youtube video:
2. The torx requested to release the display screws is not a No 6 but a smaller one. Probably a No. 4, Ι am not sure exactly as I did not have one so I used a normal small screwdriver instead.
I hope I helped, the rest of the guide was very accurate and quite easy to follow.