メインコンテンツにスキップ

この翻訳は、ソースガイドの最新の更新を反映していない可能性があります。 翻訳の更新に協力してください。 または ソースガイドを参照してください

必要な工具と部品

  1. , アクセスドア: 手順 1、 2の画像 1 , アクセスドア: 手順 1、 2の画像 2
    • アクセスドアをiMacに固定している脱落防止プラスネジを緩めます。

    • iMacからアクセスドアを取り外します。

    • 作業を開始する前に、コンピュータの電源ケーブルを抜き、電源スイッチを20-30秒間押し続け、本体内部のコンデンサの静電気を放電します。

  2. , フロントベゼル: 手順 2、 1の画像 1
    • 次の4本のネジを外します:

    • 6mm T8トルクスネジ 3本

    • 8mm T8トルクスネジ 1本

  3. この手順は未翻訳です。 翻訳を手伝う。

    : 手順 3、 2の画像 1 : 手順 3、 2の画像 2
    • Flip your iMac over and lay it stand-side down on a flat surface.

    • To lift the front bezel off the iMac, simultaneously:

    • Use your thumbs to press in the RAM arms and hold the iMac down.

    • Use your index fingers to pull the small bridge of material on the front bezel toward yourself.

    • Pull the Front bezel up with your index fingers.

    • Once the small bridge of material has cleared the RAM arms, lift the front bezel by its lower edge just enough to clear the bottom edge of the rear case.

  4. この手順は未翻訳です。 翻訳を手伝う。

    : 手順 4、 3の画像 1 : 手順 4、 3の画像 2 : 手順 4、 3の画像 3
    この手順で使用する道具:
    Plastic Cards
    $2.99
    購入する
    • Re-orient your iMac so it sits upright on the stand.

    • Insert a plastic card up into the corner of the air vent slot near the top of the rear case.

    • Push the card toward the top of the iMac to release the front bezel latch.

    • Pull the front bezel away from the rear case.

    • Repeat this process for the other side of the front bezel.

    • It may be necessary to apply several layers of duct tape to the top of the access card to aid in releasing the latches.

    • If the bezel refuses to release, try pressing the lower edge back onto the rear case and repeat this opening process.

  5. この手順は未翻訳です。 翻訳を手伝う。

    : 手順 5、 1の画像 1
    • Lay your iMac stand-side down on a table.

    • Lift the front bezel from its lower edge and rotate it away from the rest of your iMac, minding the RAM arms that may get caught.

    • Lay the front bezel above the rest of the iMac.

  6. この手順は未翻訳です。 翻訳を手伝う。

    : 手順 6、 1の画像 1
    • If necessary, remove the piece of kapton tape(it is ok to toss this) wrapped around the microphone and camera cables.

  7. : 手順 7、 2の画像 1 : 手順 7、 2の画像 2
    • カメラとマイクケーブル両方の接続を外します。

  8. この手順は未翻訳です。 翻訳を手伝う。

    : 手順 8、 1の画像 1
    • Peel up the lower EMI shield from the rear case.

    • It is only necessary to peel the shield up from three sides. Leave it attached to the display.

    • We have found it helpful to tape the EMI shield against the display to keep it out of the way.

  9. この手順は未翻訳です。 翻訳を手伝う。

    : 手順 9、 2の画像 1 : 手順 9、 2の画像 2
    • Remove the two 4.8 mm T6 Torx screws securing the display data cable to the logic board.

    • Grab the display data cable connector by its black tab and pull it straight up off the logic board.

  10. この手順は未翻訳です。 翻訳を手伝う。

    : 手順 10、 1の画像 1
    • Inverter cable on 24inch iMac pulls off to the left.

    • Pull the inverter cable connector straight up off its socket on the logic board.

  11. この手順は未翻訳です。 翻訳を手伝う。

    : 手順 11、 1の画像 1
    • Peel back the aluminum EMI tape from the two vertical edges of the display.

    • During reassembly, it is helpful to use several small strips of tape to hold the EMI shielding along the left and right edges of the display footprint out of the way before lowering the display into the rear case of your iMac.

  12. この手順は未翻訳です。 翻訳を手伝う。

    : 手順 12、 2の画像 1 : 手順 12、 2の画像 2
    この手順で使用する道具:
    TR10 Torx Security Screwdriver
    $5.99
    購入する
    • Allow the EMI shield to hang down from the display.

    • Remove the four 8 mm with 2 mm thick head coarse-thread T10 Torx screws securing the display to the rear case.

    • These screws are recessed, so a thin screwdriver such as this is essential for removal. Bit drivers tend to be too short for this application.

    • It is strongly recommended to use a magnetized screwdriver so the screws won't fall into the iMac.

  13. この手順は未翻訳です。 翻訳を手伝う。

    : 手順 13、 1の画像 1
    • Lift the display from its lower edge and pull it toward yourself to peel off the EMI shield attached to its top edge.

    • Be mindful of any cables that may get caught during removal.

  14. この手順は未翻訳です。 翻訳を手伝う。

    , ハードドライブ: 手順 14、 1の画像 1
    • De-route the bundle of power supply cables from behind the hard drive bracket.

  15. この手順は未翻訳です。 翻訳を手伝う。

    : 手順 15、 3の画像 1 : 手順 15、 3の画像 2 : 手順 15、 3の画像 3
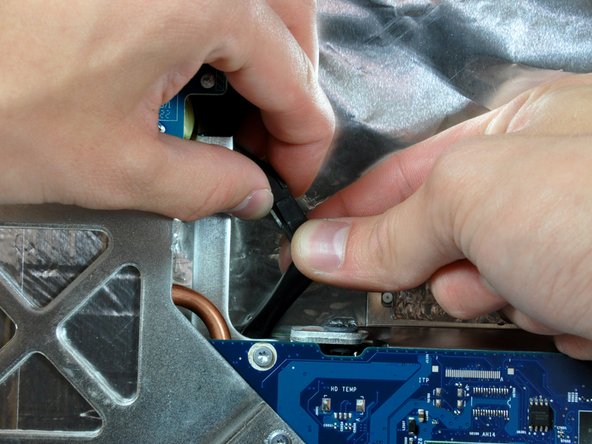
    • A hard drive thermal sensor may be present on some models. If your logic board is missing the hard drive thermal sensor socket highlighted in red in the first picture, skip this step.

    • Pull the hard drive thermal sensor connector away from its socket on the logic board.

    • Pull this connector parallel to the face of the logic board toward the top edge of the iMac.

    • Use a spudger to pry the thermal sensor and adhesive off the hard drive and install it in the same location on the replacement drive.

  16. この手順は未翻訳です。 翻訳を手伝う。

    : 手順 16、 1の画像 1
    • Press the hard drive bracket down to free it from the rear case, then rotate the top of the drive toward yourself.

    • Pressing the top of the hard drive bracket down to release it from the rear case requires a substantial amount of force, so we recommend laying your iMac stand-side down on a table to avoid knocking it over.

    • If you have trouble releasing the hard drive bracket, it can be removed from the hard drive, by removing the two T8 or T10 Torx screws securing the bracket to the drive.

  17. この手順は未翻訳です。 翻訳を手伝う。

    : 手順 17、 2の画像 1 : 手順 17、 2の画像 2
    • Lift the hard drive off its lower pins and pull it out of the rear case, minding the power supply cables that may get caught.

    • When reinstalling your hard drive, be careful not to push the two rubber grommets through their holes in the chassis. Retrieving them would require removing the logic board.

  18. この手順は未翻訳です。 翻訳を手伝う。

    : 手順 18、 2の画像 1 : 手順 18、 2の画像 2
    • Insert a spudger between the SATA connectors and twist it to separate the connector from the hard drive.

    • Disconnect both SATA connectors.

  19. この手順は未翻訳です。 翻訳を手伝う。

    : 手順 19、 1の画像 1
    • The next few steps bring your hands close to the exposed face of the power supply. Do not touch the face of the power supply to avoid a high voltage shock from the many large capacitors attached to the board.

    • Unplug the power supply cable bundle from the logic board by simultaneously depressing the locking mechanism (toward yourself) with a spudger and pulling the connector away from its socket.

    • The locking mechanism faces the rear case.

  20. この手順は未翻訳です。 翻訳を手伝う。

    : 手順 20、 1の画像 1
    • If necessary, remove the piece of tape holding the AC-in cable under the chassis.

  21. この手順は未翻訳です。 翻訳を手伝う。

    : 手順 21、 2の画像 1 : 手順 21、 2の画像 2
    • Use a pair of tweezers to pull the AC-in cable out from underneath the chassis.

    • Disconnect the AC-in cable by simultaneously depressing its locking mechanism and pulling the connector away from its socket.

  22. この手順は未翻訳です。 翻訳を手伝う。

    : 手順 22、 1の画像 1
    • Remove the four T10 Torx screws securing the power supply to the rear case.

    • Two 14mm fine-thread screws on the right.

    • One 14mm coarse-thread screw in lower left corner.

    • One 20mm coarse-thread screw in upper left corner.

  23. : 手順 23、 1の画像 1
    • ACインレットケーブルがシャーシに巻き込まれないよう注意しながら、リアケースから電源を持ち上げます。

ゴール

57 の人々がこのガイドを完成させました。

以下の翻訳者の皆さんにお礼を申し上げます:

en jp

11%

railgunさんは世界中で修理する私たちを助けてくれています! あなたも貢献してみませんか?
翻訳を始める ›

作成者

6人の作成者と共同で作成されました。

Walter Galan

694,756 ポイント

1,203のガイドは作成済み

5 件のコメント

It was quite easy, but a little fiddly. I didn't need to remove the hardrive to replace the power supply.

cjmaxwell - 返信

The PSU in the 17” is smaller than shown and has the DC - DC convertor above it.

Marcus Evans - 返信

DC - DC convertor is above the psu in the 17” model and the psu is half the size than that shown.

Marcus Evans - 返信

I wanna try this because my imac no longer turns on, but i dont know if its my power supply. I press the power button and it turns on barely for a second and then turn off completely. it makes the sound when a mac turns on and the screen turns on for a sec…..what should I do?

Jess - 返信

@jess : Check this out: My iMac will not turn on? – it explains how to read the diagnostic LEDs.

Ernst de Haan - 返信

コメントを追加

統計データ:

過去 24時間: 2

過去 7 日: 13

過去 30 日: 27

今までの合計 44,600