メインコンテンツにスキップ

このバージョンは誤った内容を含んでいる可能性があります。最新の承認済みスナップショットに切り替えてください。

必要な工具と部品

  1. この手順は未翻訳です。 翻訳を手伝う。

    : 手順 1、 2の画像 1 : 手順 1、 2の画像 2
    • Place the computer monitor face down on a safe, harmless surface.

    • Using a Phillips #00 screw driver, remove the four 6.86 mm screws from the metal plate.

  2. この手順は未翻訳です。 翻訳を手伝う。

    : 手順 2、 1の画像 1
    • Remove the metal plate from bottom of the iMac G4.

    • The four screws do not completely separate from the metal plate.

  3. この手順は未翻訳です。 翻訳を手伝う。

    : 手順 3、 2の画像 1 : 手順 3、 2の画像 2
    • Release the tabs on each side of the module by simultaneously pushing each tab away from the RAM.

    • These tabs lock the module in place and releasing them will cause the module to "pop" up.

    • Remove the RAM module from the iMac.

  4. この手順は未翻訳です。 翻訳を手伝う。

    : 手順 4、 1の画像 1
    • Use a spudger to lift and remove the AirPort's antenna connector.

    • This step is only applicable to iMacs that came with an AirPort card installed.

  5. この手順は未翻訳です。 翻訳を手伝う。

    : 手順 5、 1の画像 1
    • Remove the four 28.07mm Torx #15 screws from the lower case.

  6. この手順は未翻訳です。 翻訳を手伝う。

    : 手順 6、 2の画像 1 : 手順 6、 2の画像 2
    • Open the base by carefully pulling straight off, do not rotate the cover.

    • Open slowly to ensure that no cables are damaged or disconnected.

  7. この手順は未翻訳です。 翻訳を手伝う。

    : 手順 7、 1の画像 1
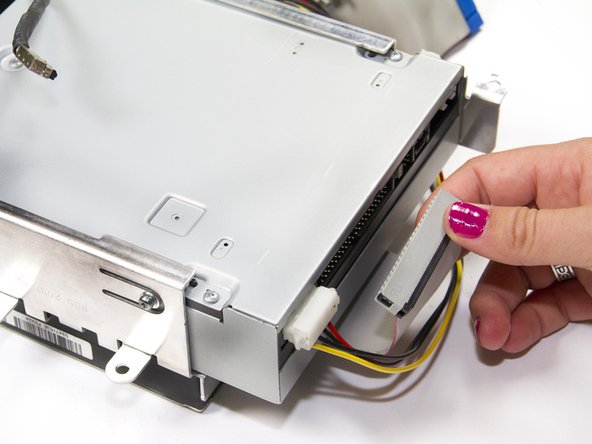
    • Squeeze the small black tab and wiggle gently to remove the colored power cable.

    • Do not pull directly on the colored wires.

    • Do not remove black grounding wire.

  8. この手順は未翻訳です。 翻訳を手伝う。

    : 手順 8、 1の画像 1
    • Grab both sides of the blue connector and firmly pull to remove it from the mother board.

    • Do not pull directly on the ribbon cable.

  9. この手順は未翻訳です。 翻訳を手伝う。

    : 手順 9、 2の画像 1 : 手順 9、 2の画像 2
    • Using a Torx #9 screw driver, remove the two 8.77mm screws holding the drive's shield onto your iMac G4.

    • Remove the drive shield from your iMac.

  10. この手順は未翻訳です。 翻訳を手伝う。

    : 手順 10、 1の画像 1
    • Using a Torx # 10 screw driver, remove the four 19.12mm screws that mount the optical drive.

  11. この手順は未翻訳です。 翻訳を手伝う。

    : 手順 11、 1の画像 1
    • Grasp the HD/Optical Drive bundle by the by the sides and gently wiggle it loose from the sides.

    • Ensure there are no wires passing over the top of the drive bundle when removing it, as it may unintentionally disconnect something.

  12. この手順は未翻訳です。 翻訳を手伝う。

    : 手順 12、 1の画像 1
    • Unplug the power source from the optical drive by pinching the plastic base of the connector and wiggling it gently.

    • Do not use excessive force, or pull on the wires directly, in order to unplug the connector from the drive.

  13. この手順は未翻訳です。 翻訳を手伝う。

    : 手順 13、 1の画像 1
    • Unplug the ribbon cable from the optical drive by grasping the plastic base of the connector and wiggling it gently.

    • Do not pull on the ribbon cable directly.

  14. この手順は未翻訳です。 翻訳を手伝う。

    : 手順 14、 1の画像 1
    • Remove the four 6.75mm Torx # 10 screws mounting the drive.

    • There are two screws on both sides of drive mount.

  15. この手順は未翻訳です。 翻訳を手伝う。

    : 手順 15、 1の画像 1
    • Slide the optical drive out from the metal support mounted to hard drive.

  16. この手順は未翻訳です。 翻訳を手伝う。

    : 手順 16、 2の画像 1 : 手順 16、 2の画像 2
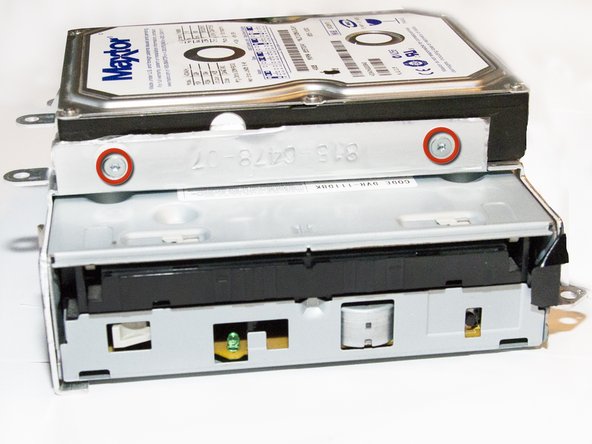
    • Using a Torx #10 screw driver, remove the four 6.03mm screws mounting the hard drive to the assembly.

    • There are two screws mounting the drive on each side.

  17. この手順は未翻訳です。 翻訳を手伝う。

    : 手順 17、 1の画像 1
    • Slide the hard drive out of the assembly.

  18. この手順は未翻訳です。 翻訳を手伝う。

    : 手順 18、 1の画像 1
    • Unplug the power connection from the Hard Drive by pinching the white plastic connector and wiggling gently.

    • Do not pull directly on the colored wires.

ゴール

37 の人々がこのガイドを完成させました。

作成者

6人の作成者と共同で作成されました。

Elliot Freerks

メンバー登録日: 10/04/11

887 ポイント

3のガイドは作成済み

チーム

Cal Poly, Team 5-32, Amido Fall 2011 Cal Poly, Team 5-32, Amido Fall 2011人のメンバー

CPSU-AMIDO-F11S5G32

4 メンバー

8のガイドは作成済み

2 件のコメント

This guide was very easy to follow and to the point. Thank you so very much for putting your time in creating it, you helped me! :-)

Elias Laleo - 返信

What kind of hard drive would you need to get?

Jacob Vaughan - 返信

コメントを追加

統計データ:

過去 24時間: 6

過去 7 日: 24

過去 30 日: 105

今までの合計 28,974