メインコンテンツにスキップ

この修理ガイドは変更されています。最新の未承認バージョンに切り替えます。

iMac G4 15" 700 MHz EMC 1873 Hard Drive Replacement

必要な工具と部品

  1. iMac G4 15" 700 MHz EMC 1873 Hard Drive Replacement, Outer Base Plate: 手順 1、 2の画像 1 iMac G4 15" 700 MHz EMC 1873 Hard Drive Replacement, Outer Base Plate: 手順 1、 2の画像 2
    • Place the computer monitor face down on a safe, harmless surface.

    • Using a Phillips #00 screw driver, remove the four 6.86 mm screws from the metal plate.

  2. iMac G4 15" 700 MHz EMC 1873 Hard Drive Replacement: 手順 2、 1の画像 1
    • Remove the metal plate from bottom of the iMac G4.

    • The four screws do not completely separate from the metal plate.

  3. iMac G4 15" 700 MHz EMC 1873 Hard Drive Replacement, RAM DIMM: 手順 3、 2の画像 1 iMac G4 15" 700 MHz EMC 1873 Hard Drive Replacement, RAM DIMM: 手順 3、 2の画像 2
    • Release the tabs on each side of the module by simultaneously pushing each tab away from the RAM.

    • These tabs lock the module in place and releasing them will cause the module to "pop" up.

    • Remove the RAM module from the iMac.

    You to not need to remove the RAM to complete this task.

    douglux - 返信

  4. iMac G4 15" 700 MHz EMC 1873 Hard Drive Replacement, AirPort Card: 手順 4、 1の画像 1
    • Use a spudger to lift and remove the AirPort's antenna connector.

    • This step is only applicable to iMacs that came with an AirPort card installed.

  5. iMac G4 15" 700 MHz EMC 1873 Hard Drive Replacement, Removing the Lower Case: 手順 5、 1の画像 1
    • Remove the four 28.07mm Torx #15 screws from the lower case.

  6. iMac G4 15" 700 MHz EMC 1873 Hard Drive Replacement: 手順 6、 2の画像 1 iMac G4 15" 700 MHz EMC 1873 Hard Drive Replacement: 手順 6、 2の画像 2
    • Open the base by carefully pulling straight off, do not rotate the cover.

    • Open slowly to ensure that no cables are damaged or disconnected.

    You can skip steps 7-9; there is no need to disconnect any internal wiring or RAM. Crack open the base a couple of inches (it doesn't really rotate, just pull it out), and the PRAM battery will be right under your nose. It's no problem to pop it out with your fingers and put the new one in. Just make sure that you note the positive and negative terminals on the old one, and put the new one in the same way.

    whshep - 返信

    No one mentioned the need for thermal paste in the reassembly...

    Federico Jimenez -

    Thermal paste? Where would you put that? As I understand it there's no need for that anywhere other than the CPU/Heatsync

    Steven Hatch -

    There's a post (or block really) that connects the cpu heatsink to the upper part of the metal shell that is just to the right (facing the imac) of the drive door. Upon reassembly it's best to clean the matching surfaces and reapply thermal paste to that upper post.

    Joe Pena -

    what's with the apparent loose black wire visible in step 6 & 7 ?? same as the loose wire just sitting there in step 3 ( which was like that on mine, just loose.....? )

    rickcee44 - 返信

    I hear that wire is bluetooth hook up.. my model has the other side but my board doesn't have the hook up... go fig :(

    sean -

    agreed with whshep. I did not disconnect these cables to complete this repair.

    douglux - 返信

  7. iMac G4 15" 700 MHz EMC 1873 Hard Drive Replacement: 手順 7、 1の画像 1
    • Squeeze the small black tab and wiggle gently to remove the colored power cable.

    • Do not pull directly on the colored wires.

    • Do not remove black grounding wire.

    The black tab is in in the middle of the plug (facing us in the photo.) Pushing not very hard on the top unlatches the bottom.

    Matt D - 返信

    I got away with not disconnecting these cables and was still able to complete the repair.

    douglux - 返信

    What if I remove the grounding cable

    Roman - 返信

  8. iMac G4 15" 700 MHz EMC 1873 Hard Drive Replacement: 手順 8、 1の画像 1
    • Grab both sides of the blue connector and firmly pull to remove it from the mother board.

    • Do not pull directly on the ribbon cable.

    It's a bit vague. That is, it explains where and how the memory module fits, but most importantly it does not. What type of DIMM memory it has to be and its speed as well as the process of not touching hands with the gold connectors of the memory module

    Carlos Sousa - 返信

    I left this connected as well. Was able to complete the repair with it connected.

    douglux - 返信

    What is this ribbon called? I need a new one and don’t know where to find one.

    Ian Young - 返信

  9. iMac G4 15" 700 MHz EMC 1873 Hard Drive Replacement, Optical Drive: 手順 9、 2の画像 1 iMac G4 15" 700 MHz EMC 1873 Hard Drive Replacement, Optical Drive: 手順 9、 2の画像 2
    • Using a Torx #9 screw driver, remove the two 8.77mm screws holding the drive's shield onto your iMac G4.

    • Remove the drive shield from your iMac.

  10. iMac G4 15" 700 MHz EMC 1873 Hard Drive Replacement: 手順 10、 1の画像 1
    • Using a Torx # 10 screw driver, remove the four 19.12mm screws that mount the optical drive.

  11. iMac G4 15" 700 MHz EMC 1873 Hard Drive Replacement: 手順 11、 1の画像 1
    • Grasp the HD/Optical Drive bundle by the by the sides and gently wiggle it loose from the sides.

    • Ensure there are no wires passing over the top of the drive bundle when removing it, as it may unintentionally disconnect something.

    This was in there pretty tightly. Had to pull hard and wiggle A LOT to get it out.

    douglux - 返信

  12. iMac G4 15" 700 MHz EMC 1873 Hard Drive Replacement: 手順 12、 1の画像 1
    • Unplug the power source from the optical drive by pinching the plastic base of the connector and wiggling it gently.

    • Do not use excessive force, or pull on the wires directly, in order to unplug the connector from the drive.

    I had a lot of trouble removing the power source cable. Ultimately needed to use needle nose plyers carefully applied around the cables.

    douglux - 返信

  13. iMac G4 15" 700 MHz EMC 1873 Hard Drive Replacement: 手順 13、 1の画像 1
    • Unplug the ribbon cable from the optical drive by grasping the plastic base of the connector and wiggling it gently.

    • Do not pull on the ribbon cable directly.

  14. iMac G4 15" 700 MHz EMC 1873 Hard Drive Replacement: 手順 14、 1の画像 1
    • Remove the four 6.75mm Torx # 10 screws mounting the drive.

    • There are two screws on both sides of drive mount.

  15. iMac G4 15" 700 MHz EMC 1873 Hard Drive Replacement: 手順 15、 1の画像 1
    • Slide the optical drive out from the metal support mounted to hard drive.

    I had some difficulty sliding the new drive in the bracket. It got about half way in and then wouldn’t go further. I couldn’t see what it was getting stuck on. I ended up pushing it thru somewhat forcefully/quickly but it worked.

    douglux - 返信

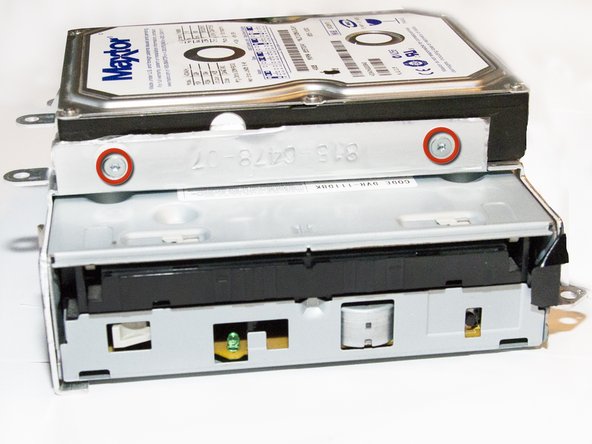
    I replaced the optical drive and hard drive (with an SSD) at the same time. When I put it all back together the new hard drive did not work. Turns out you need to set the pins on the optical drive to “SL” (which horribly stands for slave) from the default MA (master) to get this to work.

    douglux - 返信

  16. iMac G4 15" 700 MHz EMC 1873 Hard Drive Replacement, Hard Drive: 手順 16、 2の画像 1 iMac G4 15" 700 MHz EMC 1873 Hard Drive Replacement, Hard Drive: 手順 16、 2の画像 2
    • Using a Torx #10 screw driver, remove the four 6.03mm screws mounting the hard drive to the assembly.

    • There are two screws mounting the drive on each side.

  17. iMac G4 15" 700 MHz EMC 1873 Hard Drive Replacement: 手順 17、 1の画像 1
    • Slide the hard drive out of the assembly.

  18. iMac G4 15" 700 MHz EMC 1873 Hard Drive Replacement: 手順 18、 1の画像 1
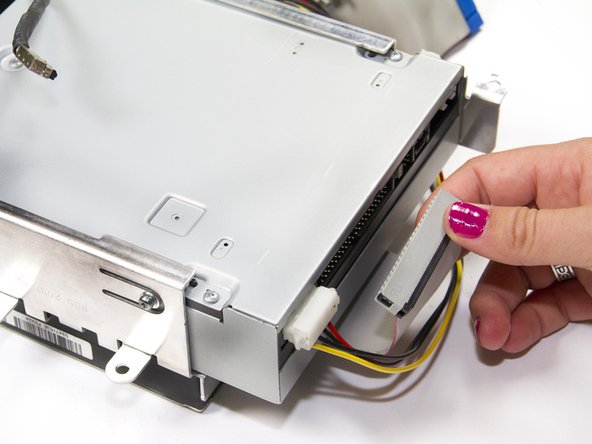
    • Unplug the power connection from the Hard Drive by pinching the white plastic connector and wiggling gently.

    • Do not pull directly on the colored wires.

    I replaced the stock hard drive with an SSD. After the install the Mac didn’t recognize the new SSD. After some troubleshooting it seems that the drive was formatted in such a way that the Mac restore CDs didn’t know what do do with it. I connected in target mode via firewire to another Mac running OS 9 which immediately mounted the new SSD and ran disc setup. Formatted the new drive as Mac OS extended and then tried to run the install CDs again which worked flawlessly. If able, I would recommend formatting the drive ahead of time to save time and panic.

    douglux - 返信

終わりに

To reassemble your device, follow these instructions in reverse order.

37 の人々がこのガイドを完成させました。

作成者

6人の作成者と共同で作成されました。

Elliot Freerks

メンバー登録日: 10/04/11

887 ポイント

3のガイドは作成済み

チーム

Cal Poly, Team 5-32, Amido Fall 2011 Cal Poly, Team 5-32, Amido Fall 2011人のメンバー

CPSU-AMIDO-F11S5G32

4 メンバー

8のガイドは作成済み

2 件のコメント

This guide was very easy to follow and to the point. Thank you so very much for putting your time in creating it, you helped me! :-)

Elias Laleo - 返信

What kind of hard drive would you need to get?

Jacob Vaughan - 返信

コメントを追加

統計データ:

過去 24時間: 1

過去 7 日: 24

過去 30 日: 105

今までの合計 28,974