メインコンテンツにスキップ

iMac G4 15" 700 MHz EMC 1873 Hard Drive Replacement

必要な工具と部品

  1. iMac G4 15" 700 MHz EMC 1873 Hard Drive Replacement, Outer Base Plate: 手順 1、 2の画像 1 iMac G4 15" 700 MHz EMC 1873 Hard Drive Replacement, Outer Base Plate: 手順 1、 2の画像 2
    • Place the computer monitor face down on a safe, harmless surface.

    • Using a Phillips #00 screw driver, remove the four 6.86 mm screws from the metal plate.

  2. iMac G4 15" 700 MHz EMC 1873 Hard Drive Replacement: 手順 2、 1の画像 1
    • Remove the metal plate from bottom of the iMac G4.

    • The four screws do not completely separate from the metal plate.

  3. iMac G4 15" 700 MHz EMC 1873 Hard Drive Replacement, RAM DIMM: 手順 3、 2の画像 1 iMac G4 15" 700 MHz EMC 1873 Hard Drive Replacement, RAM DIMM: 手順 3、 2の画像 2
    • Release the tabs on each side of the module by simultaneously pushing each tab away from the RAM.

    • These tabs lock the module in place and releasing them will cause the module to "pop" up.

    • Remove the RAM module from the iMac.

  4. iMac G4 15" 700 MHz EMC 1873 Hard Drive Replacement, AirPort Card: 手順 4、 1の画像 1
    • Use a spudger to lift and remove the AirPort's antenna connector.

    • This step is only applicable to iMacs that came with an AirPort card installed.

  5. iMac G4 15" 700 MHz EMC 1873 Hard Drive Replacement, Removing the Lower Case: 手順 5、 1の画像 1
    • Remove the four 28.07mm Torx #15 screws from the lower case.

  6. iMac G4 15" 700 MHz EMC 1873 Hard Drive Replacement: 手順 6、 2の画像 1 iMac G4 15" 700 MHz EMC 1873 Hard Drive Replacement: 手順 6、 2の画像 2
    • Open the base by carefully pulling straight off, do not rotate the cover.

    • Open slowly to ensure that no cables are damaged or disconnected.

  7. iMac G4 15" 700 MHz EMC 1873 Hard Drive Replacement: 手順 7、 1の画像 1
    • Squeeze the small black tab and wiggle gently to remove the colored power cable.

    • Do not pull directly on the colored wires.

    • Do not remove black grounding wire.

  8. iMac G4 15" 700 MHz EMC 1873 Hard Drive Replacement: 手順 8、 1の画像 1
    • Grab both sides of the blue connector and firmly pull to remove it from the mother board.

    • Do not pull directly on the ribbon cable.

  9. iMac G4 15" 700 MHz EMC 1873 Hard Drive Replacement, Optical Drive: 手順 9、 2の画像 1 iMac G4 15" 700 MHz EMC 1873 Hard Drive Replacement, Optical Drive: 手順 9、 2の画像 2
    • Using a Torx #9 screw driver, remove the two 8.77mm screws holding the drive's shield onto your iMac G4.

    • Remove the drive shield from your iMac.

  10. iMac G4 15" 700 MHz EMC 1873 Hard Drive Replacement: 手順 10、 1の画像 1
    • Using a Torx # 10 screw driver, remove the four 19.12mm screws that mount the optical drive.

  11. iMac G4 15" 700 MHz EMC 1873 Hard Drive Replacement: 手順 11、 1の画像 1
    • Grasp the HD/Optical Drive bundle by the by the sides and gently wiggle it loose from the sides.

    • Ensure there are no wires passing over the top of the drive bundle when removing it, as it may unintentionally disconnect something.

  12. iMac G4 15" 700 MHz EMC 1873 Hard Drive Replacement: 手順 12、 1の画像 1
    • Unplug the power source from the optical drive by pinching the plastic base of the connector and wiggling it gently.

    • Do not use excessive force, or pull on the wires directly, in order to unplug the connector from the drive.

  13. iMac G4 15" 700 MHz EMC 1873 Hard Drive Replacement: 手順 13、 1の画像 1
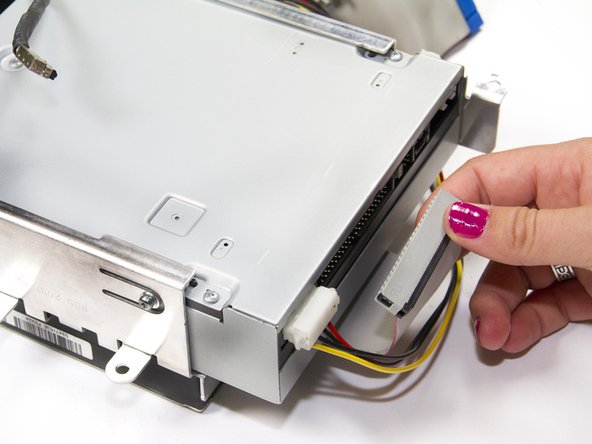
    • Unplug the ribbon cable from the optical drive by grasping the plastic base of the connector and wiggling it gently.

    • Do not pull on the ribbon cable directly.

  14. iMac G4 15" 700 MHz EMC 1873 Hard Drive Replacement: 手順 14、 1の画像 1
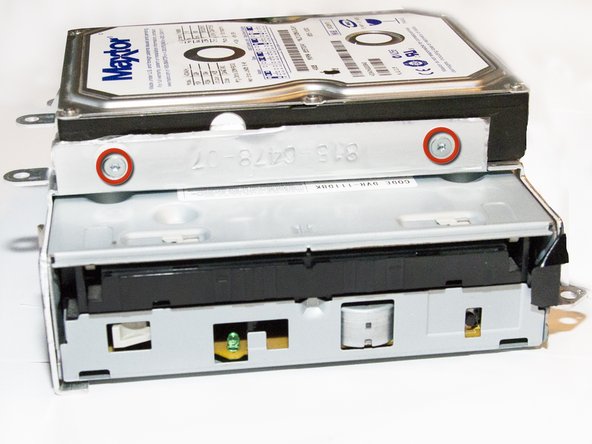
    • Remove the four 6.75mm Torx # 10 screws mounting the drive.

    • There are two screws on both sides of drive mount.

  15. iMac G4 15" 700 MHz EMC 1873 Hard Drive Replacement: 手順 15、 1の画像 1
    • Slide the optical drive out from the metal support mounted to hard drive.

  16. iMac G4 15" 700 MHz EMC 1873 Hard Drive Replacement, Hard Drive: 手順 16、 2の画像 1 iMac G4 15" 700 MHz EMC 1873 Hard Drive Replacement, Hard Drive: 手順 16、 2の画像 2
    • Using a Torx #10 screw driver, remove the four 6.03mm screws mounting the hard drive to the assembly.

    • There are two screws mounting the drive on each side.

  17. iMac G4 15" 700 MHz EMC 1873 Hard Drive Replacement: 手順 17、 1の画像 1
    • Slide the hard drive out of the assembly.

  18. iMac G4 15" 700 MHz EMC 1873 Hard Drive Replacement: 手順 18、 1の画像 1
    • Unplug the power connection from the Hard Drive by pinching the white plastic connector and wiggling gently.

    • Do not pull directly on the colored wires.

終わりに

To reassemble your device, follow these instructions in reverse order.

37 の人々がこのガイドを完成させました。

作成者

6人の作成者と共同で作成されました。

Elliot Freerks

メンバー登録日: 10/04/11

887 ポイント

3のガイドは作成済み

チーム

Cal Poly, Team 5-32, Amido Fall 2011 Cal Poly, Team 5-32, Amido Fall 2011人のメンバー

CPSU-AMIDO-F11S5G32

4 メンバー

8のガイドは作成済み

2 件のコメント

This guide was very easy to follow and to the point. Thank you so very much for putting your time in creating it, you helped me! :-)

Elias Laleo - 返信

What kind of hard drive would you need to get?

Jacob Vaughan - 返信

コメントを追加

統計データ:

過去 24時間: 4

過去 7 日: 28

過去 30 日: 118

今までの合計 28,864