メインコンテンツにスキップ

このバージョンは誤った内容を含んでいる可能性があります。最新の承認済みスナップショットに切り替えてください。

必要な工具と部品

  1. この手順は未翻訳です。 翻訳を手伝う。

    : 手順 1、 1の画像 1
    • The iMac G3. This was a great computer for the time, and had plenty of features.

  2. この手順は未翻訳です。 翻訳を手伝う。

    : 手順 2、 1の画像 1
    • Start by flipping the iMac upside-down. It may help to lay it on a towel, so you don't damage the screen, or scratch the face.

  3. この手順は未翻訳です。 翻訳を手伝う。

    : 手順 3、 3の画像 1 : 手順 3、 3の画像 2 : 手順 3、 3の画像 3
    • Remove this Phillips screw.

    • Using a flathead screwdriver, work your way around the bottom cover, until it comes off.

    • Then, lift the bottom cover up and out, and set it aside.

  4. この手順は未翻訳です。 翻訳を手伝う。

    : 手順 4、 3の画像 1 : 手順 4、 3の画像 2 : 手順 4、 3の画像 3
    • Now, remove the DB-15 Video connector from the logic board.

    • It may be helpful to use a Phillips screwdriver to remove the thumbscrews.

  5. この手順は未翻訳です。 翻訳を手伝う。

    : 手順 5、 3の画像 1 : 手順 5、 3の画像 2 : 手順 5、 3の画像 3
    • Remove the power cable from the logic board assembly.

  6. この手順は未翻訳です。 翻訳を手伝う。

    : 手順 6、 2の画像 1 : 手順 6、 2の画像 2
    • Remove the front panel connector. (You may also need to remove an additional screw that connects the front panel connector to the logic board assembly).

  7. この手順は未翻訳です。 翻訳を手伝う。

    : 手順 7、 3の画像 1 : 手順 7、 3の画像 2 : 手順 7、 3の画像 3
    • Now, remove these Phillips screws.

    • Now, grab the logic board assembly by the piece of plastic, and lift it out.

  8. この手順は未翻訳です。 翻訳を手伝う。

    : 手順 8、 1の画像 1
    • The logic board assembly. This is the heart of the computer, it contains the motherboard, CPU, RAM, V-RAM, PRAM battery, the hard drive, and the optical drive.

  9. この手順は未翻訳です。 翻訳を手伝う。

    : 手順 9、 1の画像 1
    • Now to remove the optical drive!

  10. この手順は未翻訳です。 翻訳を手伝う。

    : 手順 10、 1の画像 1
    • The optical drive is located near the front of the assembly.

  11. この手順は未翻訳です。 翻訳を手伝う。

    : 手順 11、 3の画像 1 : 手順 11、 3の画像 2 : 手順 11、 3の画像 3
    • To remove the drive, push it in, lift up, and then pull forward.

    • As you pull the drive forward, disconnect the ribbon cable and set it aside.

  12. この手順は未翻訳です。 翻訳を手伝う。

    : 手順 12、 3の画像 1 : 手順 12、 3の画像 2 : 手順 12、 3の画像 3
    • Remove the two phillips #00 screws.

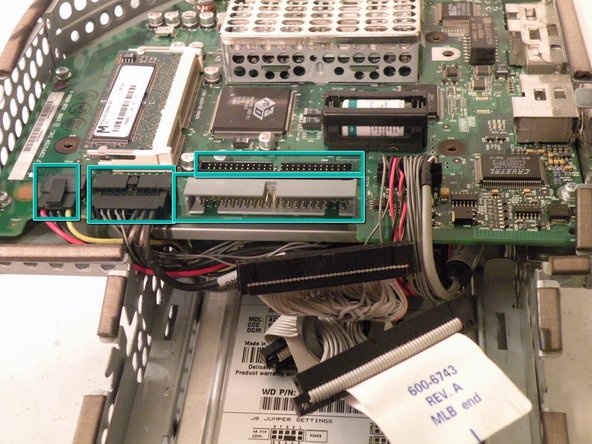
    • Then remove the board. This will reveal that it is a standard PATA drive.

    • Congrats, the drive is free! You can use any PATA-tray loading drive in the iMac G3 which means you can install a CDRW to burn CDs in OS9 or X(if using OSX,install that DVD writer) but, of course only original drives will match the great look of the iMac).

  13. この手順は未翻訳です。 翻訳を手伝う。

    : 手順 13、 1の画像 1
    • Hard Drive Removal:

  14. この手順は未翻訳です。 翻訳を手伝う。

    : 手順 14、 2の画像 1 : 手順 14、 2の画像 2
    • Start by removing these Phillips screws:

    • Now, remove all of these cables:

  15. この手順は未翻訳です。 翻訳を手伝う。

    : 手順 15、 2の画像 1 : 手順 15、 2の画像 2
    • Now, remove the optical drive retention spring.

    • Push in on both sides, and pull towards you releasing the retention spring.

    • It may help to do it one side at a time.

  16. この手順は未翻訳です。 翻訳を手伝う。

    : 手順 16、 3の画像 1 : 手順 16、 3の画像 2 : 手順 16、 3の画像 3
    • Now lift the drive up, and pull it out.

    • Make sure that no cables are snagged before completed pulling out the drive!

  17. この手順は未翻訳です。 翻訳を手伝う。

    : 手順 17、 1の画像 1
    • When installing a new drive, make sure that the drive jumper block is set to "Single drive". In most drives, this means removing the jumper, or positioning the jumper horizontally instead of vertically, so you don't lose it.

    • To remove the drive from the metal caddy, remove these four screws from the side of the drive.

ゴール

39 の人々がこのガイドを完成させました。

作成者

3人の作成者と共同で作成されました。

Chris Green

メンバー登録日: 10/11/09

37,014 ポイント

49のガイドは作成済み

チーム

Master Techs Master Techs人のメンバー

Community

322 メンバー

2,539のガイドは作成済み

8 件のコメント

great description, great photos

antiquarian1 - 返信

Many thanks. Worked perfectly.

Bob Schowalter - 返信

is the hard disk on a mac interchangeable to iMac 4984 from iMac M5521? Power supply failed on M5521. thx

alexa pritchard - 返信

Çok güzel. Makul bir para ödemesi yapabilirim.

Erdog ̆an Tas ̧cı - 返信

Thank you so much! My grandmother finally decided to throw hers away but she wanted the hard drive and I got it for her with your help!!!

Heather Hall - 返信

コメントを追加

統計データ:

過去 24時間: 10

過去 7 日: 74

過去 30 日: 250

今までの合計 49,004