メインコンテンツにスキップ

iLive IKBC384S Motherboard Replacement

必要な工具と部品

  1. iLive IKBC384S Motherboard Replacement, Top Cover: 手順 1、 2の画像 1 iLive IKBC384S Motherboard Replacement, Top Cover: 手順 1、 2の画像 2
    • Make sure you remove all seven 3 mm screws before proceeding to the next step.

  2. iLive IKBC384S Motherboard Replacement: 手順 2、 2の画像 1 iLive IKBC384S Motherboard Replacement: 手順 2、 2の画像 2
    • Use iOpener or heat gun on all sides except the front.

  3. iLive IKBC384S Motherboard Replacement: 手順 3、 2の画像 1 iLive IKBC384S Motherboard Replacement: 手順 3、 2の画像 2
    • Be cautious when taking the top of the device off there may still be some adhesive stuck to device.

    • The top of the device will be very difficult to remove because of the adhesive holding it together.

  4. iLive IKBC384S Motherboard Replacement, Motherboard: 手順 4、 1の画像 1
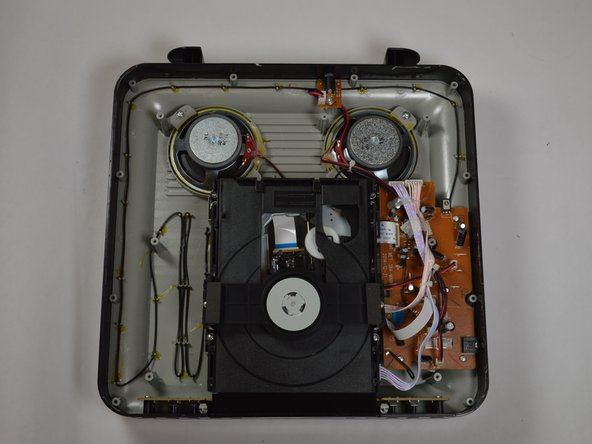
    • After removing the top of the device, locate the screws on the motherboard. Gently unscrew all four of the 3.5mm screws on the motherboard.

  5. iLive IKBC384S Motherboard Replacement: 手順 5、 2の画像 1 iLive IKBC384S Motherboard Replacement: 手順 5、 2の画像 2
    • Unplug the ribbon cable connected to the motherboard that stems from the disc drive.

    • Disconnect the two power connectors from the motherboard.

  6. iLive IKBC384S Motherboard Replacement: 手順 6、 1の画像 1
    • You will need to desolder the antenna.

    • Be sure to desolder the piece connected to the motherboard not the wire.

  7. iLive IKBC384S Motherboard Replacement: 手順 7、 1の画像 1
    • You will need to remove the speakers and power connector.

    • Once you have removed all of these from the motherboard, the motherboard can be removed

終わりに

To reassemble your device, follow these instructions in reverse order.

作成者

3人の作成者と共同で作成されました。

Tracy Walts

メンバー登録日: 03/21/17

201 ポイント

2のガイドは作成済み

チーム

Texas Tech, Team S46-G6, Bennett Spring 2017 Texas Tech, Team S46-G6, Bennett Spring 2017人のメンバー

TTU-BENNETT-S17S46G6

3 メンバー

6のガイドは作成済み

0 件のコメント

コメントを追加

統計データ:

過去 24時間: 0

過去 7 日: 0

過去 30 日: 0

今までの合計 265