メインコンテンツにスキップ

このバージョンは誤った内容を含んでいる可能性があります。最新の承認済みスナップショットに切り替えてください。

必要な工具と部品

  1. この手順は未翻訳です。 翻訳を手伝う。

    : 手順 1、 1の画像 1
    • Use a coin to rotate the battery locking screw 90 degrees clockwise.

    • Lift the battery out of the computer.

  2. この手順は未翻訳です。 翻訳を手伝う。

    : 手順 2、 1の画像 1
    • Use a pin to remove the three rubber feet from the lower case.

  3. この手順は未翻訳です。 翻訳を手伝う。

    : 手順 3、 1の画像 1
    • Remove the three newly-revealed Phillips screws.

  4. この手順は未翻訳です。 翻訳を手伝う。

    : 手順 4、 1の画像 1
    • Use a spudger or small flathead screwdriver to pry up the three metal rings that housed the rubber bumpers.

  5. この手順は未翻訳です。 翻訳を手伝う。

    : 手順 5、 1の画像 1
    • Remove the three hex screws using a T8 Torx screwdriver.

    • The screw in the center is shorter than the other two.

  6. この手順は未翻訳です。 翻訳を手伝う。

    : 手順 6、 1の画像 1
    • Remove the two Phillips screws on either side of the battery contacts.

  7. この手順は未翻訳です。 翻訳を手伝う。

    : 手順 7、 1の画像 1
    • Breathe deeply. Trying times are ahead, but we promise the lower case does come off.

    • Push the thin rims of the lower case surrounding the battery compartment in, bending them past the tabs, and then lift up to free that corner of the lower case.

  8. この手順は未翻訳です。 翻訳を手伝う。

    : 手順 8、 1の画像 1
    • There is a slot on the wall of the battery compartment that locks the lower case in place.

    • Use a small flathead screwdriver to pry out the slot's lower rim and pull up on the lower case to free the slot from the tabs holding it.

  9. この手順は未翻訳です。 翻訳を手伝う。

    : 手順 9、 1の画像 1
    • Run a spudger along the seam between the lower case and upper case on the front of the computer to free the tabs locking the lower case.

    • Pull up on the lower case and continue to use the spudger as necessary until you hear three distinct clicks.

  10. この手順は未翻訳です。 翻訳を手伝う。

    : 手順 10、 1の画像 1
    • Continue to run the spudger around the front, right corner.

    • There are two tabs on the port side of the computer, one near the front corner and one near the sound out port.

  11. この手順は未翻訳です。 翻訳を手伝う。

    : 手順 11、 1の画像 1
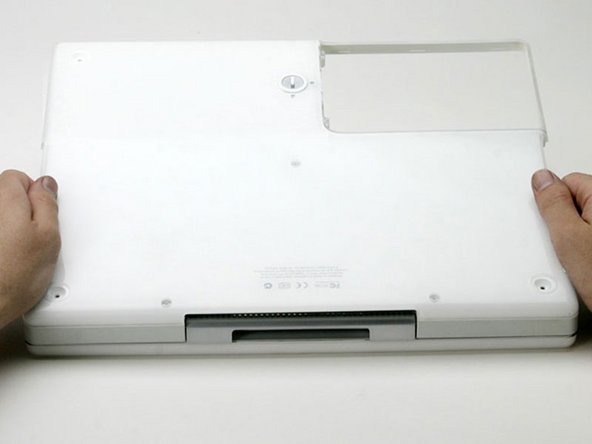
    • Once the front and sides of the lower case are free, turn the computer so that the back is facing you.

    • Pull the lower case up and toward you until the back tabs pop free.

    • It may be helpful to jiggle the case up and down.

  12. この手順は未翻訳です。 翻訳を手伝う。

    : 手順 12、 1の画像 1
    • Remove the small greasy springs with white plastic caps from either side of the battery contacts.

ゴール

2 の人々がこのガイドを完成させました。

作成者

5人の作成者と共同で作成されました。

iRobot

メンバー登録日: 09/24/09

1 ポイント

636のガイドは作成済み

0 件のコメント

コメントを追加

統計データ:

過去 24時間: 0

過去 7 日: 1

過去 30 日: 2

今までの合計 4,288