メインコンテンツにスキップ

asus laptop k75vm replacing the broken lcd cable Replacement

必要な工具と部品

  1. asus laptop k75vm replacing the broken lcd cable Replacement, replacing the broken lcd cable: 手順 1、 2の画像 1 asus laptop k75vm replacing the broken lcd cable Replacement, replacing the broken lcd cable: 手順 1、 2の画像 2
    • first remove the battery

  2. asus laptop k75vm replacing the broken lcd cable Replacement: 手順 2、 3の画像 1 asus laptop k75vm replacing the broken lcd cable Replacement: 手順 2、 3の画像 2 asus laptop k75vm replacing the broken lcd cable Replacement: 手順 2、 3の画像 3
    • remove the big cover , removing 3 screws

  3. asus laptop k75vm replacing the broken lcd cable Replacement: 手順 3、 3の画像 1 asus laptop k75vm replacing the broken lcd cable Replacement: 手順 3、 3の画像 2 asus laptop k75vm replacing the broken lcd cable Replacement: 手順 3、 3の画像 3
    • now , remove the DVD player by removing 1 screw.

    • keep track of the screws, make a map and tape the screws to your map..

    • Use a spudger to remove the dvd player.

  4. asus laptop k75vm replacing the broken lcd cable Replacement: 手順 4、 2の画像 1 asus laptop k75vm replacing the broken lcd cable Replacement: 手順 4、 2の画像 2
    • remove the RAM

  5. asus laptop k75vm replacing the broken lcd cable Replacement: 手順 5、 1の画像 1
    • remove the HDD bay and screws. ( 2 in my case..)

    • after removing the 2 black screws slide the HDD out.

  6. asus laptop k75vm replacing the broken lcd cable Replacement: 手順 6、 3の画像 1 asus laptop k75vm replacing the broken lcd cable Replacement: 手順 6、 3の画像 2 asus laptop k75vm replacing the broken lcd cable Replacement: 手順 6、 3の画像 3
    • now we will remove the screws from the case.

  7. asus laptop k75vm replacing the broken lcd cable Replacement: 手順 7、 1の画像 1
    • other screws from the case..

    • there are also 3 small screws hidden under the dvd bay. if you remove the dvd bay ( like in step before) you will see the 3 small screws. i don't have a picture of it.

  8. asus laptop k75vm replacing the broken lcd cable Replacement: 手順 8、 3の画像 1 asus laptop k75vm replacing the broken lcd cable Replacement: 手順 8、 3の画像 2 asus laptop k75vm replacing the broken lcd cable Replacement: 手順 8、 3の画像 3
    • now turn the laptop again and use a spudger te remove the upper case with the keyboard attached to it.

    • while removing : be carefull for the keyboard and touchpad connectors and ribbon cables...

  9. asus laptop k75vm replacing the broken lcd cable Replacement: 手順 9、 1の画像 1
    • remove the ribbon cables from the connector on the main board.

    • use a flat head screwdriver or a small plastic spudger to lift the small plastic lever from the connector upwards.

    • slide the cables away from the connector when te lever is "open" , and close the small lever again.

  10. asus laptop k75vm replacing the broken lcd cable Replacement: 手順 10、 1の画像 1
    • after removing the upper case ( holding the keyboard) you will see the main board ...

    • if you want to replace the keyboard : the keyboard is attached to the upper case , remove the screws from the metal frame and remove the old keyboard. always be carefull with the ribbon cable..

  11. asus laptop k75vm replacing the broken lcd cable Replacement: 手順 11、 3の画像 1 asus laptop k75vm replacing the broken lcd cable Replacement: 手順 11、 3の画像 2 asus laptop k75vm replacing the broken lcd cable Replacement: 手順 11、 3の画像 3
    • now we will loosen the cable's from the main board.

    • remove the DC jack cable connected to the connector on the main board.

    • Be careful when you do this, it is a very weak plastic connector ! i recommend using a small flathead screwdriver or a plastic spudger...

    • in the picture you see me using a IC axtractor, but i don't recommend it when you are not used to repair laptops...

    • when you are dealing with an broken DC jack , remove the whole cable ( black and red) running trough the plastic frame of the laptop...

  12. asus laptop k75vm replacing the broken lcd cable Replacement: 手順 12、 2の画像 1 asus laptop k75vm replacing the broken lcd cable Replacement: 手順 12、 2の画像 2
    • remvinf the LCD cable from the connector , use a IC extractor , be very gently doing this.. when you break or tear it , you will have screen problems...

    • remove the small connector next to the big lcd connector, it is the web cam connector.

  13. asus laptop k75vm replacing the broken lcd cable Replacement: 手順 13、 3の画像 1 asus laptop k75vm replacing the broken lcd cable Replacement: 手順 13、 3の画像 2 asus laptop k75vm replacing the broken lcd cable Replacement: 手順 13、 3の画像 3
    • remove the white big flat ribbon cable attached to the USB ( on the right) PCB.

    • again be careful and use a flat head screwdriver or a spudger to lift up the lever..

    • remove the audio cable from the connector , be careful if you tear the cables , you will have audio problems and there is a possibility that you will have BSOD ( blue screen of death) ...

    • remove the FAN cable from the connector , be very carefull because it are very tiny and breakeble cables...

  14. asus laptop k75vm replacing the broken lcd cable Replacement: 手順 14、 3の画像 1 asus laptop k75vm replacing the broken lcd cable Replacement: 手順 14、 3の画像 2 asus laptop k75vm replacing the broken lcd cable Replacement: 手順 14、 3の画像 3
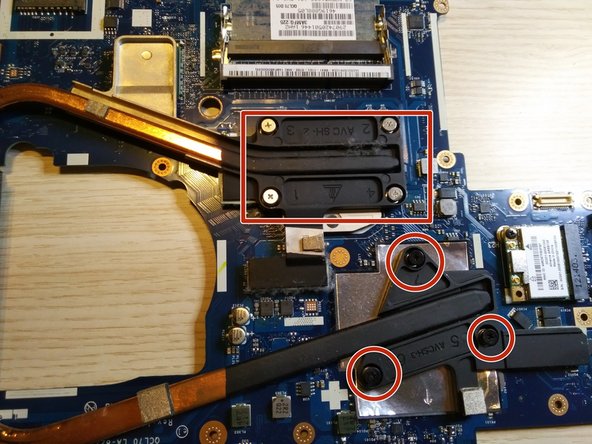
    • remove the 3 screws seen in picture 1

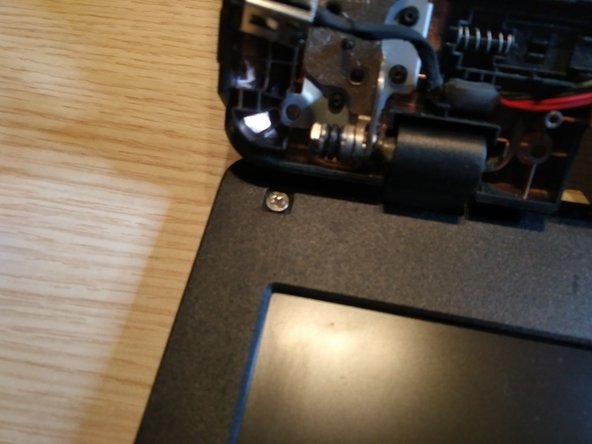
    • remove 1 screw on the left side from the LCD connector.

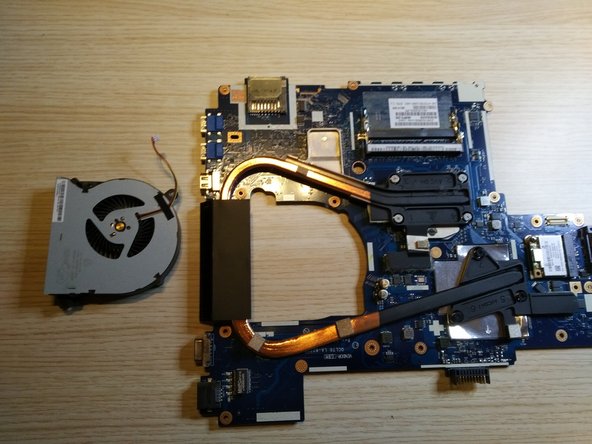
    • after that, you can slide the main board out. ( lift it up on the right side, then slide to the right and take it out. )

    • when you want to remove the fan as well ( or replace it) you have to remove 3 screws, see picture 3

  15. asus laptop k75vm replacing the broken lcd cable Replacement: 手順 15、 3の画像 1 asus laptop k75vm replacing the broken lcd cable Replacement: 手順 15、 3の画像 2 asus laptop k75vm replacing the broken lcd cable Replacement: 手順 15、 3の画像 3
    • after removing the main board you have a view of the henges from the screen.

    • in picture 2 you will see the main board. , you can clean and or replace the CPU now.

    • to replace a cpu or clean the pads you will have to remove the screws seen in picture 3 .

    • clean the pads with isopropyl alcohol and always renew the CPU thermal paste . ( one drop on each spot is enough)

  16. asus laptop k75vm replacing the broken lcd cable Replacement: 手順 16、 2の画像 1 asus laptop k75vm replacing the broken lcd cable Replacement: 手順 16、 2の画像 2
    • remove the 3 screws on each hinge

    • on the right hinge there is a metal hook attached on the hinge. this is attached to the bottom case .. just move the screen to release it.

  17. asus laptop k75vm replacing the broken lcd cable Replacement: 手順 17、 3の画像 1 asus laptop k75vm replacing the broken lcd cable Replacement: 手順 17、 3の画像 2 asus laptop k75vm replacing the broken lcd cable Replacement: 手順 17、 3の画像 3
    • remove the black square rubber to reveal the hidden screws.

    • there are 2 screws one on the bottom left and one on the bottom right.

    • after removing the scrws you can slide a spudger or opening tool arround the plastic frame.

  18. asus laptop k75vm replacing the broken lcd cable Replacement: 手順 18、 1の画像 1
    • once the plastic frame is removed , you can replace the screen , the LCD cable..

    • i don't have pictures anymore when i was removing the screen .. my apologies for that. but you can follow other guides to do that , cause it is all the same...

終わりに

To reassemble your device, follow these instructions in reverse order.

ある他の人がこのガイドを完成しました。

作成者

1人の作成者と共同作成されました。

Kevin D

メンバー登録日: 05/02/14

7,294 ポイント

21のガイドは作成済み

0 件のコメント

コメントを追加

統計データ:

過去 24時間: 0

過去 7 日: 6

過去 30 日: 12

今までの合計 5,865