はじめに
Immer wieder versucht sich der Cloud- und Software-Vertriebsgigant Valve in Sachen Hardware, siehe Steam Machine. Dieses Mal wollen sie mit dem Steam Controller unsere Spielgewohnheiten revolutionieren. Wir wurden in der Vergangenheit mit hochmodularer Technik beeindruckt, was uns neugierig auf das macht, was uns hier erwartet.
Wenn du schon hier bist, folge der iFixit-Crew auf
必要な工具と部品
-
-
Wir öffnen das Gerät und folgende Spezifikationen werden sichtbar:
-
Hochauflösendes haptisches Feedback
-
Dual-Trackpads
-
USB 2.0 via Mirco-USB Port
-
6-Achsen Bewegungssensor
-
Dual Analog Trigger mit digitalem Button bei vollständigem Durchdruck
-
Bis zu 80 Stunden an Spielzeit mit einem Paar AA-Batterien
-
5 Meter Reichweite bei drahtloser Kommunikation
-
-
-
Neben den vier Schrauben rund um die Batteriefächer finden sich unter dem Aufkleber 3 weiter T6 Torx-Schrauben.
-
Nachdem das hintere Gehäuse entfernt wurde, bekommen wir einen freien Blick auf die moosgrüne Platine.
I bought mine about 10 months ago and it does not have those additional srews under the paddle/battery cover. After unscrewing those 4 Torx on the handles I cannot remove the bottom of the cover without having to worry - it feels as if it rather breaks than become loose. Especially the areas under the usb port and around the release slider of the paddle do not seem to become loose at all. It seems as if they made minor changes to the design. Mine became a bit sticky while carrying it around and the steam button would get stuck when pressed. I wanted to clean the buttons but I really worry to break the thing. It is insanely tight even with those 4 Torx removed.
The info decal under the rear cover is extremely heavy-duty and makes it hard to see where the screws are, but rub your fingernail in the three spots shown. You should begin to see the indentations of the screw wells underneath the decal. Then, punch through the decal to access the screws.
Those two top T6 screws are too deep for my screwdriver to reach, I have the 64-bit set from ifixit. Kind of a shame..
Cas Eliëns - 返信
Doesn't come apart after removing screws
-
-
-
-
Hinter der Abdeckung finden wir ein paar Hebel für den Batterie-Auswurf - eine Besonderheit, die nur dieser Controller bietet.
-
Auch wenn Batterie-Auswurfhebel toll sind, interessiert es uns sehr, weshalb sich Valve gegen einen internen Akku entschieden hat.
-
Dieses Design schließt eine der meist am Ausfall verantwortlichen Komponente aus, verlängert die Lebenszeit des Steam Controllers und gibt uns die Wahl: Batterien oder Akkus. Die Zukunft unseres Planeten liegt sozusagen in deinen Händen.
They mention battery eject levers, how do you normally hit these levers to get the batteries out? Or do you just push them down and the levers are on a spring?
You press them up from the bottom. There are arrows below the release levers that should show what I mean.
This step forgets about 4 screws holding the motherboard in place.
Hi Mårten, as the banner at the top of this page states, this is a teardown meant for entertainment purposes. It is not meant to be followed as a repair guide.
Use this it is far more useful than this crappy guide. https://www.coloredcontrollers.com/blog/...
if its possible please go in to more detail with the battery eject levers I fix it
-
-
-
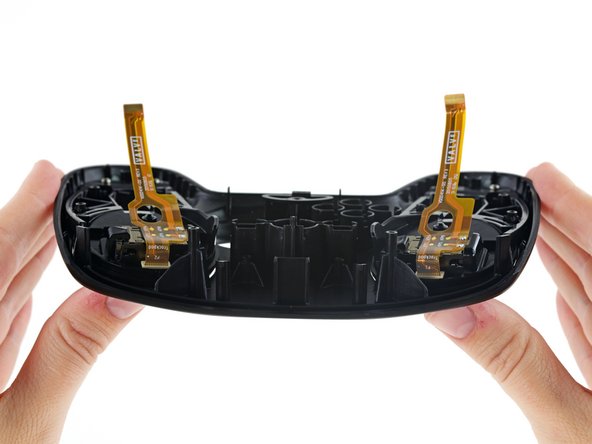
It's a Trap! Wenn man die Leiterplatte aus dem Gehäuse hebt, sieht man 2 Flachbandkabel, die die Touchpads mit der Unterseite der Platine verbinden.
-
Wir sind keine Fans von solch tückischen Kabeln, aber das ist mit Abstand das Schlimmste was wir bis jetzt gesehen haben.
-
Wir fahren fort, indem wir mit einem zielgerichteten Ziehen die beiden Kabel lösen, um einen freien Blick auf das Innere und auch die Touchpads zu bekommen.
It would have been nice if you told us about the two T6 screws holding the motherboard in place… or are there more? Because I can’t proceed beyond this step
Hi Mårten, as the banner at the top of this page states, this is a teardown meant for entertainment purposes. It is not meant to be followed as a repair guide.
-
-
-
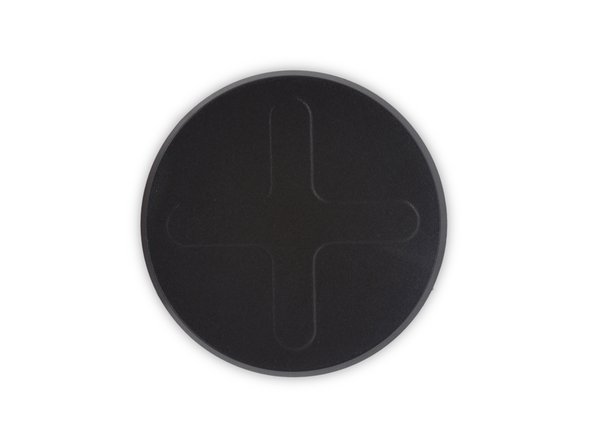
Wir holen endlich unsere liebsten Werkzeuge heraus, um die Touchpads aus ihrer Verankerung zu lösen. Hierfür benutzen wir ein Plastik-Öffnungswerkzeug aus unserem komplett neuen Pro Tech Toolkit
-
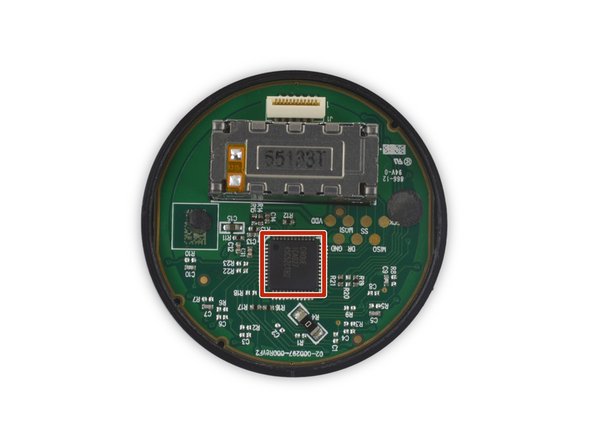
Das Flachbandkabel befindet sich in einem Sockel auf der Schwesterplatine und ist an die Komponenten für das haptische Feedback gelötet, die den Touchpads einen Hauch Wertigkeit verleihen.
-
Die gesamte Konstruktion ist eine Lösung von Cirque, höchstwahrscheinlich ein GlidePoint TM040040.
-
Das "Hirn" des Ganzen ist ein Cirque 1CA027 Companion MCU.
-
Auf der Schwesterplatine verbirgt sich außerdem eine unserer am wenigsten beliebten Komponenten: Kleber. Diese zwei kleinen Klebepunkte sichern die Lage des Touchpads in seiner Halterung.
-
-
-
Mit dem geschickten Entfernen ein paar weiterer Schrauben lassen sich die Analog-Trigger von der Platine lösen.
-
Zu unserer Überraschung wurden sie lediglich in die Platine gesteckt. Weder Kleber noch andere mechanische Tricks wurden angewandt.
-
Die Analog-Trigger können in zwei kleinere Komponenten zerlegt werden:
-
Der Erste ist der analoge Trigger, welcher durch einen Magnetflusssensor die Position und die Geschwindigkeit des Triggers durch einen zeitbasierten Fluss misst.
-
Der zweite Teil ist das Klick am Ende des Triggers, welches einen physikalischen Schalter auf der Platine auslöst.
The triggers can actually be further disassembled- there is a small screw hidden underneath that separates the trigger from the actual mechanical frame. This means that all external faces of the controller can be separated from mechanical or electrical components, which will make Counter Strike-esque paint jobs a breeze!
I've just lost the spring to the right trigger does anyone know what size it is. I'd greatly appreciate your help. My email is Dallasjames2001@yahoo.com
The spring for the trigger is 19 mm long with about 14 coils
-
-
-
Die Platine ist das Fiberglass-Zuhause für einen Haufen verschiedener Schaltkreise. Unter gebotener Sorgfalt konnten wir folgende ausmachen:
-
NXP LPC11U37F 32bit ARM Cortex-M0 Microcontroller
-
Nordic Semiconductor nRF51822 Bluetooth Smart und 2.4GHz proprietärer SoC
-
Invensense MPU-6500 6-Achsen (Lage- und Geschwindigkeitssensor) MEMS MotionTracking Gerät
It's worth noting that there are spots for Tag Connect connectors for interfacing with the wireless radio chip and the main controller. The radio's is marked radio right underneath it, and the main controller's is marked debug, and is down to the left. Hopefully valve releases a more open source firmware soon so we can have the open controller of our dreams!
-
-
-
Steam Controller Reparierbarkeits-Wertung: 8 von 10 (10 ist am leichtesten)
-
Den einzigen Kleber fanden wir an den Touchpads. Alle anderen Verbindungen waren geschraubt.
-
Der relativ modulare Aufbau des Controllers bedeutet ein einfaches Tauschen der verschiedenen Komponenten.
-
Auch wenn wir immer sagen "Schrauben statt Kleber", ist die Gefahr da, dass die nichtmagnetischen Schrauben an der falschen Stelle montiert werden, was eine Reparatur verkomplizieren kann.
-
Die am häufigsten ausfallende Komponente - der Analog-Stick - ist an der Hauptplatine fest verlötet.
Most likely to fail component is actually the small, thin and uniquely shaped flange that activate the right and left bumpers. They are slightly paddle shaped and extend out from the oddly shaped bracket they are a part of on a narrow neck that appears extremely fragile. Their known longevity is a testament to the design of the whole controller as they seem to last far beyond what one would assume. When they DO break however, the bumper is totally useless and since they are only a piece sticking out of a larger whole (and Valve no longer makes these controllers or parts) to replace it is an exercise involving more parts and areas than necessary, cannibalizing another Steam controller, or desperately searching for an improbable find online. Crafting a replacement is far more likely an option and this has its own issues.. There is a youtube video where a guy uses a tape measure for its type of metal material as the source for the creation of a replacement... I recommend it if this is wha you are dealing with.
I don't agree, I think it's the upper shoulder buttons, which I just have to fix. It's just a small plastic-part with a thin bridge used as a spring-like, so an obvious breakpoint.
The other one was also already cracked. I just superglued them back now, seems to work, how long is the question though.
Otherwise I've seen there's also 3D-printing manuals on thingiverse, next time I will try printing them myself, maybe with a thicker bridge then.
lornlynx -
-


以下の翻訳者の皆さんにお礼を申し上げます:
81%


これらの翻訳者の方々は世界を修理する私たちのサポートをしてくれています。 あなたも貢献してみませんか?
翻訳を始める ›

39 件のコメント
Does swapping the touchpads and reconnecting them work?
In theory yes in practice no, if you swap them you will end up with an off angle dpad. shape almost like an X Same goes for A B X Y, I tried to do the original nintendo layout but they where angled so it did not work well.
It doesn't work in theory or in practice. I mean it can work. But the effects wouldn't be what you would think. You would actually have to mod the chassis itself which takes patience and artistic craftsmanship. But it can be done just not as easy as one would think. I tried this last night. No cigar. You can always attempt a cross wire and play without the top chassis but it would be uncomfortable and exposed.
So the thumbstick potentiometer is soldered, that's normal, but can the stick itself be replaced? My DS4 has 3rd party metal sticks.
Frank Zhao - 返信
I'd like to know this as well, if I get one of these I'd want to replace it with an Xbox One thumbstick if possible.
Yes, actually, I think the XBOne's analog sticks can be used as drop in replacements, I've seen one person replace it with an anodized steel stick, so it can be done.
Might want to check out the steam controler subreddit (/r/steamcontroller) and the steam controller mods subreddit (/r/steamcontrollermods)
Well yeah? Anything that is soldered can be unsoldered with a soldering wick and iron. Its roughly the same size. So it should fit through the plastic case. I may be wrong though. It can definitely be replaced though the only problem would be how big the hole in the case is. If it's big enough you should be fine. If not, just do what you do and play without the case. I seen some people do this, you would need to modify everything to make it comfortable though. Personally I think the sticks are fine. Its probably the thumb pad itself you don't like. THAT is easily replaceable, just carefully rip one off an x bone then carefully hot glue it to the top
How big are ds4 thumb sticks, pretty small right? If so. It can be done. Well the ds4 sticks would fit onto the steam Controller, but.vice versa? Maybe not.. the steam stick is small but is it that small? Idk. But they ARe third party like you said. So you should definitely try it and let us know. I'd try it but I don't have a DS. You ARE talking about the Nintendo ds right? Lol
Yes, it just pops off once the front cover is no longer holding it back.
I answered a question about replacing the stick over here.
I'm surprised you guys didn't post the exploded diagram of the controller that you can find on the inside of the retail box! From the looks of it, it appears to be fairly accurate.
My retail box didn't have one, then again my controller is from the first batch of those produced. I noticed a few differences between mine and theirs. I think they either got an earlu proto type or from a later more recent batch
Those 2 pads on the back of the PCB look like "connections" for a yet to be announced battery-pack, or "play and charge kit"
Any confirmation? I don't want to open mine yet...
What is the polarity of these? I suspect the right one would be +5V and the one on the left to be GND - That would make sense because of how the USB connector is laid out
Measured the pads. Both pads are 0 Ohm to GND.
Guess it's just to ground it then as the other guy said it's both on zero.
lornlynx -
I think that would be interesting to have a plastic covering similar to the xbox one design but with the touch pad sensors included and the feedback motor.
That IS what the steam Controller is. Actually the case.is superior to the x bone controller. Its handles bend in a way that makes it more comfortable. But the layout is essentially the same. Keep in mind this controller isn't really for fps games. Keep a keyboard and mouse for fps but the steam Controller is good for most anything else. I use it for third person shooters and turn based games.
I'm considering a tear-down of mine I just got- I think one of this would look FRESH with a custom paintjob. Especially since (if I read it correctly) I won't have to deal with the hard parts of this controller if I just want to paint the casing- not even the touchpads, just the outer casing.
You should still take it apart. Remove the chassis (plastic covering) and separate the innards including buttons and thumbtack. Anything can be easily soldered or snapped back. Don't risk getting pain on your PCB you will regret it. It should be fairly easy if you use the right paint. There is paint specifically for plastic. Get that, you can find it at any craft store. I'm doing the same soon, I scratched the original paint on accident during a removal procedure.
ATTENTION modders: this guide is perfect but has one is single flaw. It seems most stram controllers have hidden screws on the back panel. This guide doesn't mention they are hidden. But they are exactly where the guide says they are. When you open the panel it looks like they are not there. But you can feel them under the sticker. Cut a hole with a box cutter, its just really thick paper, and you will find the three screws. You can even feel em with your hand if you press down your finger hard enough, it will leave an indent where to cut. All the screws are size t6. They can be unlocked with torque 6 security screwdrivers.
My left touchpad makes a REALLY loud noise when I press it, like something isn't working right. What part could be causing this and how hard is it to fix? A little percussive maintenance temporarily fixes it but I'd like a permanent solution (and unfortunately live outside the US, meaning getting it fixed officially is out of question)
It may be that the weight inside the haptic motor is improperly attached? Does this happen consistently or only when experiencing haptic feedback?
I've had my Steam controller for about 1 year and at the 6 month mark the left flipper broke. Since it is all configurable I just made left flipper now left grip.
Then a month ago the battery compartment cover / left and right grip, had one of the two plastic prongs break off so of course I got out the duct tape xD
It's electronically sound so far but the molded plastic is giving out !!
The left joystick takes a lot of abuse and is holding up fine so far.
I'll comment again should anything else fail.
Oh I didn't mention that it is used daily for 8 plus hours.
The bumper buttons are weak af.. I broke them within two months of daily Rocket League (air roll on LB). This is the third time I've managed to do it. So there's definitely a manufacturing/engineering issue here. The mechanism broke so that the LB button is permanently pressed down and cannot be lifted up. Pressing it elicits no LB button response any more. And I can also hear rattling parts inside the controller now. Just to reiterate, this is the third steam controller that I've encountered the exact same problem. Luckily I've broken it so fast I've been able to get warranty replacements. As a result, I don't have any info on the repairing of the LB button mechanisms inside
I’ve busted 2 LB’s playing Warframe (both out of warranty, of course) There is a plastic plate under the front cover, it has a left and right sort of tab that flexes when pushing the LB and RB. The LB pushes the tab the tab pushes the switch on the edge of the PCB. The thinner flex part of the tab is what breaks, it then rattles around inside.
Just for posteriority, this is what I just fixed on mine. It's just a small plastic-part with a thin bridge used as a spring-like, so an obvious breakpoint.
The other one was also already cracked. I just superglued them back now, seems to work, how long is the question though.
Otherwise I've seen there's also 3D-printing manuals on thingiverse, next time I will try printing them myself, maybe with a thicker bridge then..
lornlynx -
My r 1 button has broken, and I don't really want to open it up, but I will if I have to. If I shake it slightly it rattles, and it doesn't click anymore, it's more or less just detached in some way. The thing I am afraid of is that the button is completely broken, or detached from the motherboard, because I would rather not solder it. This is my favorite controller, and I don't have a lot of money to spend on fixing it. I really appreciate any help, than you.
I’ve busted 2 LB’s playing Warframe (both out of warranty, of course) There is a plastic plate under the front cover, it has a left and right sort of tab that flexes when pushing the LB and RB. The LB pushes the tab the tab pushes the switch on the edge of the PCB. The thinner flex part of the tab is what breaks, it then rattles around inside.
Just for posteriority, this is what I just fixed on mine. It's just a small plastic-part with a thin bridge used as a spring-like, so an obvious breakpoint.
The other one was also already cracked. I just superglued them back now, seems to work, how long is the question though.
Otherwise I've seen there's also 3D-printing manuals on thingiverse, next time I will try printing them myself, maybe with a thicker bridge then.
lornlynx -
i had a battery leaking acid onto the motherboard which caused problems with he right touch-pad.
I tried cleaning the residue from the MB and the touch-pad ribbon cable but i think i made it all worse.
does anyone know of a website where i can purchase a replacement touch-pad ribbon cable?
i dropped my steam controller and now one of the grip buttons doesnt have proper haptics. the plastic on the backplate looks fine, and the dome switches look fine to my untrained eye. what do i do?
Is there an ifixit location I can send this to for repair?
Hallo, ich danke für die Deutsche Übersetzung. ich muss nur noch schauen wo ich ein neuen Analog Stick her bekomme.
Hi, I would like to know what size the screws are for the initial back plate? (Corners) The screw threads have snapped off on my device and I plan to replace them with a nut glued to the plastic
Mykie Merc - 返信
I know its obvious but it would be nice if this guide included how many screws were needed to take out.
Just for posteriority, because I also forget to check it and had to figure our in hindsight.
The first seven are 6 small ones and a long one in the middle under the sticker.
The next four long ones are what holds the board to the upper part, two are at the top near the shoulder buttons on the inside, and the other two are left and right at the bottom, they are also part of the battery holding cases.
The rest are small ones, but I didn't remove the ones holding the touchpads so I can't say for sure.
lornlynx -
Good guide. I was already at a loss of figuring out that the screws are torx, I wondered why my imbus didn't work despite fitting. Also that it's actually a sticker and under it are more screws lol
Should have also mentioned where which screws fit, one is in the middle under the sticker, and four are fixing the board.
And after you unscrewed the first seven, I suggest turning it around, otherwise you can easily loose one of the springs and also the battery hinges fall out.
Reason for repair was one of my shoulderbuttons broke. After I opened it and removed the shoulderbuttons, the other one also broke off as it was already cracked. They don't use any springs for those, just two plastic pieces and using a small plastic bridge as a spring-like. It's an obvious breakpoint that way though.
I know just superglued them back, next time they break I probably need a full part replace, but there's already a 3D-printing manual I've seen.
Too bad that the stick is soldered, mine still works but the rubber is nearly gone now