はじめに
This is a general disassembly, mainly intended for replacement of the LCD / screen assembly. My first guide on iFixit so please be gentle. :) If you are looking for the LCD assembly, we have them available for sale, with fast shipping from California.
必要な工具と部品
-
-
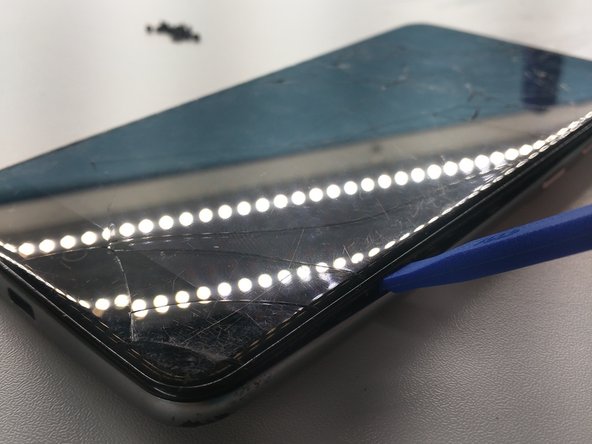
Pry rear cover off starting at the corner
-
Continue down the side
-
Lift rear cover off
-
-
-
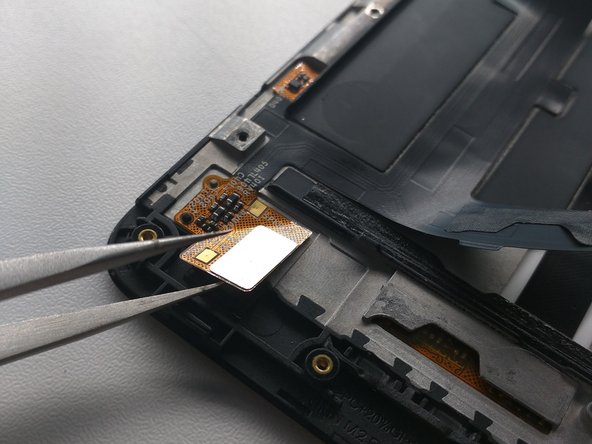
Remove Kapton tape covering fingerprint scanner cover
-
Unscrew two screws holding on fingerprint scanner flex cover
-
Disconnect fingerprint sensor flex cable and set rear cover aside.
How do I pull up the scanner from the back of the casing
Between step s 2 and 3 you have to remove 15 Phillips screws on the mid-frame assembly before the LCD and digitizer will come out.
Jason McDonald - March 22 ( please follow his directions as seen below)
What if you tear the strip will phone work without it
If you break flex cable will phone work without it
If you break the fingerprint sensor cable there’s a chance that the phone will continue working, but the fingerprint sensor will not work.
-
-
-
Remove the 15 Phillips 00 screws securing the midframe to the phone.
This is easier if you disconnect the fingerprint sensor first. Switch steps 2 and 3.
in addition to the above, you will have to remove the tape over one of the 15 screws.
-
-
-
Carefully insert pry tool on side of phone between LCD and frame
-
Continue down the side the phone and around the edges until frame and LCD assembly are separated
-
Ta-da!
Right and how often do you change the battery
Do you have to do this step (separate frame from LCD) if you're just changing battery? Can I remove battery after the previous step?
jerryc1010 - 返信
-
-
-
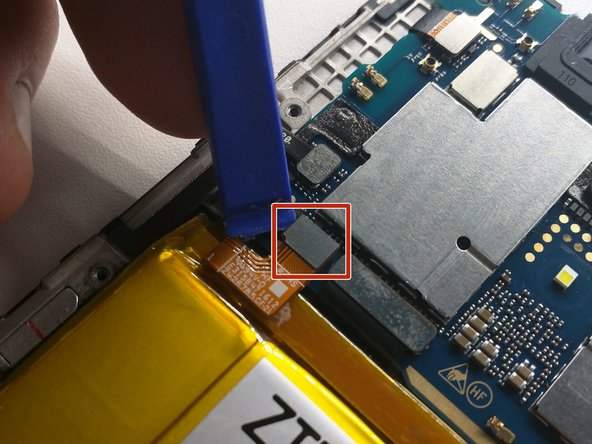
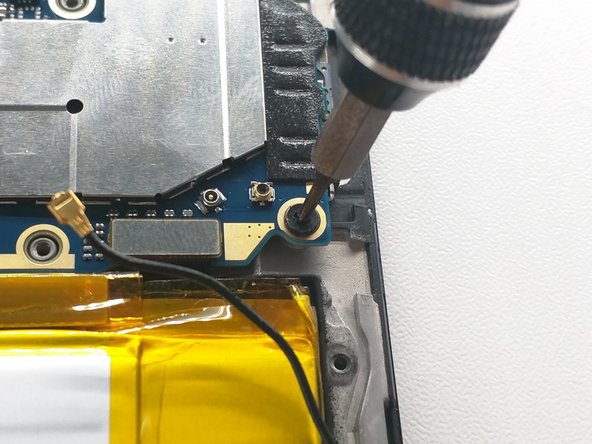
Remove Kapton tape over battery plug
-
Disconnect battery
-
Disconnect this other flex cable above the battery, whatever it goes to
The wide connector next to the battery connector is the extension cable to the replacable charge port assembly at the bottom.
Nate Evans - 返信
DO NOT REMOVE BATTERY.
simply disconnect…
If you want to replace the digitizer, then you need to remove the battery to get the ribbon cable out.
-
-
-
-
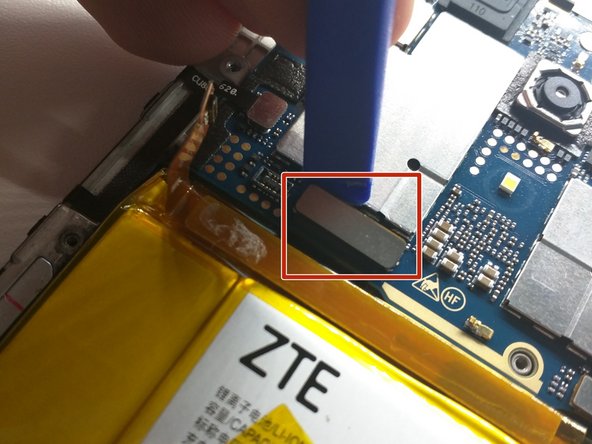
Disconnect antenna
-
Unscrew motherboard screw
-
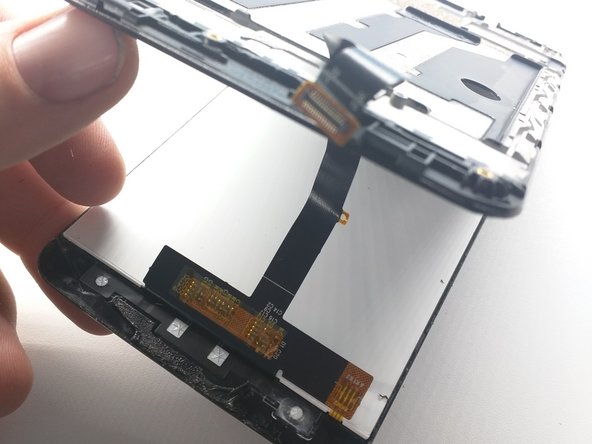
Disconnect LCD flex cable
-
-
-
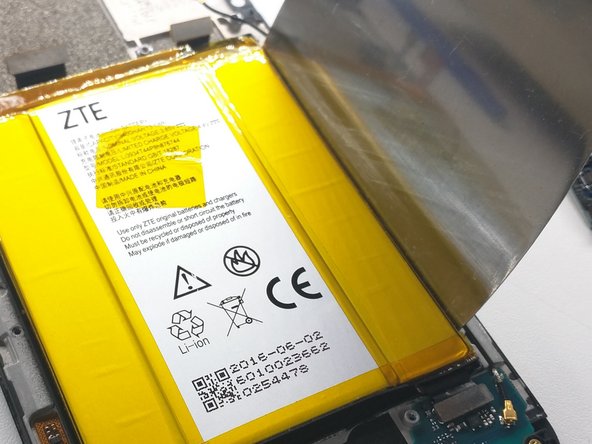
Heat up battery
-
Find appropriate tool to pry battery
The plastic cards ( Plastic Cards ) would be the perfect tool to assist you in prying out the battery.
Nate Evans - 返信
I find it easier to use the heat on the glass/LCD side rather than directly on the battery itself. Less likely to have a problem with the battery exploding as the author mentioned.
I think it would be wise to say what temperature to heat the battery.
-
-
-
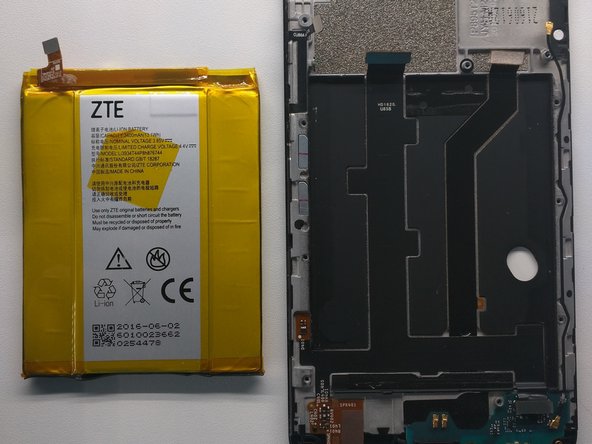
Once you have found the proper tool, begin prying up on either side of the battery.
-
Finally, bend the battery back into shape so it doesn't look too bad in your photos.
-
-
-
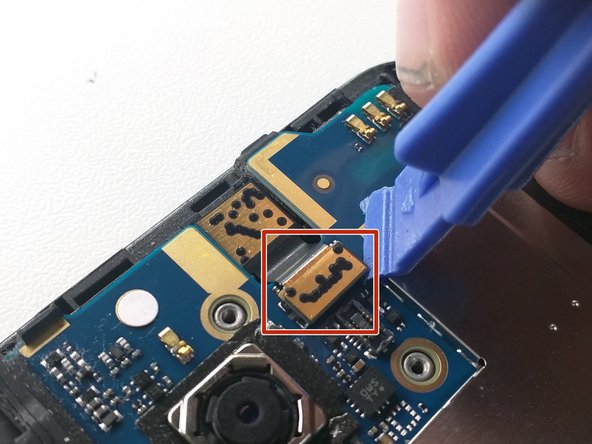
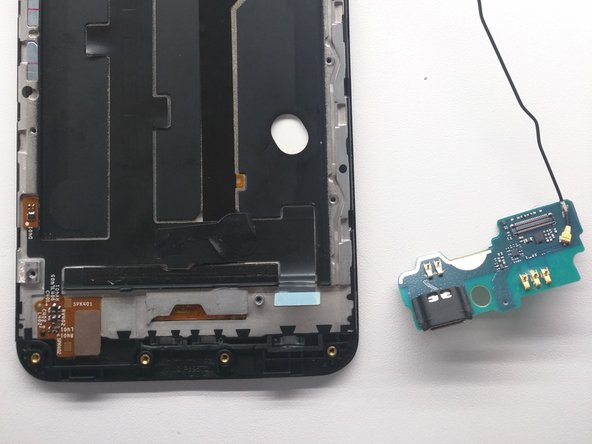
Remove tape holding charging board down (red outline)
-
Pry up charging port / antenna daughterboard.
-
Remove from frame and set aside
what are u useing to take off the back of the phone
-
-
-
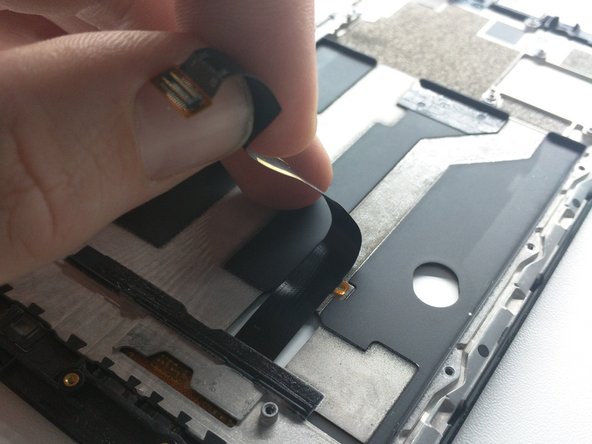
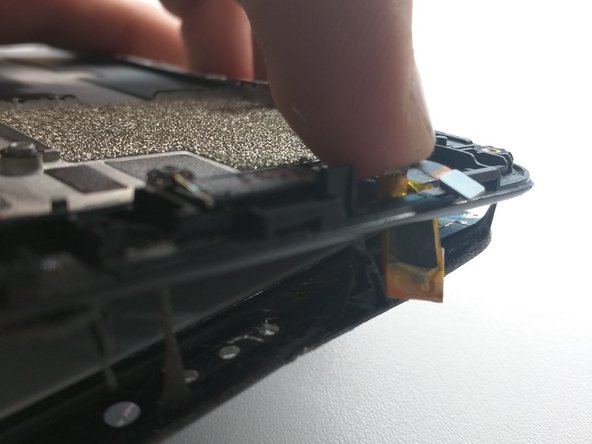
Push digitizer flex cable through frame
-
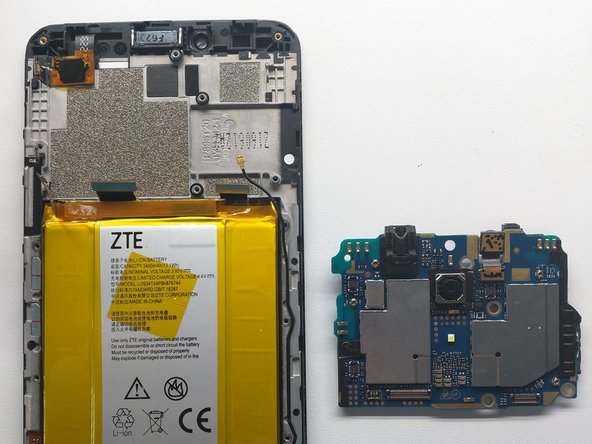
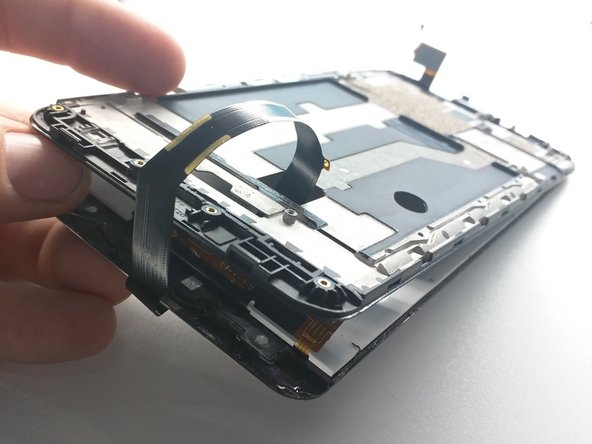
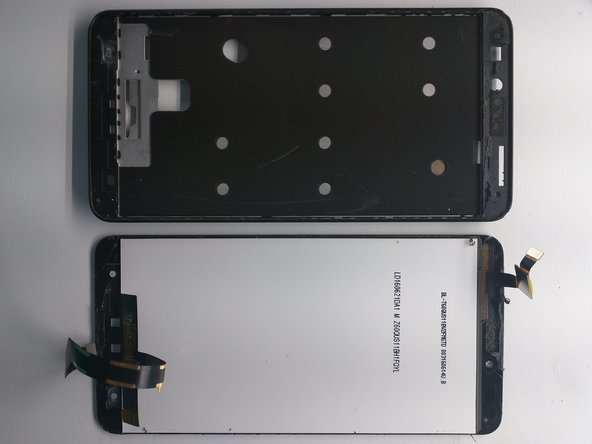
Remove LCD assembly from phone
Is the glass glued to the LCD?
Yes it is glued together.
Im ficing my phone now what kind of glue
Ya, I lost out but I should've bought the lcd, digitizer AND frame COMBO since I'm a novice at this. It was recommended this way. Now I have to worry about uv foca glue : (
I wish I was warned that I should've bought the lcd and glass as a combo unless I have a $10,000 machine. :(
Everyone make sure u buy the lcd + digitizer glass 2 in 1 already laminated or even 3 in 1 frame, lcd, digitizer glass
THANK YOU
What is the best screen with frame to buy and where to purchase and r they all 1080p and how much .for zte zmax pro from metro
I just bought one for 30 sum dollars. I might try to install it myself but I don’t have a heat gun.
A hair dryer will work in place of heat gun
454bholmes - 返信
Keys to successful digitizer/lcd/glass replacement:
1. Purchase a quality glass/digitizer//frame assembly.
2. Avoid using metal objects as pry tools.
3. Read through instructions or watch videos from at least 3 sources before starting.
4. Take pictures as you proceed through disassembly. This will greatly aid in reassembly.
5. Go slow, it takes longer to be better.
6. Use a good magnifier and take short breaks to avoid eyestrain.
454bholmes - 返信
-


To reassemble your device, follow these instructions in reverse order.
To reassemble your device, follow these instructions in reverse order.
90 の人々がこのガイドを完成させました。
48 件のコメント
Does the digitizer snap in? Or will I need adhesive to install my new digitizer?? Other phones that I have replaced the digitizer I needed adhesive, but I know some just snap in. I'm hoping this is one of those that just snap in.
With this phone, you would need new adhesive. I would recommend using the 2mm Tessa 61395 tape ( Tesa 61395 Tape )
So is it even possible to actually just replace the digitizer? Because it seems like in getting it out I took the lcd with it?? is that "always" the case???
The digitizer may be built into the LCD panel it self, it's not uncommon. If that's the case, no, it would not be possible to replace just the digitizer. And the cost to difficulty ratio would be rather low
Is it possible to replace just the lcd glass (front piece) and not the lcd digitizer, or are they glued together? Some places sell just the glass and that's all that's broken on my phone.
The LCD assembly consists of three layers(typically); Glass lens, digitizer and the LCD panel. That being said, yes, it is possible however impractical. As Danny said it's much easier to replace the entire assembly, even if it cost a few tens of dollars more. I always recommend replacing the entire assembly whenever possible.
I've been fixing phones for 5 years now and it is so much harder to replace just glass when u can get the glass and digitizers for really cheap now the only ones that r expensive r the newer iPhones the process to remove just glass involves heating the glass that is already broken so now ur heating pulling out a piece and reheating it's not a fun process at all and if u do manage to get it off without breaking the digitizer and that's a big IF u still have to get a uv light and uv glue and glue it to the digitizer and hope u don't get air bubbles in between!!! The $10 bucks extra is way worth it makes the job a lot easier but if u do end up doing just the glass GOOD LUCK lol I would pay the extra even if it was $50 more
Very well written! Nice job! You took wonderful photos and had a very detailed and methodical repair guide! I would suggest to link the tools you used, or would use in the header of the guide. As well as a few wider angle shots of some of the close ups would also be helpful for the reader to help oriente themselves where they are in the phone, also simply for more detail and insight into the phone.
Well done Brennan!
#Nate#
-nerdBoy
Nate Evans - 返信
Need help getting my sim card out of this phone
You can get the Sim and the SD card out from the side port using the pin tool that came with the phone, or a paper clip bent to form a letter “p” shaped handle. Just insert the straight part of the paper clip (tool) in the hole and press until the side port ejects.
Between step s 2 and 3 you have to remove 15 Phillips screws on the mid-frame assembly before the LCD and digitizer will come out.
Any tips on step 12. I cant seem to get the screen loose from frame. Cant find an opening to pry.
Since the screen is obviously not going to be working I personally used heat and a razor blade. Obviously be careful not to scratch the bezel. But the have plastic "razor blades". Also what also works wonders are a regular deck of playing cards to hold open the screen!! And/or thin guitar picks...
Aerial L -
Do you have to heat the battery?
You don't have to heat the battery. I used my plastic pry tool around the right edge and lifted up then used an old rewards card wiggle through the adhesive. About a third of the way I pulled up on the bottom corner and the battery lifted out.
Followed this guide and it worked out great! The only problem I have is that now everything works other than the led light at the bottom of the phone that illuminates the circle and flashes for notifications is always on. doesnt matter if the phones off or screens off that light always stays on draining the battery. Any ideas where i went wrong?
I replace the screan but the touch sensor doesnt work. Please
Is there a way to reset the zte.my friend gave it to me and has moved to ohio..and i cant unlock the security code or fingerprint????
Do a hard reset it's the same on most phones running Android.
Did you ever figure out how to reset passwords, or unlock this phone?
My auto rotate doesn't work any idea how I could fix it or what steps I should take. It is turned on rotate yet when I click the phone nothing seems to happen.
Lot of work for a $99 phone. Why not buy another one. I was going to attempt for a battery replacement but why on Earth would I.
Lol. Great point Joe. It wasn't difficult taking it apart but I thought to myself the entire time, “why so many screws and glue?”
What if I want to replace just the touch screen with the digitizer do I still have to go through all the steps and remove the LCD housing or can I skip some of the steps and just take out that the digitizer with touch screen at an earlier Step
These really are wonderful pictures of the process but do did you happen to do a video on it? I like visuals, like a go through guide type thing. Am I out of luck on that? I can always check youtube.
Jean Brick - 返信
If I need just to swap main board, I think I can get to that step on both phones, right?
Is it possible to replacethe fingerprint sensor
Is it possible to change the fingerprint sensor. My cable
I replaced the screen but now my ringer or speaker phone doesn't work. please help
i replaced the screen but now my ringer and speaker phone don't work
Thanks Brennan, for the most helpful tutorial. You have insured the painless replacement of the battery in my cell phone.
I replace the screen but now the touch sensor does not work. Please help
Overall well done, approached project with caution, managed to tear/bend Li BATTERY. Replacing BATTERY is only option …“May explode if damaged or disposed of in fire"(verbatim).
Gotta love alkali earth
You are very funny…thabk you..I probably would have ripped that touch button/flex cable right off the back starting out…due to the light you shined in advance I kbew to take heed when prying off that back cover.
Just to be clear, there is no Loca glue between the digitizer and LCD is there?
I did a while assembly change and everything work except for the mic during calls, they cant hear me but i can hear them and on speaker it make alien sounding noises and echos, how do I fix this
My mame topszchelesa fu ma zte
Brilliant work. I followed all but now I can't use keyboard to input pin. Keyboard not working.
Will disassemble/reassemble unless some knows why this happened.
Adrian
I just replaced the battery in one of these ZTE z981. First time. Very easy if you follow part of this guide. No need to remove the logic board and all the connectors. Some people are fine with prying the battery out without adding heat. I find its much easier to add heat, I used a blow dryer and a guitar pick to pop it out. A flat head screw driver worked well too, BUT BE CAREFUL when prying the battery, there are 2 ribbon cables under it that could easily be punctured. They are glued in place and flush with the plastic but, ya, be careful. Patience is key! Good luck!
Will a crease on the black flex cable effect it in anyway?
Will a bent flex cable mess up performance at all?
I lost my sim card on the inside of the phone how do I get it out
peggy shawback - 返信
You should mention that the best way to separate the panel it's starting with removing the SIM card slot.
Marc Ferguson - 返信