メインコンテンツにスキップ

ZD-N Plus Wireless Controller Repair D-Pad Replacement

必要な工具と部品

  1. ZD-N Plus Wireless Controller Repair D-Pad Replacement, Back Panel: 手順 1、 1の画像 1
    • Remove the seven 12mm JIS #00 screws that hold the back panel in place.

  2. ZD-N Plus Wireless Controller Repair D-Pad Replacement: 手順 2、 2の画像 1 ZD-N Plus Wireless Controller Repair D-Pad Replacement: 手順 2、 2の画像 2
    • Lift up on the back panel of the ZD-N Plus to remove it from the rest of the controller.

  3. ZD-N Plus Wireless Controller Repair D-Pad Replacement, Battery: 手順 3、 1の画像 1
    • Use an opening tool to pry the battery from its original position.

    • The battery is glued on, so this may take some effort.

  4. ZD-N Plus Wireless Controller Repair D-Pad Replacement: 手順 4、 2の画像 1 ZD-N Plus Wireless Controller Repair D-Pad Replacement: 手順 4、 2の画像 2
    • Use an opening tool to pry the connector away from the two metallic prongs.

    • The parts are built to stay together, so this may take some effort.

    • Be careful to not warp the prongs in the process.

  5. ZD-N Plus Wireless Controller Repair D-Pad Replacement: 手順 5、 2の画像 1 ZD-N Plus Wireless Controller Repair D-Pad Replacement: 手順 5、 2の画像 2
    • Remove the battery from the controller.

  6. ZD-N Plus Wireless Controller Repair D-Pad Replacement, Rumble Motor: 手順 6、 2の画像 1 ZD-N Plus Wireless Controller Repair D-Pad Replacement, Rumble Motor: 手順 6、 2の画像 2
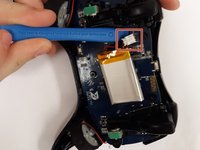
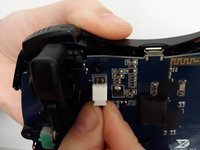
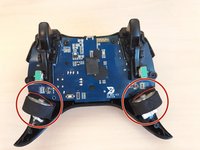
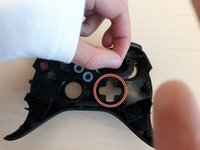
    • Remove the electrical connector attaching each rumble motor to the controller.

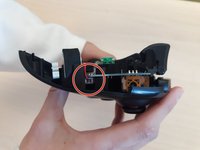
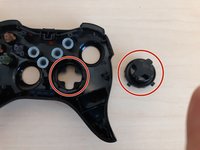
    • Lift up on the circular section of the rumble to remove it from the controller.

  7. ZD-N Plus Wireless Controller Repair D-Pad Replacement, Motherboard: 手順 7、 2の画像 1 ZD-N Plus Wireless Controller Repair D-Pad Replacement, Motherboard: 手順 7、 2の画像 2
    • Remove the three 1.2mm JIS #00 screws that hold the motherboard in place.

  8. ZD-N Plus Wireless Controller Repair D-Pad Replacement: 手順 8、 1の画像 1
    • Lift the motherboard out of the controller.

  9. ZD-N Plus Wireless Controller Repair D-Pad Replacement, D-Pad: 手順 9、 2の画像 1 ZD-N Plus Wireless Controller Repair D-Pad Replacement, D-Pad: 手順 9、 2の画像 2
    • Simply remove the plastic piece of the directional pad. It is not glued in so it should come out easily.

終わりに

To reassemble your device, follow these instructions in reverse order.

作成者

3人の作成者と共同で作成されました。

Devin Matos

メンバー登録日: 10/15/19

181 ポイント

2のガイドは作成済み

チーム

Grand Valley State University, Team S4-G1, DeVasto Fall 2019 Grand Valley State University, Team S4-G1, DeVasto Fall 2019人のメンバー

GVSU-DEVASTO-F19S4G1

4 メンバー

7のガイドは作成済み

0 件のコメント

コメントを追加

統計データ:

過去 24時間: 0

過去 7 日: 0

過去 30 日: 3

今までの合計 176