メインコンテンツにスキップ

Xiaomi Yi Microphone Replacement

必要な工具と部品

  1. Xiaomi Yi Microphone Replacement, Battery: 手順 1、 2の画像 1 Xiaomi Yi Microphone Replacement, Battery: 手順 1、 2の画像 2
    • Push the battery door switch to the left.

    • Lift the battery door up.

  2. Xiaomi Yi Microphone Replacement: 手順 2、 3の画像 1 Xiaomi Yi Microphone Replacement: 手順 2、 3の画像 2 Xiaomi Yi Microphone Replacement: 手順 2、 3の画像 3
    • Lift the battery tab up.

    • Remove the battery by pulling the removal tab.

  3. Xiaomi Yi Microphone Replacement, Front Panel: 手順 3、 2の画像 1 Xiaomi Yi Microphone Replacement, Front Panel: 手順 3、 2の画像 2
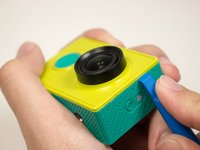
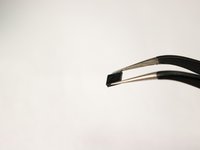
    • Introduce the plastic opening tool into any of the sides of the camera.

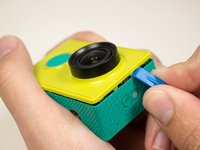
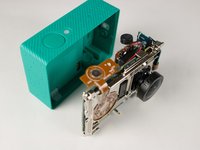
    • Pry with the plastic opening tool at the seam between the front and the back panel.

  4. Xiaomi Yi Microphone Replacement: 手順 4、 3の画像 1 Xiaomi Yi Microphone Replacement: 手順 4、 3の画像 2 Xiaomi Yi Microphone Replacement: 手順 4、 3の画像 3
    • Slide prying tool along the seam until front panel is fully separated from the back panel.

  5. Xiaomi Yi Microphone Replacement, Back Panel: 手順 5、 2の画像 1 Xiaomi Yi Microphone Replacement, Back Panel: 手順 5、 2の画像 2
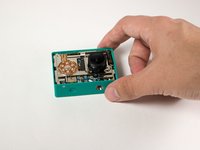
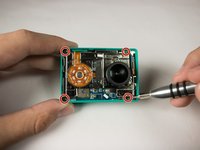
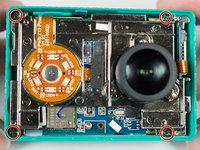
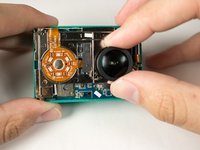
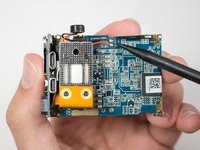
    • Remove the four 3.8 mm Phillips #000 screws located in the outer corners of the motherboard.

  6. Xiaomi Yi Microphone Replacement: 手順 6、 3の画像 1 Xiaomi Yi Microphone Replacement: 手順 6、 3の画像 2 Xiaomi Yi Microphone Replacement: 手順 6、 3の画像 3
    • Pull on and remove the black spacer located at the top inside of the camera body using the tweezers and set the part aside.

  7. Xiaomi Yi Microphone Replacement: 手順 7、 2の画像 1 Xiaomi Yi Microphone Replacement: 手順 7、 2の画像 2
    • Remove the motherboard from from the back case by gently pulling on the lens housing.

    • Back panel remains.

  8. Xiaomi Yi Microphone Replacement, Microphone: 手順 8、 2の画像 1 Xiaomi Yi Microphone Replacement, Microphone: 手順 8、 2の画像 2
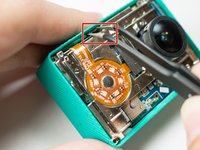
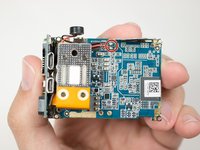
    • Locate the solder points connected to the red and black wire on the back of the motherboard.

  9. Xiaomi Yi Microphone Replacement: 手順 9、 1の画像 1
    • Heat these two points with a Soldering Iron and remove the microphone. Reapply fresh solder with the replacement microphone.

    • Soldering Irons are very hot and fumes from melted solder can cause irritation. Use only in a clean, well ventilated area.

終わりに

To reassemble your device, follow these instructions in reverse order.

13 の人々がこのガイドを完成させました。

作成者

1人の作成者と共同作成されました。

Matt Bibby

メンバー登録日: 08/26/15

531 ポイント

1ガイドが承認済み

チーム

USF Tampa, Team 15-5, Blackwell Fall 2015 USF Tampa, Team 15-5, Blackwell Fall 2015人のメンバー

USFT-BLACKWELL-F15S15G5

3 メンバー

10のガイドは作成済み

2 件のコメント

My camera came with the microphone not soldered at all (two microphone wires were hanging above the motherboard with no sign of soldering).

That was an easy repair as soon as I figured out what's the culprit, but before I've blamed the software for this issue for two days and tinkered with the software for at least 6 hours with no result.

adryjanowski, very nice tutorial, thank you!

Ivan Elizarov - 返信

コメントを追加

統計データ:

過去 24時間: 0

過去 7 日: 5

過去 30 日: 11

今までの合計 7,792