メインコンテンツにスキップ

Xiaomi Redmi Note 8T Motherboard Cover Removal

必要条件のみ
この修理ガイドは、他のガイドの前提条件として使用されます。それ自体は不完全で、単独で使用されることはありません。

必要な工具と部品

  1. Xiaomi Redmi Note 8T Motherboard Cover Removal, Xiaomi Redmi Note 8T Rear Glass Removal: 手順 1、 1の画像 1
    • Before you begin, switch off your phone.

    • Apply a heated iOpener to the back of the phone to loosen the adhesive beneath the back cover. Apply the iOpener for at least two minutes.

  2. Xiaomi Redmi Note 8T Motherboard Cover Removal: 手順 2、 3の画像 1 Xiaomi Redmi Note 8T Motherboard Cover Removal: 手順 2、 3の画像 2 Xiaomi Redmi Note 8T Motherboard Cover Removal: 手順 2、 3の画像 3
    • Secure a suction handle to the bottom of the rear glass, as close to the edge as possible.

    • If the phone's rear glass is cracked, the suction handle may not stick. Try lifting it with strong tape, or superglue the suction handle in place and allow it to cure so you can proceed.

    • Lift the rear glass with the suction handle to create a small gap between the glass and the frame.

    • Insert an opening pick into the gap.

    • If you have trouble, apply more heat to further soften the adhesive. Follow the iOpener instructions to avoid overheating.

    • Slide the opening pick to the bottom right corner.

  3. Xiaomi Redmi Note 8T Motherboard Cover Removal: 手順 3、 2の画像 1 Xiaomi Redmi Note 8T Motherboard Cover Removal: 手順 3、 2の画像 2
    • Insert a second opening pick and slide it to the bottom left corner to cut the adhesive.

    • Leave the opening picks in place to prevent the adhesive from resealing.

    • Don't remove the suction handle yet. You're going to use it later in the removal procedure as a rear glass stand.

  4. Xiaomi Redmi Note 8T Motherboard Cover Removal: 手順 4、 3の画像 1 Xiaomi Redmi Note 8T Motherboard Cover Removal: 手順 4、 3の画像 2 Xiaomi Redmi Note 8T Motherboard Cover Removal: 手順 4、 3の画像 3
    • Insert a third opening pick at the bottom left corner.

    • Slide the tip of the opening pick from the bottom left corner along the side of the phone to cut the adhesive.

    • Leave the opening pick in its place at the top left corner to prevent the adhesive from resealing.

  5. Xiaomi Redmi Note 8T Motherboard Cover Removal: 手順 5、 2の画像 1 Xiaomi Redmi Note 8T Motherboard Cover Removal: 手順 5、 2の画像 2
    • If the adhesive becomes hard to cut, it has most likely cooled down. Use your iOpener to reheat it.

    • Insert a fourth opening pick under the top left corner of the rear glass.

    • Slide the opening pick along the top edge of the phone to cut the adhesive.

    • Leave the opening pick in the top right corner to prevent the adhesive from resealing.

  6. Xiaomi Redmi Note 8T Motherboard Cover Removal: 手順 6、 2の画像 1 Xiaomi Redmi Note 8T Motherboard Cover Removal: 手順 6、 2の画像 2
    • Do not insert the opening pick deeper than 5 mm to avoid damaging the fingerprint connector.

    • Insert a fifth opening pick at the top right corner of the phone.

    • Slide the opening pick along the right side to cut the remaining adhesive.

    • Do not remove the rear glass all the way yet, the fingerprint cable is still connected to the motherboard.

  7. Xiaomi Redmi Note 8T Motherboard Cover Removal: 手順 7、 2の画像 1 Xiaomi Redmi Note 8T Motherboard Cover Removal: 手順 7、 2の画像 2
    • Carefully fold the rear glass to the right side of the phone. Use the suction handle as a stand for the rear glass.

  8. Xiaomi Redmi Note 8T Motherboard Cover Removal: 手順 8、 2の画像 1 Xiaomi Redmi Note 8T Motherboard Cover Removal: 手順 8、 2の画像 2
    • Use a spudger to pry up and disconnect the fingerprint flex cable.

    • Remove the rear glass.

    • During reassembly, this is a good point to power on your phone and test all functions before sealing it up. Be sure to power your phone back down completely before you continue working.

  9. Xiaomi Redmi Note 8T Motherboard Cover Removal, Xiaomi Redmi Note 8T Motherboard Cover Removal: 手順 9、 1の画像 1
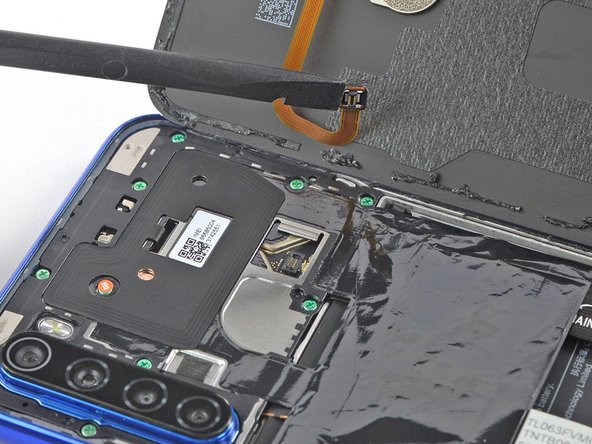
    • Remove the eleven Phillips #00 screws (3.9 mm length).

  10. Xiaomi Redmi Note 8T Motherboard Cover Removal: 手順 10、 2の画像 1 Xiaomi Redmi Note 8T Motherboard Cover Removal: 手順 10、 2の画像 2
    • Insert the tip of an opening pick underneath the bottom edge of the motherboard cover.

    • Use the opening pick to pry up the motherboard cover.

  11. Xiaomi Redmi Note 8T Motherboard Cover Removal: 手順 11、 2の画像 1 Xiaomi Redmi Note 8T Motherboard Cover Removal: 手順 11、 2の画像 2
    • Remove the motherboard cover including the black protective foil that covers the battery.

終わりに

To reassemble your device, follow these instructions in reverse order.

ある他の人がこのガイドを完成しました。

作成者

1人の作成者と共同作成されました。

Dominik Schnabelrauch

メンバー登録日: 11/23/16

202,558 ポイント

682のガイドは作成済み

チーム

iFixit iFixit人のメンバー

Staff

135 メンバー

16,722のガイドは作成済み

0 件のコメント

コメントを追加

統計データ:

過去 24時間: 0

過去 7 日: 2

過去 30 日: 3

今までの合計 199