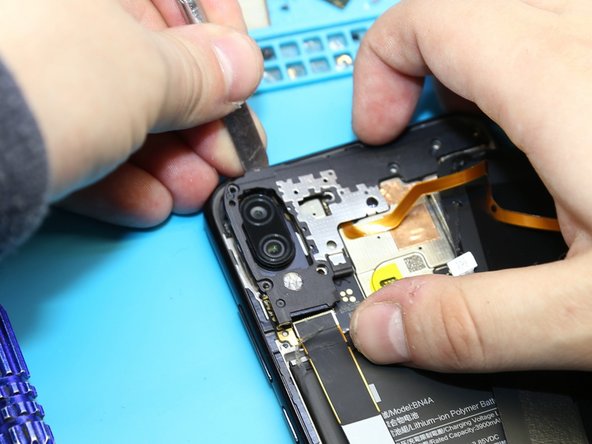
メインコンテンツにスキップ

Replacement of the motherboard of Xiaomi Redmi Note 7 Pro Motherboard Replacement

  1. Replacement of the motherboard of Xiaomi Redmi Note 7 Pro Motherboard Replacement, The motherboard: 手順 1、 1の画像 1
    • Before you begin, switch off your phone.

    • Heat your phone to about 195 degrees Fahrenheit (90 C).

  2. Replacement of the motherboard of Xiaomi Redmi Note 7 Pro Motherboard Replacement: 手順 2、 1の画像 1
    • Lift the back cover to create a gap between the glass and the frame.

    • Insert an opening pick into the gap.

  3. Replacement of the motherboard of Xiaomi Redmi Note 7 Pro Motherboard Replacement: 手順 3、 1の画像 1
    • Start sliding the opening pick from the lower left corner along the side of the device to cut the adhesive

    • Leave the opening pick in the side to prevent the adhesive from resealing.

  4. Replacement of the motherboard of Xiaomi Redmi Note 7 Pro Motherboard Replacement: 手順 4、 1の画像 1
    • Lift the cover open like a book, but be careful to make sure you do not damage the flex cable while it’s still connected.

  5. Replacement of the motherboard of Xiaomi Redmi Note 7 Pro Motherboard Replacement: 手順 5、 2の画像 1 Replacement of the motherboard of Xiaomi Redmi Note 7 Pro Motherboard Replacement: 手順 5、 2の画像 2
    • Using a screwdriver (1.5 mm ), unscrew 4 screw and remove the bracket holding the connector.

  6. Replacement of the motherboard of Xiaomi Redmi Note 7 Pro Motherboard Replacement: 手順 6、 1の画像 1
    • Disconnect the connector to avoid a possible short circuit during disassembly.

    • Disconnect connectors and remove the inter-board cable.

  7. Replacement of the motherboard of Xiaomi Redmi Note 7 Pro Motherboard Replacement: 手順 7、 3の画像 1 Replacement of the motherboard of Xiaomi Redmi Note 7 Pro Motherboard Replacement: 手順 7、 3の画像 2 Replacement of the motherboard of Xiaomi Redmi Note 7 Pro Motherboard Replacement: 手順 7、 3の画像 3
    • Using a screwdriver (1.5 mm), unscrew the 7 screws.

    • Remove the cover.

  8. Replacement of the motherboard of Xiaomi Redmi Note 7 Pro Motherboard Replacement: 手順 8、 1の画像 1
    • Pry up on the connector and remove the fingerprint sensor cable.

  9. Replacement of the motherboard of Xiaomi Redmi Note 7 Pro Motherboard Replacement: 手順 9、 1の画像 1
    • Disconnect the connector on PCB, and remove the front facing (selfie) camera.

  10. Replacement of the motherboard of Xiaomi Redmi Note 7 Pro Motherboard Replacement: 手順 10、 1の画像 1
    • Disconnect the connectors on the PCB.

  11. Replacement of the motherboard of Xiaomi Redmi Note 7 Pro Motherboard Replacement: 手順 11、 1の画像 1
    • Pull off and remove the PCB.

終わりに

To reassemble your device, follow these instructions in reverse order.

17 の人々がこのガイドを完成させました。

以下の翻訳者の皆さんにお礼を申し上げます:

es en

100%

これらの翻訳者の方々は世界を修理する私たちのサポートをしてくれています。 あなたも貢献してみませんか?
翻訳を始める ›

作成者

1人の作成者と共同作成されました。

Remphone.ru

メンバー登録日: 10/02/19

630 ポイント

1ガイドが承認済み

コメント 1 件

Give Me Your Phone Number..

The Comedy King - 返信

コメントを追加

統計データ:

過去 24時間: 8

過去 7 日: 114

過去 30 日: 203

今までの合計 10,880