メインコンテンツにスキップ

Xbox One X Lower Metal Case Replacement

必要条件のみ
この修理ガイドは、他のガイドの前提条件として使用されます。それ自体は不完全で、単独で使用されることはありません。

必要な工具と部品

  1. Xbox One X Lower Metal Case Replacement, Remove the sticker: 手順 1、 2の画像 1 Xbox One X Lower Metal Case Replacement, Remove the sticker: 手順 1、 2の画像 2
    • Use blunt tweezers to peel off the sticker covering the right-side screw on the back of the console.

    • Before starting this guide: Turn off the device. Then, unplug any cables from the console.

  2. Xbox One X Lower Metal Case Replacement, Remove the external screws: 手順 2、 1の画像 1
    • Use a T10 Torx screwdriver to remove the two 12.6 mm–long screws located on the back of the console.

  3. Xbox One X Lower Metal Case Replacement, Slide the upper case horizontally: 手順 3、 2の画像 1 Xbox One X Lower Metal Case Replacement, Slide the upper case horizontally: 手順 3、 2の画像 2
    • Rotate the console 90 degrees.

    • Pull the front of the upper plastic case horizontally toward the front of the console until it comes to a stop. This slides the clips out of the slots on the upper plastic case.

  4. Xbox One X Lower Metal Case Replacement, Lift the upper case off the lower case: 手順 4、 2の画像 1 Xbox One X Lower Metal Case Replacement, Lift the upper case off the lower case: 手順 4、 2の画像 2
    • Rotate the console 90 degrees so that the back is facing you.

    • Lift up the left side of the upper plastic case (as viewed from the back of the console), stopping when it won’t lift any further.

  5. Xbox One X Lower Metal Case Replacement: 手順 5、 3の画像 1 Xbox One X Lower Metal Case Replacement: 手順 5、 3の画像 2 Xbox One X Lower Metal Case Replacement: 手順 5、 3の画像 3
    • While continuing to hold the left side of the upper plastic case, push up on the right side to move the right-side screw boss out of the way.

    • If pushing up on the case doesn't work, try moving it in different directions until it can swing open.

    • Swing the upper plastic case open to 75 degrees.

  6. Xbox One X Lower Metal Case Replacement: 手順 6、 2の画像 1 Xbox One X Lower Metal Case Replacement: 手順 6、 2の画像 2
    • Push the upper plastic case down and away from the console to remove it completely.

  7. Xbox One X Lower Metal Case Replacement, Disconnect the ribbon cable: 手順 7、 3の画像 1 Xbox One X Lower Metal Case Replacement, Disconnect the ribbon cable: 手順 7、 3の画像 2 Xbox One X Lower Metal Case Replacement, Disconnect the ribbon cable: 手順 7、 3の画像 3
    • Use the pointed end of a spudger, an opening tool, or your fingernail to flip down the small, hinged locking flap on the ribbon cable ZIF connector on the front circuit board.

  8. Xbox One X Lower Metal Case Replacement, Disconnect the ribbon cable: 手順 8、 1の画像 1
    • Use blunt tweezers to pull the ribbon cable down out of the connector.

  9. Xbox One X Lower Metal Case Replacement, Remove the front circuit board screws: 手順 9、 1の画像 1
    • Use a T8 Torx screwdriver to remove the three 13.3 mm screws securing the front circuit board to the upper metal case.

  10. Xbox One X Lower Metal Case Replacement, Remove the front circuit board: 手順 10、 2の画像 1 Xbox One X Lower Metal Case Replacement, Remove the front circuit board: 手順 10、 2の画像 2
    • Pull the front circuit board straight out away from the upper metal case and set it aside.

    • Grip the board on either side of where it is plugged in to avoid bending and damaging it.

  11. Xbox One X Lower Metal Case Replacement, Remove the upper metal case screws: 手順 11、 1の画像 1
    • Use a T10 Torx screwdriver to remove the six 47.7 mm screws securing the upper metal case to the lower plastic case.

    • Use a T8 Torx screwdriver to remove the two 7.5 mm screws securing the press connector to the upper metal case.

  12. Xbox One X Lower Metal Case Replacement, Detach the press connector: 手順 12、 2の画像 1 Xbox One X Lower Metal Case Replacement, Detach the press connector: 手順 12、 2の画像 2
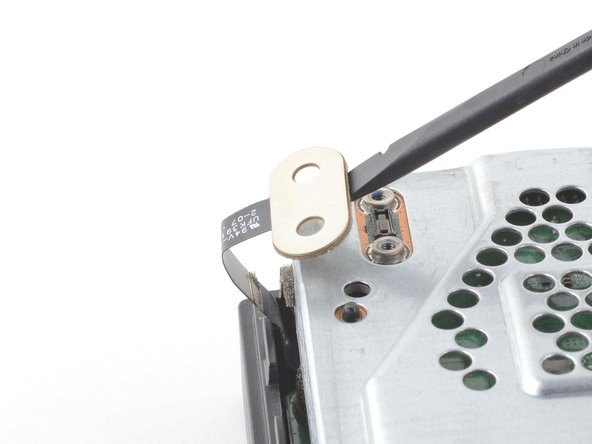
    • Insert the flat end of a spudger underneath the press connector on the side opposite of the ribbon cable.

    • Use the spudger to lift the press connector up and away from the upper metal case.

    • Don't push the spudger all the way to the socket. Prying up the socket may damage it.

    • To re-attach press connectors like this one, carefully align and press down on one side until it clicks into place, then repeat on the other side. Do not press down on the middle. If the connector is misaligned, the pins can bend, causing permanent damage.

  13. Xbox One X Lower Metal Case Replacement, Remove the lower plastic case: 手順 13、 3の画像 1 Xbox One X Lower Metal Case Replacement, Remove the lower plastic case: 手順 13、 3の画像 2 Xbox One X Lower Metal Case Replacement, Remove the lower plastic case: 手順 13、 3の画像 3
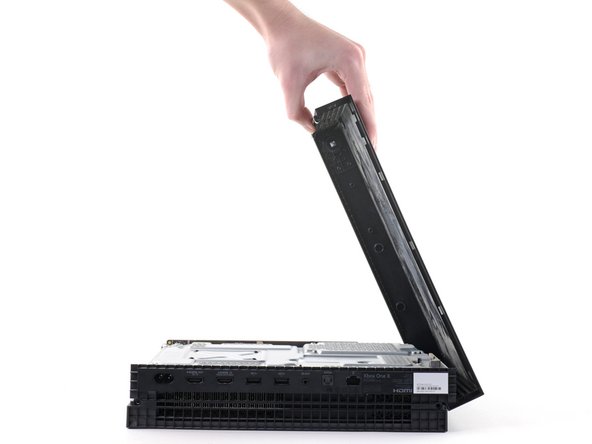
    • Flip the console over.

    • Hold on to the lower plastic case because it is no longer attached to the metal case.

    • Lift the lower plastic case up from the metal case and set it aside.

  14. Xbox One X Lower Metal Case Replacement, Remove the lower metal case screws: 手順 14、 1の画像 1
    • Remove the two T10 Torx screws securing the lower metal case:

    • One 7.7 mm screw

    • One 11.4 mm screw

  15. Xbox One X Lower Metal Case Replacement, Remove the lower metal case: 手順 15、 1の画像 1
    • Lift the lower metal case up off the upper metal case and internal components.

    • The disc drive may lift up with the lower metal case. Hold it down during this step.

    • Set the lower metal case aside.

終わりに

To reassemble your device, follow these instructions in reverse order.

Kyle Smith

メンバー登録日: 02/01/21

40,872 ポイント

123のガイドは作成済み

0 件のコメント

コメントを追加

統計データ:

過去 24時間: 0

過去 7 日: 0

過去 30 日: 0

今までの合計 134