はじめに
このガイドに従って、Xbox One X モデル 1787 の電源を交換してください。ゲーム機の電源関連の問題を解決するために、他のトラブルシューティング方法が機能しない場合に、この作業を行うことがあります。
このガイドを始める前に、ゲーム機の電源を切り、ケーブルをすべて抜いてください。ゲーム機を修理する際は、一般的な静電放電(ESD)の安全手順に従ってください。
必要な工具と部品
-
-
コンソールを90度回転させます。
-
上部プラスチックケースの前部を、本体前面に向かって水平に引き抜きます。これでクリップが上部プラスチックケースの溝から出てきます。
-
-
-
コンソールを90度回転させて、コンソール背面を手前に配置します。
-
これ以上上がらない位置まで、上部プラスチックケースの左側を持ち上げます。(コンソール背面から内側を見えるように)
-
-
-
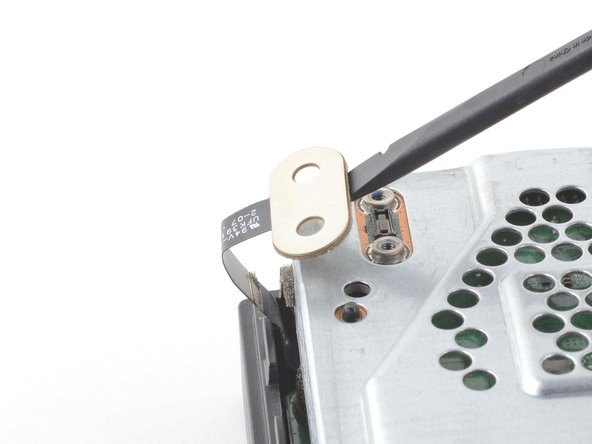
先端が尖っていないピンセットを使って、コネクタからリボンケーブルを引き抜きます。
What happens if I broke the connector to the ribbon cable ?
If you broke the cable, then one Wifi module would be broken.
Why we dont remove at first the 3 screws and lift the board a little bit, before removing the cable completely?
-
-
-
T8ドライバーを使って、フロント回路基板を上部メタルケースに固定している、13.3mmネジを3本外します。
How crucial and important is this step? I ovwrlooked it when doing this. Will this mess it all up?
-
-
-
-
フロント回路基板を上部メタルケースからまっすぐ引き抜きます。
During the reassembly process, I highly recommend that you reattach and lock the ribbon cable (steps 7 and 8) before you attach the circuit board. There is plenty of ribbon to work with, and once the circuit board is attached it is nearly impossible to get the ribbon flat and aligned and pushed up into the guide. Obviously be careful you don’t yank the ribbon as you maneuver the circuit board into place, but who’s not being careful while they are doing this?
-
-
-
T10トルクスドライバーを使って、上部にメタルケースを下部プラスチックケースに固定している47.7mmネジを6本外します。
-
T8トルクスドライバーを使って、上部メタルケースにプレスコネクタを固定している7.5mmネジを2本外します。
Must remove power supply screws as well
Hi, this step only includes the screws needed to remove the lower metal case. Guides that require removing the power supply screws will have a step later on with instructions on which screws to remove.
Why we dont't remove the hard drive screws in this step, please?
-
-
-
リボンケーブルと反対側のプレスコネクターの下に、スパッジャーの平面側先端を差し込みます。
-
スパッジャーを使って、上部メタルケースにからプレスコネクタを持ち上げて、取り出します。
I need to know what it calls and I will purchase the one like press connector on the upper metal case.
-
-
-
コンソールを裏返します。
-
下部プラスチックケースをメタルケースから持ち上げて外します。
-
-
-
下部メタルケースを固定している、T10トルクスネジを2本外します。
-
7.7mmネジー1本
-
11.4mmネジー1本
bei mir waren beide Schrauben identisch konnte sie auch komplett versenken
Evtl. fand vor mir schon ein Austausch statt
-
-
-
コンソールカバーを裏返します。
-
T10トルクスドライバーを使って、電源装置とファンを上部メタルケースに固定しているネジを外します。
-
11.4 mmネジー2本
-
11.4 mmネジー2本
-
11.4 mmネジー1本
Die zwei orangen Schrauben müssen aus meiner Sicht nicht unbedingt gelöst werden. Hatte Probleme die zweite wieder reinzudrehen da sich der Anschluss verschoben hatte.
Habe Ihn daher vor Rücksetzung des Schritt 22 wieder angeschraubt. Ich konnte alle Schritte zum Rückbau Problemlos ausführen. Empfehle diesen Weg
Somewhat superfluous - all 5 screws are identical.
-
-
-
コンソールを裏返します。
-
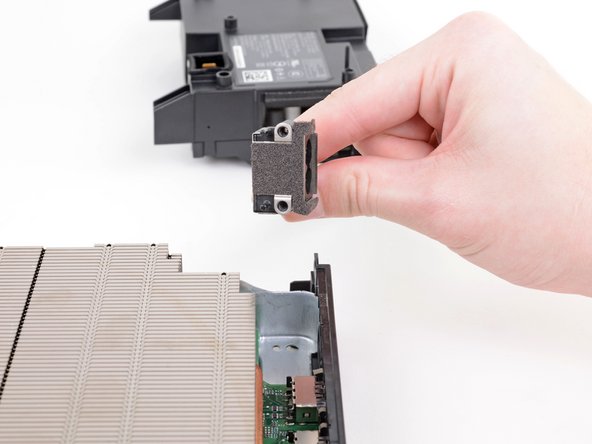
ディスクドライブのメタルタブを電源から外すために、ディスクドライブを持ち上げます。
-
ディスクドライブを上部メタルケースに置き、ハードドライブの上に載せます。マザーボードから電源を抜くために、十分なスペースを確保しなければなりません。
-
-
-
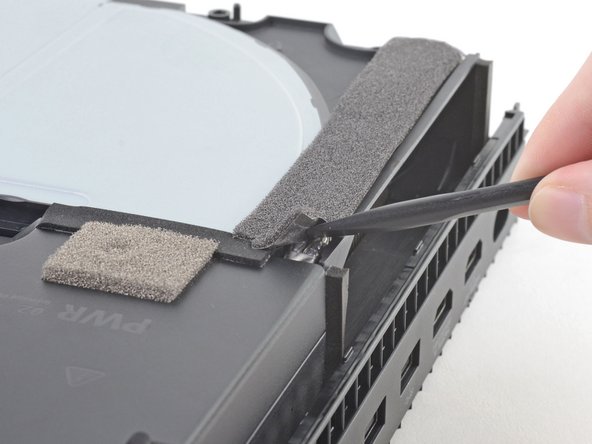
スパッジャーの平面側先端を、電源に近い角とコンソールの端付近のダークグレーのフォームテープの下に挿入します。
-
コーナーを持ち上げます。
-
テープの反対側までスパッジャーの先端がフォームから出てくるまで、をゆっくりと押し込みながらスライドします。
-


このデバイスを再組み立てするには、インストラクションを逆の順番に従って作業を進めてください。
e-wasteを処理する場合は、認可済みリサイクルセンターR2を通じて廃棄してください。
修理がうまくいきませんか?ベーシックなトラブルシューティングを試してみるか、Xbox One X のアンサーコミュニティを参照してください。
このデバイスを再組み立てするには、インストラクションを逆の順番に従って作業を進めてください。
e-wasteを処理する場合は、認可済みリサイクルセンターR2を通じて廃棄してください。
修理がうまくいきませんか?ベーシックなトラブルシューティングを試してみるか、Xbox One X のアンサーコミュニティを参照してください。
36 の人々がこのガイドを完成させました。
以下の翻訳者の皆さんにお礼を申し上げます:
100%

Midori Doiさんは世界中で修理する私たちを助けてくれています! あなたも貢献してみませんか?
翻訳を始める ›

8 件のコメント
easy to follow
Hi all,
Did anyone have any struggles with step 7, disconnecting the ribbon cable? my cable was extremely tight, and take a lot of effort to get the cable out. I’m yet to take delivery of the new power module, but am a little concerned about the ribbon cable being damaged hence the difficulty to get out, or the potential to damage when inserting the ribbon cable back in… any suggestions welcome!
Hi,
The ribbon cable in step 7 uses a ZIF connector and should be easy to remove from the connector slot. The cable may bend slightly when you pull it out and reinsert it, but avoid bending it as much as possible.
worked a treat. thank you!
Does anyone know where I can buy the 8 pin power switch ribbon cable? Original one is damaged.
I have zero experience, will I be able to do it with the above guide?