はじめに
このガイドに従って、Xbox One X モデル 1787 のハードドライブを交換してください。ハードドライブが動作しなくなった場合、この作業を行うことがあります。
このガイドを始める前に、ゲーム機の電源を切り、ケーブルをすべて抜いてください。ゲーム機を修理する際は、一般的な静電放電(ESD)の安全手順に従ってください。
この手順では、ハードドライブの交換方法のみを説明しています。交換用のハードドライブを機能させるには、追加のソフトウェアツールが必要になる場合があります。
必要な工具と部品
ビデオの概要
-
-
コンソールを90度回転させます。
-
上部プラスチックケースの前部を、本体前面に向かって水平に引き抜きます。これでクリップが上部プラスチックケースの溝から出てきます。
-
-
-
コンソールを90度回転させて、コンソール背面を手前に配置します。
-
これ以上上がらない位置まで、上部プラスチックケースの左側を持ち上げます。(コンソール背面から内側を見えるように)
-
-
-
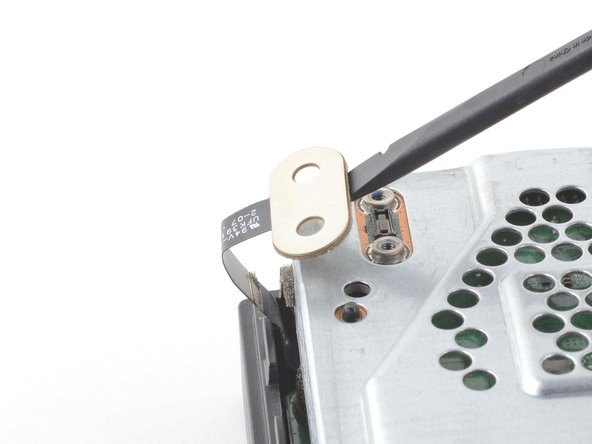
先端が尖っていないピンセットを使って、コネクタからリボンケーブルを引き抜きます。
What happens if I broke the connector to the ribbon cable ?
If you broke the cable, then one Wifi module would be broken.
Why we dont remove at first the 3 screws and lift the board a little bit, before removing the cable completely?
-
-
-
-
T8ドライバーを使って、フロント回路基板を上部メタルケースに固定している、13.3mmネジを3本外します。
How crucial and important is this step? I ovwrlooked it when doing this. Will this mess it all up?
-
-
-
フロント回路基板を上部メタルケースからまっすぐ引き抜きます。
During the reassembly process, I highly recommend that you reattach and lock the ribbon cable (steps 7 and 8) before you attach the circuit board. There is plenty of ribbon to work with, and once the circuit board is attached it is nearly impossible to get the ribbon flat and aligned and pushed up into the guide. Obviously be careful you don’t yank the ribbon as you maneuver the circuit board into place, but who’s not being careful while they are doing this?
-
-
-
T10トルクスドライバーを使って、上部にメタルケースを下部プラスチックケースに固定している47.7mmネジを6本外します。
-
T8トルクスドライバーを使って、上部メタルケースにプレスコネクタを固定している7.5mmネジを2本外します。
Must remove power supply screws as well
Hi, this step only includes the screws needed to remove the lower metal case. Guides that require removing the power supply screws will have a step later on with instructions on which screws to remove.
Why we dont't remove the hard drive screws in this step, please?
-
-
-
リボンケーブルと反対側のプレスコネクターの下に、スパッジャーの平面側先端を差し込みます。
-
スパッジャーを使って、上部メタルケースにからプレスコネクタを持ち上げて、取り出します。
I need to know what it calls and I will purchase the one like press connector on the upper metal case.
-
-
-
コンソールを裏返します。
-
下部プラスチックケースをメタルケースから持ち上げて外します。
-
-
-
下部メタルケースを固定している、T10トルクスネジを2本外します。
-
7.7mmネジー1本
-
11.4mmネジー1本
bei mir waren beide Schrauben identisch konnte sie auch komplett versenken
Evtl. fand vor mir schon ein Austausch statt
-
-
-
コンソールを裏返しにします。
-
T10トルクスドライバーを使って、ハードドライブを上部メタルケースに固定している11.4 mmネジを4本外します。
-
-
-
ディスクドライブが外れていることに注意しながら、本体を裏返します。
-
ディスクドライブを持ち上げると、メタルタブが電源から外れます。
-
ディスクドライブを裏返して、電源の上に重ねます。ディスクドライブは最初に装着されていた位置から逆の方向に向きます。
-
-
-
ハードドライブとマザーボードを繋いでいるSATAケーブルを直接上向きに引き抜いて、接続を外します。
-
-
-
ハードドライブを裏返して、プラスチックのマウンタブラケットを上向きにします。
-
T10トルクスドライバーを使って、ハードドライブをマウンタブランドに固定している 8.6 mmネジを4本外します。
-


元通りに組み立てるには、これらの手順を逆に実行します。
e-wasteを処理する場合は、認可済みリサイクルセンターR2を通じて廃棄してください。
修理がうまく進みませんか?ベーシックなトラブルシューティングを試してみるか、Xbox One Xのアンサーコミュニティに尋ねてみましょう。
元通りに組み立てるには、これらの手順を逆に実行します。
e-wasteを処理する場合は、認可済みリサイクルセンターR2を通じて廃棄してください。
修理がうまく進みませんか?ベーシックなトラブルシューティングを試してみるか、Xbox One Xのアンサーコミュニティに尋ねてみましょう。
100 の人々がこのガイドを完成させました。
以下の翻訳者の皆さんにお礼を申し上げます:
100%


これらの翻訳者の方々は世界を修理する私たちのサポートをしてくれています。 あなたも貢献してみませんか?
翻訳を始める ›

20 件のコメント
If I buy a new hard drive off of amazon, how do I install the Xbox OS back on? The offline usb?
The only way I found was to clone the disc sector-by-sector. I read online that you can expand it by making the “user content” partition larger.
Do an offline update for xbox one x. I posted a link in another comment.
Check out this video. It has a great step by step for putting the console into troubleshooting mode and downloading the correct software.
metric -
I read a post somewhere saying that if Microsoft detect non-standard hardware in your system you could be banned. Has anyone had any experience with this?
That was the case for the Xbox 360, these were very picky and only accepted certain models of Western Digital Hard Drives (if you didn't modify them with RGH/JTAG but then you would get banned if you tried to connect to Xbox Live).
The Xbox One is totally fine with other hard drives, I replaced my One X's HDD two years ago with a 2 TB Samsung 860 Evo SSD and had no problems, some people rather recommend using the SSD externally but IMHO it's worth the effort, because it also accelerates the Operating System drastically like in every PC/Mac (I don't want to use systems with the OS on an HDD anymore except some retro computers up to mid-2000s).
I didn’t remove the fragile connectors, that ribbon cable I just opened the lock and slowly slid out the ribbon cable, I finally just put it all back together it took me a day, I done it very slowly, I have a SSD in there, it’s blazing fast. After doing all that download OSU1, extract it and format your USB to NTFS, copy $systemupdate to the root of your NTFS formatted USB, the update will auto partition and script the hard drive, download OSU1 from Microsoft, specifically search for offline Xbox update, then good luck putting your Xbox back together. No need to run third part scripts anymore.
I have had no luck finding the xbox one x os im not sure if its general for all xbox ones or if there’s a specific one for each? Also I’ve had not luck finding a source for a link to the code to reformat the drive that I trust (except for the ifixit youtube video but that link is dead.) in summary I was wondering if there is a good source someone could lead me to?
This is the link for One X and One S models: https://support.xbox.com/en-US/help/hard...
The article says something about a different file for regular Xbox One. Idk what or where it is. But it’s on their site somewhere.
A couple of questions posted on installing the OS:
https://support.xbox.com/en-CA/help/hard...
*The download file is there too and you can see the link but you must right-click and save as. Regular left-click will not work.
This was exactly right. New Hard drive in, the trouble shooter auto-ran when the xbox was turned on. I installed the update from a formatted Flashdrive and it’s all up and running.
(Running a 2018 Xbox One X)
Good guide, thanks. There’s no need to unplug the sata cables from the main board, though, as there is enough play to reach the four screws holding the hdd to the plastic bracket.
Reinstalling the last part of the case can be tricky, the key is to locate the plastic lugs down one side of the base in their respective slots on the case. Once they’re in it all falls into place.
I purchased a 1 TB Samsung 870 QVO for my Xbox One X, I did not perform any formatting to the HDD prior to the install, it went straight from the packaging it came in and was installed in the console. I didn’t use any scripts or OSU files. I simply plugged the ethernet cable in and booted it up using the manual recovery button method. The Xbox immediately recognized the new SSD and automatically formatted and installed the OS. No special tools or hacks. The console is just like it was before just loads games a bit faster, I can play online, it updates when it needs to without hassle. Not sure why everyone is having such a hard time with finding so called software for the new hdd.
I had to download the software to a usb drive and install it manually. Not sure how yours automatically installed the new software.
metric -
I like to use the Powershell script from XFiX on this YouTube channel to do hard drive maintenance (format, partition, etc.) on the XBox Hard Drive. He also has some other helpful videos too.
Did you not read the last comment before yours? You don't need any of the formatting tools. Just stick the new drive in connect to the internet with Ethernet and when it boots up it will do all the work for you.
Honestly I am desperate, I tried to change with another SSD for my Xbox One X Scorpio Edition, which the original HDD is dead.
I purchased Kingston 480GB and another one Crucial 1TB, they didn't work and didn't start. Xbox One X is very weird, it don't want another any kind of SSD/HDD! Anyone experienced same way? Thanks in advance
The drive I ordered wasn't anything too special.
I followed the guide here and then the OS restore here.
XBox One X SSD Upgrade - LFC#268 - YouTube
Worked like a charm.
metric -
As much as I would want a faster SSD on mine, I'm not doing this one, if there's a risk of getting banned.