メインコンテンツにスキップ

この翻訳は、ソースガイドの最新の更新を反映していない可能性があります。 翻訳の更新に協力してください。 または ソースガイドを参照してください

Xbox Oneのワイヤレスコントローラの方向パッドの交換

必要な工具と部品

  1. Xbox Oneのワイヤレスコントローラの方向パッドの交換, バッテリーパック: 手順 1、 1の画像 1
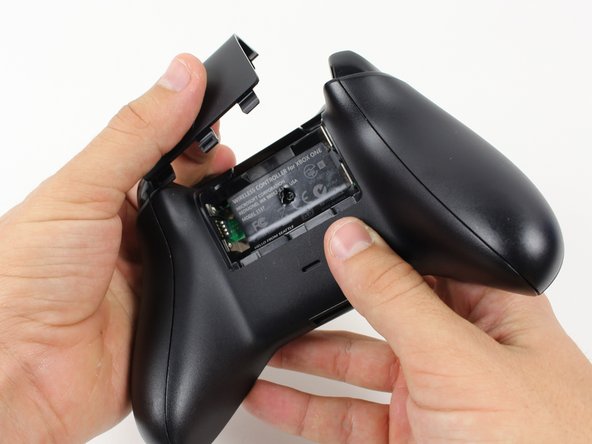
    • バッテリーパックのカバーを外します。

    • バッテリーを取り外します。

  2. Xbox Oneのワイヤレスコントローラの方向パッドの交換, ハンドルをスライドします: 手順 2、 2の画像 1 Xbox Oneのワイヤレスコントローラの方向パッドの交換, ハンドルをスライドします: 手順 2、 2の画像 2
    • ナイロン製スパッジャーを使ってこの作業を行ってください。ここではメタルスパッジャーを使用しています。

    • サイドハンドルを外すため、コントローラーをしっかりと握ります。スパッジャーをフロントとハンドルプレートの間にできた隙間に差し込みます。

    • スパッジャーを前後に動かしながら、フロントプレートからサイドプレートを外します。サイドプレートの隙間全体にスパッジャーを動かして作業を進めてください。

    Start prying the side plate off underneath the trigger, this makes it easier to disconnect the other clips connecting the side plate to the backplate.

    Brandon - 返信

    One you take it off, is it possible to click it back in?

    Aiden Bear - 返信

    As long as you don’t exceed the couple tons you need to take it off you should be able to put it back.

    Brandon -

    I don’t have a squdger

    TimidFerret4982 Gaming - 返信

    getting those handles back on seems impossible, they just dont fit as well, a gap remains even after snapping into place.

    Dont think ill be doing this in the future

    Spoutin Wyze - 返信

    edit: wiggled the bo9ttom middlewith the handles off and somethign finally “clicked” into place for that extra 1/4 mm for the down arrow on my D-Pad to click back up into place!.

    Spoutin Wyze - 返信

  3. Xbox Oneのワイヤレスコントローラの方向パッドの交換, ネジ: 手順 3、 2の画像 1 Xbox Oneのワイヤレスコントローラの方向パッドの交換, ネジ: 手順 3、 2の画像 2
    • ラベルの裏のコントローラ中央部分にネジが一本隠れています。

    • ドライバーを使って、ラベルの中央部分の穴に向けて直接押し込んで穴を開けます。

    • もしラベルに穴を開けたくない場合はラベルを剥がしてください。

    • TR8いじり止めトルクスドライバーを使って、コントローラ裏側にある長さ10mmのネジを5本外します。

    i damaged my screws. how do i get the screws out?

    tenzin - 返信

    wait. i just watched a video guide on ifixit's youtube channel about damaged screws. i'll try those methods.

    tenzin - 返信

    It's a t8 or t9 security bit btw, I got the top two out with a regular T8, but the bottom two and middle needed a T9 Security bit.

    David Loper - 返信

    All five faceplate/backplate screws in the controller I disassembled were T8 security fasteners.

    John Dziedzic - 返信

    Am I doing something wrong because I got the tool it said I needed and got the middle screw out but the others have a bump or something in the center of the screw and it won't fit.

    kolton77 - 返信

    The T8 is only good for the middle screw on my One S controller. The others require something bigger

    Matej Skelo - 返信

    These requires SECURITY Torx bits (they have a cannulated hole in the driver). I don't believe the iFixIt branded driver is cannulated but you can buy a set of bits from DeWalt DWAX200 which is overkill but has what you need.

    jhighsmith - 返信

    The driver that iFixIt sells is cannulated.

    jhighsmith -

    where do you get this dumb ass screw driver

    Jake Zweier - 返信

    iFixit Store #IF145-027-3

    VauWeh - 返信

    You can bypass it with a 1.5mm flathead.

    Marianne Sandling - 返信

    thank you for this. worked for me

    Mr Anderson (Evolluisionist) -

    These screws required a T10, not T8.

    Armand - 返信

    TR9. A $10 kit from Walmart has the bit/driver in it and extra goodies to make life simple.

    Matt Martin - 返信

    As weird as it sounds, the top 2 came out for me with a flathead- but the bottom two and the middle one wont

    macybrooksevans - 返信

    If you damage the middle part of the screws you can still take it out with the same screwdriver.

    Kev God - 返信

    Thank-You :)

    Isaiah - 返信

    needed a T8H, not easy to see.

    on a grey green xbox one controller

    Michael - 返信

    On my 1708 controller there are two internal screws near the rumble motors that need to be removed with a T6 non security bit to remove the back cover.

    teeedubb - 返信

  4. Xbox Oneのワイヤレスコントローラの方向パッドの交換, バックプレート: 手順 4、 1の画像 1
    • バックプレートを取り外します。

  5. Xbox Oneのワイヤレスコントローラの方向パッドの交換, フェイスプレート: 手順 5、 1の画像 1
    • フェイスプレートを取り外します。

  6. この手順は未翻訳です。 翻訳を手伝う。

    Xbox Oneのワイヤレスコントローラの方向パッドの交換, 方向パッド: 手順 6、 2の画像 1 Xbox Oneのワイヤレスコントローラの方向パッドの交換, 方向パッド: 手順 6、 2の画像 2
    • Pry off the metal frame around the D-Pad.

  7. Xbox Oneのワイヤレスコントローラの方向パッドの交換, 方向パッド: 手順 7、 1の画像 1
    • ハウジングから方向パッドを持ち上げます。

終わりに

デバイスを再度組み立てるには、この説明書の逆の順番で組み立ててください。

44 の人々がこのガイドを完成させました。

以下の翻訳者の皆さんにお礼を申し上げます:

en jp

75%

railgunさんは世界中で修理する私たちを助けてくれています! あなたも貢献してみませんか?
翻訳を始める ›

作成者

7人の作成者と共同で作成されました。

Garrett George

メンバー登録日: 01/22/15

6,154 ポイント

3のガイドは作成済み

チーム

Cal Poly, Team 20-15, Maness Winter 2015 Cal Poly, Team 20-15, Maness Winter 2015人のメンバー

CPSU-MANESS-W15S20G15

5 メンバー

50のガイドは作成済み

7 件のコメント

Can you show me how to replace xbox one controller 3.5mm stereo jack dpad

Arief Hidayat - 返信

This model of the xbox one controller does not feature a 3.5mm headphone jack. Please look at the guides for later models of the xbox one controller.

Brandon -

it's exactly the same like shown above :)

David Schmidt - 返信

How do u fix one of the silver things behind the d-pad?

Bob - 返信

How do fix the silver things behind each d-pad

Bob - 返信

I had a unresponsive left-button on my D-pad. It worked consistently only if I pressed very hard. l fixed mine, not with a new D-pad, but by adding a few layers of plastic tape over the press-sensitive “cushion” (the one that the button plastic part of the left d-pad should trigger). That made it much more responsive. It feels slightly different pressing down on the button now, but I can live with that trade-off.

john lastson - 返信

Como arreglo las teclas además de desmontar se puede arreglar cada botón?
isaac barreto - 返信

コメントを追加

統計データ:

過去 24時間: 4

過去 7 日: 65

過去 30 日: 308

今までの合計 63,096