この翻訳は、ソースガイドの最新の更新を反映していない可能性があります。 翻訳の更新に協力してください。 または ソースガイドを参照してください。
はじめに
交換が必要なマザーボード上の特定の部品にアクセス必要があるため、このガイドは重要です。
必要な工具と部品
-
-
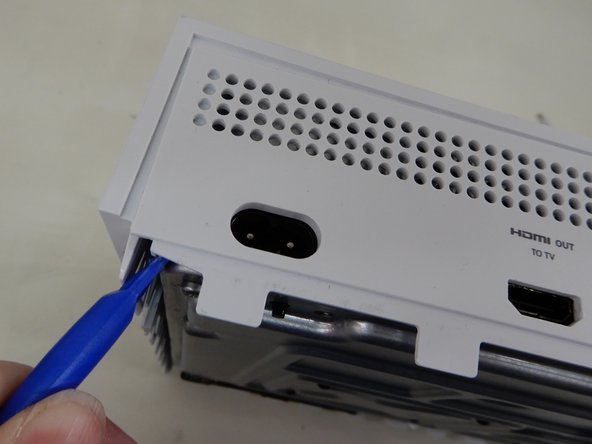
プラスチック製開口ツールを、底部ケースと格子状に穴が開いた上部との隙間に差し込みます。次に、この隙間でケースを固定しているクリップを探します。
-
開口ツールを使用してクリップを外します。黒いケースを底部側からこじ開けて外すのが最も簡単です。
Important!!
You've to start from the back corner where is the information label, because there is a main clip behind a warranty sticker
They should add this to the guide! I didnt know that, and did some minor damage to the bottom piece where that main clip is.
I dont mind because it's my own Xbox, but what if it belonged to a customer?
They should add this to the guide! I didnt know that, and did some minor damage to the bottom piece where that main clip is.
I dont mind because it's my own Xbox, but what if it belonged to a customer?
💯% same opinion!
I legitimately cannot open the case where the warranty sticker is, ive tried everything, im resorting to a fork to try and open this
-
-
-
金属ケースにある、F1~F6と刻印された緑色のネジの位置を全て確認します。
-
T10トルクスドライバーを使用して、長さ50 ㎜のネジ6本を取り外します。
My F3 isn't coming out. The screwdriver isn't sitting tight like it is for the other ones. Any idea on how to fix that?
ben mccord - 返信
-
-
-
-
適切な方法で、慎重にインナーケースをアウターケースから分離します。
“appropriate method is not descriptive like Mr. Ross’s comment. The original poster should edit the description to ensure people do in fact remove the box from the case appropriately. I would also add arrows to the picture.
____________⬆️
↖️Yes! I see it the same way!↗️
⬅️Arrows are always a good thing!➡️
↙️Can't do anything wrong with them! ↘️
____________⬇️
😅😅
I didn't realize that metal ribbon was connecting the case to the console and I yanked it w out realizing it was there. How o I get a replacement?
-
-
-
ハードドライブを交換するには、C3とC4の位置にある10 ㎜ T-10トルクスネジ2本を、Xbox One Sの裏面から取り外します。
Some of my silver were gold screws, so just letting people know to look out for that!
The Torx screw circled on the left is actually C5
I found the same. On my Xbox One S, it's C3 and C5 that hold in the hard drive caddy. C4 holds in the optical disk caddy.
jamesr -
Funny thing on my console rev t t3 built feb 2018 it’s C4 and C5
KingofRome - 返信
-
-
-
慎重にハードドライブとマザーボードの接続を解除します(写真のプラスチック製コネクタ2か所)。
Do not remove the cable!!!! You can change while the cables are plugged. It took 2 hours trying to put mm precisely all the little pins because of the removal of the cables.
Please update the post, I could easily end up as the Aaron, breaking the XBOX completly.
Yes, this has also happened to me the connectors had broken and the pins bent and snapped off.
-
-
-
光学ディスクドライブを取り外すには、「C5」と表記された銀色の10 ㎜ T-10トルクスネジを取り外します。
-
-
-
マザーボードを交換するには、「C1」、「C2」、「C6」と表記された銀色の10 ㎜ T-10トルクスネジ3本を取り外す必要があります。
-
「A1」「A2」「A3」「A4」と表記された黒い8 ㎜ T-9トルクスネジ4本を取り外します。
The Black screws are T-8 Torx, not T-9!
I didnt see this before, so thankfully I was able to use T9 without stripping the screws!
IMPORTANT! You also need to remove the two T10 screws labeled B1 and B2 in order to remove the motherboard! I had to figure this out on my own.
-
-
-
電源ブロックの反対側の隅にある銀色の長方形クランプの位置を確認します。
-
-
-
これでクランプが外れたので、慎重にマザーボードを端から持ち上げて、メタルケースから取り外します。マザーボードは簡単に外れるはずです。
How do you open it?
They forget, I think, to tell that first you need to take off screw B1 and B2
-


元通りに組み立てるには、これらの手順を逆に実行します。
元通りに組み立てるには、これらの手順を逆に実行します。
55 の人々がこのガイドを完成させました。
以下の翻訳者の皆さんにお礼を申し上げます:
50%

prednin5mgさんは世界中で修理する私たちを助けてくれています! あなたも貢献してみませんか?
翻訳を始める ›
チーム

Cal Poly, Team S22-G3, Livingston Spring 2017 Cal Poly, Team S22-G3, Livingston Spring 2017人のメンバー
CPSU-LIVINGSTON-S17S22G3
4 メンバー
56のガイドは作成済み
10 件のコメント
This guide is really missing alot between steps 13 and 14. There are two black panels that have to be removed(they’re in the teardown guide). One is on the front with with screws E1 ,E2, E3, E4. And theres another panel on the side with screws D1, D2, D3. Finally there are two more screws on the bottom that hold down the motherboard B1, and B2. Theres Also a black from in between the Fan and case that slides off too.
Yep, I was using this guide and realized that it is missing a few vital steps. Thank you Nathan.
If you have a multimeter could you please test the test points around the board and give me a list of a voltages?
fantastic! only issues that are missing, are mentioned in the comments above. I´d like to include that most of the exterior hardcase clips are made to be HELD in place. Which is why it´s a nuisanse to remove. So, newcomers be careful with it. otherwise you´ll easily break it.
Son los mejores
My xbox one s turns on, fan runs but no signal nor will not connect to controller.
I do have a faint burnt smell, any idea what could be at fault?
a 5 min job ???????? LOL
Alan Sears - 返信