この修理ガイドは変更されています。最新の未承認バージョンに切り替えます。
はじめに
ヒートシンクとファンは個別のパーツですが、マザーボード上で相互に取り付けられているため、片方を交換する手順は、他方を交換する手順と全く同じです。
必要な工具と部品
-
-
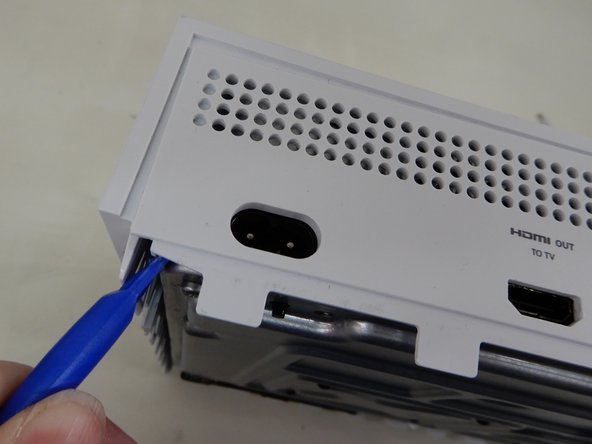
プラスチック製開口ツールを、底部ケースと格子状に穴が開いた上部との隙間に差し込みます。次に、この隙間でケースを固定しているクリップを探します。
-
開口ツールを使用してクリップを外します。黒いケースを底部側からこじ開けて外すのが最も簡単です。
Important!!
You've to start from the back corner where is the information label, because there is a main clip behind a warranty sticker
They should add this to the guide! I didnt know that, and did some minor damage to the bottom piece where that main clip is.
I dont mind because it's my own Xbox, but what if it belonged to a customer?
They should add this to the guide! I didnt know that, and did some minor damage to the bottom piece where that main clip is.
I dont mind because it's my own Xbox, but what if it belonged to a customer?
💯% same opinion!
I legitimately cannot open the case where the warranty sticker is, ive tried everything, im resorting to a fork to try and open this
-
-
-
金属ケースにある、F1~F6と刻印された緑色のネジの位置を全て確認します。
-
T10トルクスドライバーを使用して、長さ50 ㎜のネジ6本を取り外します。
My F3 isn't coming out. The screwdriver isn't sitting tight like it is for the other ones. Any idea on how to fix that?
ben mccord - 返信
-
-
-
適切な方法で、慎重にインナーケースをアウターケースから分離します。
“appropriate method is not descriptive like Mr. Ross’s comment. The original poster should edit the description to ensure people do in fact remove the box from the case appropriately. I would also add arrows to the picture.
____________⬆️
↖️Yes! I see it the same way!↗️
⬅️Arrows are always a good thing!➡️
↙️Can't do anything wrong with them! ↘️
____________⬇️
😅😅
I didn't realize that metal ribbon was connecting the case to the console and I yanked it w out realizing it was there. How o I get a replacement?
-
-
-
-
ハードドライブを交換するには、C3とC4の位置にある10 ㎜ T-10トルクスネジ2本を、Xbox One Sの裏面から取り外します。
Some of my silver were gold screws, so just letting people know to look out for that!
The Torx screw circled on the left is actually C5
I found the same. On my Xbox One S, it's C3 and C5 that hold in the hard drive caddy. C4 holds in the optical disk caddy.
jamesr -
Funny thing on my console rev t t3 built feb 2018 it’s C4 and C5
KingofRome - 返信
-
-
-
慎重にハードドライブとマザーボードの接続を解除します(写真のプラスチック製コネクタ2か所)。
Do not remove the cable!!!! You can change while the cables are plugged. It took 2 hours trying to put mm precisely all the little pins because of the removal of the cables.
Please update the post, I could easily end up as the Aaron, breaking the XBOX completly.
Yes, this has also happened to me the connectors had broken and the pins bent and snapped off.
-
-
-
光学ディスクドライブを取り外すには、「C5」と表記された銀色の10 ㎜ T-10トルクスネジを取り外します。
-
-
-
マザーボードを交換するには、「C1」、「C2」、「C6」と表記された銀色の10 ㎜ T-10トルクスネジ3本を取り外す必要があります。
-
「A1」「A2」「A3」「A4」と表記された黒い8 ㎜ T-9トルクスネジ4本を取り外します。
The Black screws are T-8 Torx, not T-9!
I didnt see this before, so thankfully I was able to use T9 without stripping the screws!
IMPORTANT! You also need to remove the two T10 screws labeled B1 and B2 in order to remove the motherboard! I had to figure this out on my own.
-
-
-
電源ブロックの反対側の隅にある銀色の長方形クランプの位置を確認します。
-
-
-
これでクランプが外れたので、慎重にマザーボードを端から持ち上げて、メタルケースから取り外します。マザーボードは簡単に外れるはずです。
How do you open it?
They forget, I think, to tell that first you need to take off screw B1 and B2
-
-
-
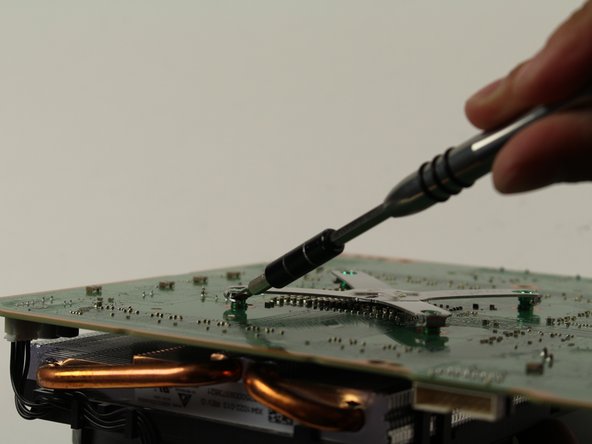
マザーボードを裏返して、金属製のX字型ブラケットを探します。
-
スパッジャーまたはプラスチック製開口ツールを使用して、ブラケットの四隅にある、小さな緑色の固定具をこじ上げて外します。
-
-
-
白いプラスチック製のコネクタを慎重に引っ張って、ボードからファン/ヒートシンクを取り外します。
You don’t have to take the heatsink off the motherboard to take the fan off if that’s what you’re after, just take a flathead and lift the clips and that should let the fan go.
-
-
-
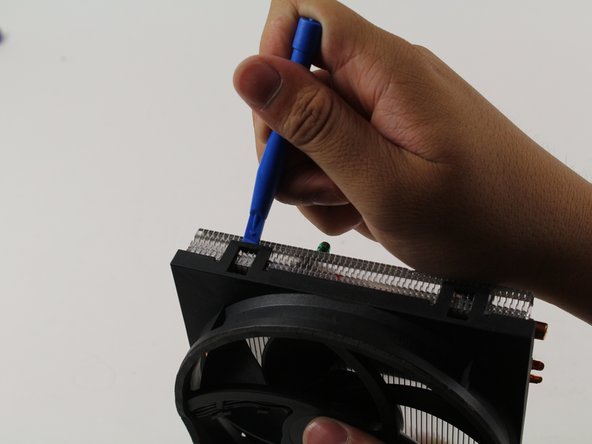
ヒートシンク/ファンをボードから取り外したら、プラスチック製開口ツールでプラスチック製ファンの長方形クリップをこじ上げて、ファンを金属製ヒートシンクから取り外します。
This guide and the visual diagrams provided are great but shouldn’t you at least mention destatic process, work matt grounding and the need to replace thermal compound for the sake of novices doing at home repairs?
I agree with the comments, though I am not the author; I repair stuff like this for a living. Making manuals on IFIXIT.com is a dilemma. The manuals are great if you are the repair guy and need some basic help on a new device. But if then again, if you are the repair guy, and you have much experience, do I really want to give away all my hard-earned experience to the average home DIY guy who thinks they can do everything without paying anybody for it? My .02 on the comment by Mikey is that indeed, a cursory mention of "additional precautions/procedures" should be included, but not with much detail. In fact, I think ALL of the IFIXIT manuals abruptly end and should have a disclaimer to the effect of, "THIS GUIDE MAY BE INCOMPLETE. INEXPERIENCED DIYers MAY PERMANENTLY DAMAGE OR "BRICK" THE DEVICE. WE HIGHLY RECOMMEND CONTACTING AN EXPERIENCED TECHNICIAN."
"Cannot edit comment after 5 minutes past" is very stupid. What if I wanted to correct a typo or logic error? 5 minutes is way too short. After 24 hours maybe... So now the community knows why we do not post much on this forum. And BTW, the laws in California are very different than the laws in other states, so some of the issues that are pushed do not apply at all in other states.
-


元通りに組み立てるには、これらの手順を逆に実行してください。
元通りに組み立てるには、これらの手順を逆に実行してください。
42 の人々がこのガイドを完成させました。
以下の翻訳者の皆さんにお礼を申し上げます:
100%

prednin5mgさんは世界中で修理する私たちを助けてくれています! あなたも貢献してみませんか?
翻訳を始める ›
チーム

Cal Poly, Team S22-G3, Livingston Spring 2017 Cal Poly, Team S22-G3, Livingston Spring 2017人のメンバー
CPSU-LIVINGSTON-S17S22G3
4 メンバー
56のガイドは作成済み
9 件のコメント
After researching replacement costs through local "fixit" places and Microsoft and cost ranging from $140 to $175 for fan replacement. Decided to take chance on this fan for Xbox one S. https://www.amazon.com/gp/product/B07HD3... Take time taking the bottom black plastic cover off once it gets started its easy. The corner by MS logo has tab that seems a bit thicker and took some doing to get off. Followed this guide did not have to do port removal. Once I got main white case off I just took hard drive and optical drive screws out. Just lifted enough to get to tab holding fan onto heat sink. popped them off and then replaced with this unit. Be aware when putting optical drive and hard drive back in place there are plastic tabs that match to holes on motherboard and let the two units sit down all the way. Also If I recall the hard drive goes in first and then optical drive. 15 minutes from start to finish. Worked like a champ right off! thanks for the awesome guide!
ACHTUNG!!! Schritt 15 ist UNNÖTIG bzw. hat so wie hier beschrieben womöglich FATALE Folgen für Eure Xbox! (Es sei denn Ihr wollt aus irgendeinem mir nicht ersichtlichen Grund den Kühler austauschen und nicht den Lüfter.) Denn was hier unterschlagen wird: Löst man den Kühler wie in den Bildern gezeigt von der Platine wird die Verbindung zwischen Kühleinheit und Prozessor unterbrochen und die Kühlpaste zerbröselt und verliert jegliche Wirkung!
Der Lüfter lässt sich auch OHNE Ablösen des Kühlkörpers relativ einfach von diesem abhebeln. Falls dennoch der Kühlkörper von der Platine abgelöst werden soll/muss (oder so wie in meinem Fall im blinden Vertrauen auf die Richtigkeit obiger Anleitung unnötigerweise entfernt wurde) UNBEDINGT Prozessor und Kühlkörper von der alten Paste befreien und neue Paste auftragen (Anleitungen hierfür finden sich im Netz).
Es rät sich auf jeden Fall an, die Wärmeleitpaste zwischen Kühlkörper und Prozessor zu wechseln (besonders, wenn sie bereits trocken ist und beim Ausbau zerbröselt), wenn man sich schon die Mühe macht und die Xbox komplett demontiert.
Die Anleitung zum Austausch der Wärmeleitpaste gibt es hier:
Ach ja: außerdem fehlt in der Beschreibung das Lösen der beiden seitlich angebrachten Funkmodule (in neuren Modellen?) und zwei zusätzliche Schrauben (B1 und B2) müssen auch noch entfernt werden, um die Hauptplatine lösen zu können. ;-)
Regulär alles da. Nur separat aufgelistet
completely misses steps of the process. screws B1 and B2 are required to be removed to seperate the motherboard, and you didnt mention removing the power supply at all, its just in one step and gone the next. with the help of another barely helpful guide, i managed to figure out enough of it to get the job done. would recommend you use gifs for certain steps.
noticed this too i might make a guide with improved steps to help future fixers
Hayden -
what size fan doser it use as i have some leftover 120mm fans but idk if they will fit