この翻訳は、ソースガイドの最新の更新を反映していない可能性があります。 翻訳の更新に協力してください。 または ソースガイドを参照してください。
はじめに
Xbox One Sのケースを取り外す際は、クリップを損傷しないように注意してください。
必要な工具と部品
-
-
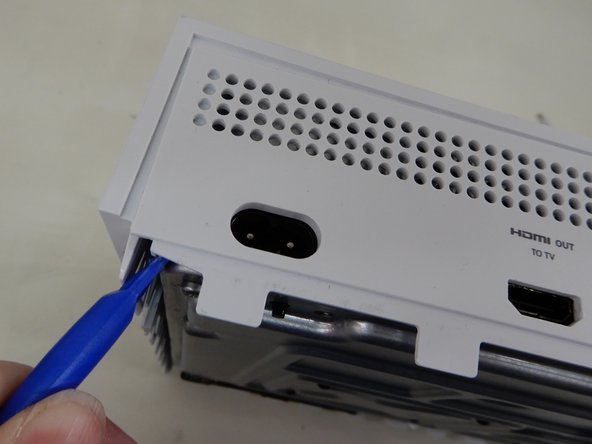
プラスチック製開口ツールを、底部ケースと格子状に穴が開いた上部との隙間に差し込みます。次に、この隙間でケースを固定しているクリップを探します。
-
開口ツールを使用してクリップを外します。黒いケースを底部側からこじ開けて外すのが最も簡単です。
Important!!
You've to start from the back corner where is the information label, because there is a main clip behind a warranty sticker
They should add this to the guide! I didnt know that, and did some minor damage to the bottom piece where that main clip is.
I dont mind because it's my own Xbox, but what if it belonged to a customer?
They should add this to the guide! I didnt know that, and did some minor damage to the bottom piece where that main clip is.
I dont mind because it's my own Xbox, but what if it belonged to a customer?
💯% same opinion!
I legitimately cannot open the case where the warranty sticker is, ive tried everything, im resorting to a fork to try and open this
-
-
-
-
金属ケースにある、F1~F6と刻印された緑色のネジの位置を全て確認します。
-
T10トルクスドライバーを使用して、長さ50 ㎜のネジ6本を取り外します。
My F3 isn't coming out. The screwdriver isn't sitting tight like it is for the other ones. Any idea on how to fix that?
ben mccord - 返信
-
-
-
適切な方法で、慎重にインナーケースをアウターケースから分離します。
“appropriate method is not descriptive like Mr. Ross’s comment. The original poster should edit the description to ensure people do in fact remove the box from the case appropriately. I would also add arrows to the picture.
____________⬆️
↖️Yes! I see it the same way!↗️
⬅️Arrows are always a good thing!➡️
↙️Can't do anything wrong with them! ↘️
____________⬇️
😅😅
I didn't realize that metal ribbon was connecting the case to the console and I yanked it w out realizing it was there. How o I get a replacement?
-
元通りに組み立てるには、これらの手順を逆に実行してください。
元通りに組み立てるには、これらの手順を逆に実行してください。
36 の人々がこのガイドを完成させました。
以下の翻訳者の皆さんにお礼を申し上げます:
55%
これらの翻訳者の方々は世界を修理する私たちのサポートをしてくれています。 あなたも貢献してみませんか?
翻訳を始める ›
5 件のコメント
I struggled with the retention tabs the first time I opened the Xbox S. I dabbed a little Armor All on a Qtip and coated both sides of tabs with a little. Popped right open the second time, wiped Armor All on the fan blades as well to minimize dust collection.
Hi!
Great review of the process! I have a question, having stripped down an rebuilt an XBox One S to extract a 500 yuan note and two peties my 7 year old inserted in the CD/DVD slop, as well as a DOA DVD drive the power switch is not working. It works if I short the contact but there appears to be a square hole in the back of the power switch (the x box logo)
Should there be a conducting contact in the back of the switch and if so, is it simply a square lump of steel or is it tapered? Would like the dimensions please.
Many thanks for taking time to reply!
Dr B
Dr John C Bullas
Southampton UK
Hi can u fit a core i5 apple gen in Xbox one s case
Excuse me but is there an everyday item that I can use to open the bottom of my Xbox one s with?
Brody Luce - 返信


