メインコンテンツにスキップ

この修理ガイドは変更されています。最新の未承認バージョンに切り替えます。

Xbox DVD Drive Disassembly

必要な工具と部品

  1. Xbox DVD Drive Disassembly, Hard Drive: 手順 1、 1の画像 1
    • Make sure your Xbox is safely unplugged and is laying on a flat, stable surface.

  2. Xbox DVD Drive Disassembly: 手順 2、 1の画像 1
    • Turn the Xbox over to reveal the four rubber feet.

    • Use a metal spudger to pry off the four rubber feet.

  3. Xbox DVD Drive Disassembly: 手順 3、 2の画像 1 Xbox DVD Drive Disassembly: 手順 3、 2の画像 2
    • There are 2 more screws hidden under the two labels on the bottom of the case.

    • You can either remove the labels or simply feel for the screw holes through the labels and then cut or punch a hole through them.

  4. Xbox DVD Drive Disassembly: 手順 4、 1の画像 1
    • Remove the six T20 Torx screws securing the top cover to the bottom cover.

  5. Xbox DVD Drive Disassembly: 手順 5、 2の画像 1 Xbox DVD Drive Disassembly: 手順 5、 2の画像 2
    • Once the bottom and top shells are no longer attached, carefully turn the Xbox right-side-up, lift and remove the top cover.

  6. Xbox DVD Drive Disassembly: 手順 6、 2の画像 1 Xbox DVD Drive Disassembly: 手順 6、 2の画像 2
    • Remove the three 3 mm T10 screws securing the hard drive to the Xbox.

    • There is one screw on the rear left side of the hard drive that is only visible when the IDE ribbon cable is lifted up. The other two are at the front right and left sides of the hard drive.

    • The screw on the lower left corner of the disk drive is not in the hole that it appears to be in, but rather just closer to the corner.

  7. Xbox DVD Drive Disassembly: 手順 7、 2の画像 1 Xbox DVD Drive Disassembly: 手順 7、 2の画像 2
    • Free the hard drive power cable from the carrier for sufficient slack to lift the hard drive out.

    • Lift the plastic hard drive carrier out of the Xbox case.

  8. Xbox DVD Drive Disassembly: 手順 8、 3の画像 1 Xbox DVD Drive Disassembly: 手順 8、 3の画像 2 Xbox DVD Drive Disassembly: 手順 8、 3の画像 3
    • Remove the four 3.4 mm T15 Torx screws from the plastic hard drive carrier (two screws per side).

    • Carefully remove the hard drive from the plastic carrier. Gentle rocking will see the hard drive come out quite easily.

  9. Xbox DVD Drive Disassembly: 手順 9、 2の画像 1 Xbox DVD Drive Disassembly: 手順 9、 2の画像 2
    • Pull both the hard drive data ribbon cable and the power cable straight up from the hard drive.

    • They may be firmly seated, so be careful trying to remove them. DO NOT pull the wires as you may damage the cable assembly.

  10. Xbox DVD Drive Disassembly, Disc Drive: 手順 10、 3の画像 1 Xbox DVD Drive Disassembly, Disc Drive: 手順 10、 3の画像 2 Xbox DVD Drive Disassembly, Disc Drive: 手順 10、 3の画像 3
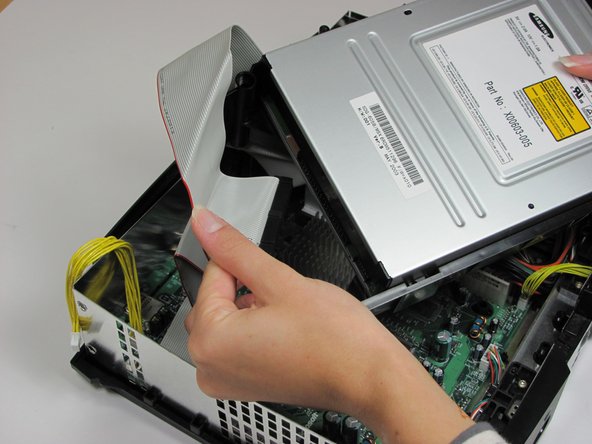
    • Remove the disk drive. It should come right out.

    • Unplug the ribbon cable and yellow cables from back of disk drive.

  11. Xbox DVD Drive Disassembly: 手順 11、 1の画像 1
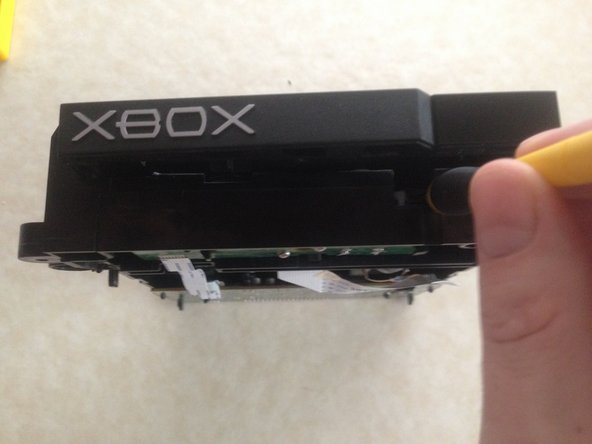
    • Pry back the black plastic tabs around the disk drive in order to remove it from its housing. Once removed, set the drive aside.

    • ONLY REMOVE IF DEAD!

  12. Xbox DVD Drive Disassembly, Remove DVD Drive Casing: 手順 12、 3の画像 1 Xbox DVD Drive Disassembly, Remove DVD Drive Casing: 手順 12、 3の画像 2 Xbox DVD Drive Disassembly, Remove DVD Drive Casing: 手順 12、 3の画像 3
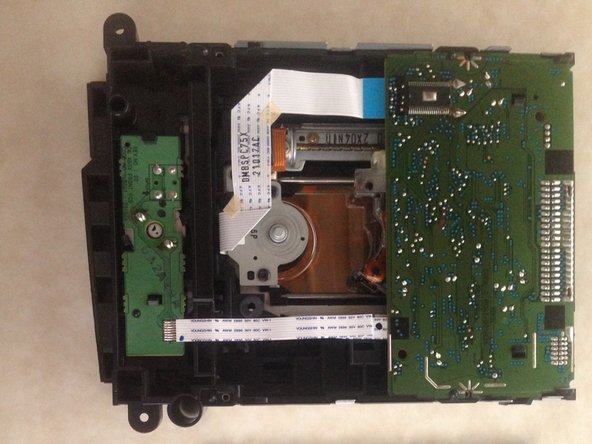
    • Please note that if all you are trying to do is manually eject a game and not make repairs to the drive, step 14 is the ONLY required step. It is NOT necessary to remove the drives casing, just push the tray in when you're done.

    • Start by removing the 4 screws on the bottom of the drives case using a Philips #0. There are different variations of the drive and some have Torx screws instead of Philips. Use the necessary tool for the specific version that you have.

    • Once screws are removed, lift the bottom half of the case up and away from the drive.

    • Flip the drive over and remove the top half of the drives case.

  13. Xbox DVD Drive Disassembly, Manually Ejecting the Drive: 手順 13、 3の画像 1 Xbox DVD Drive Disassembly, Manually Ejecting the Drive: 手順 13、 3の画像 2 Xbox DVD Drive Disassembly, Manually Ejecting the Drive: 手順 13、 3の画像 3
    • Using your screwdriver, or anything slim enough to fit, gently push the white lever back. Put your object on the right hand side of the lever, slightly pushing right as you push back.

    • The lens will drop down and your drive door will open about a quarter inch.

    • Gently pull the tray to its open position. If you have a game stuck in your drive, this would be the ideal time to remove it. It can be removed in step 13 but it's not as easy.

  14. Xbox DVD Drive Disassembly, Closing/Resetting the Drive: 手順 14、 1の画像 1
    • Gently push the tray closed by hand.

    • Using your screwdriver, or whatever object best suits you, you need to return the white lever to its forward position to reset the drive properly. Get your object behind the right side of the lever, gently pushing it forward, returning it to its original position.

  15. Xbox DVD Drive Disassembly, Reattaching DVD Drive Case: 手順 15、 1の画像 1
    • Put the top of the case on first and then flip the drive.

    • Replace the bottom half of the case and secure the screws back in place.

終わりに

To reassemble your device, follow these instructions in reverse order STARTING FROM STEP 12.

6 の人々がこのガイドを完成させました。

作成者

2人の作成者と共同で作成されました。

Navy Vet 2015

メンバー登録日: 06/25/15

7,296 ポイント

15のガイドは作成済み

3 件のコメント

What is the easiest way to clean the laser in the original xbox?

Brayan Hernandez - 返信

Hit it with a can of air duster. If further cleaning is required apply a small amount of rubbing alcohol on a Q-tip and gently clean the lens. I hope this helps.

Navy Vet 2015 - 返信

It there any trouble shooting guide for this drive or similar. I replaced the laser on mine but it still will not read disks. Not sure if it is a bad part.

maddigor - 返信

コメントを追加

統計データ:

過去 24時間: 5

過去 7 日: 39

過去 30 日: 169

今までの合計 20,741