はじめに
このガイドを参照して、マザーボードを取り出します。CPUとGPUヒートシンクを再インストールする前に、放熱グリスを必ず塗布してください。
必要な工具と部品
-
-
スパッジャーの平面側先端、もしくはXbox 360開口ツールの先端を下部ベントの正面側端にできた小さな隙間に差し込みます。
-
下部ベントの正面端をこじ開けて、フェイスプレートを外します。
You can avoid this step by pulling the front cover off. Just make sure you don't break the springs for the USB bay area.
Hello, thank you ifix for this guide, I followed this guide, I got stuck at some point but I resolved it. Also I want to share this resource: Step by Step guide to fix Xbox 360 errors it helped me go through all the things associated with Xbox 360 and the troubleshooting of errors. Hope this can also help you all.
-
-
-
スパッジャーの平面側先端を、フェイスプレートと電源ボタン付近の外側ケースの間に差し込みます。
-
スパッジャーをフェイスプレートの端に沿ってスライドして、コンソール正面側に固定されているクリップを外します。
The faceplate just pulls off, using a tool is completely unneccessary. https://beta.support.xbox.com/help/xbox-...
-
-
-
-
コンソールの上部端を下向きに立てます。
-
コンソールから慎重に保証対象外となる、ボイドステッカーを剥がします。
LOL “Romove the warenty seal”
-
-
-
Xbox 360の開口ツールを使って、 I/Oポート付近の上部ケースと下部ケースを固定しているクリップを押し込みます。
-
ツールで押し込みながら、下部と上部ケースを押して固定クリップを外します。
I didn't have an XBox tool, so I followed instructions in this video for this step (https://www.youtube.com/watch?v=qaxIB6cX...) to pry it open with your fingers and a screwdriver.
The small (metal) women's hair clip is best for un-latching the tabs. The screw drivers just make the holes bigger.
Denny Ross - 返信
You can also use the pointed end of a plastic spudger to push each clip free while you separate the case with your free hand.
-
-
-
スパッジャーの先端を使って、メタルケース上のイジェクトボタンを固定しているクリップを外します。
-
スパッジャーの平面側先端を、イジェクトボタンと光学ドライブの間に差し込みます。
-
イジェクトボタンを固定しているポートからこじ開けて外します。
-
-
-
光学ドライブとメタルケースを固定しているシルバーのテープを剥がします。
Looking at mine, I doubt it. It looks like standard foil tape
-
-
-
電源コネクタのケーブルをつまんで、まっすぐ光学ドライブ上のソケットから引き抜きます。
-
光学ドライブのソケットから、SATAデータコネクタの接続を外します。
I found the power cable to be very tough to get out, at least it is the first time doing this.
-
-
-
メタルケースから光学ドライブアセンブリを持ち上げます。
Be careful not to lose or break the two teeny metal clips securing the optical drive assembly snugly to the metal casing on either side of the drive's front face. I used a spudger to press in the topmost tines on these clips because they were catching on the drive and bending up. The clips should stay on the metal housing, not come off with the drive.
-
-
-
スパッジャーの平面側先端を、冷却ファンダクトの上部の小さな長方形の開口部分に差し込みます。
-
ファンダクトの固定クリップを慎重に外します。
-
Xbox 360の開口ツールでも対応できます。
Fair warning for people using this guide for maintenance, the inside will likely have a coating of fine dust or dirt
-
-
-
メタル製シャーシのストリップをデュアルファンの上に持ち上げながら、ファンをマザーボード中央側に引っ張ります。
Cleaning out the fan now, will help problems in the future.
Joe Begley - 返信
Do Step 35 first (remove the fan connector from the motherboard), otherwise as you pull the fans forward out of the metal bracket you risk stressing the connector's attachment to the motherboard (because the fans will press against the connector as you pull them forward).
There are small black feet on the bottom of the fan assembly, You can push up from the bottom of the case if needed.
these are powerful fans. im having over heating issues with a brushless motor. anything less than a 120mm pc fan does nothing. but i must keep the top off to fit the 120 and adequate heat removal. so i wanna use tbis turbo fan and mount i ti the lid.
how do i remove the blades and get to the bearings and guts??
theres no rear access hole hiding under the specs sticker.
please help! thank
-
-
-
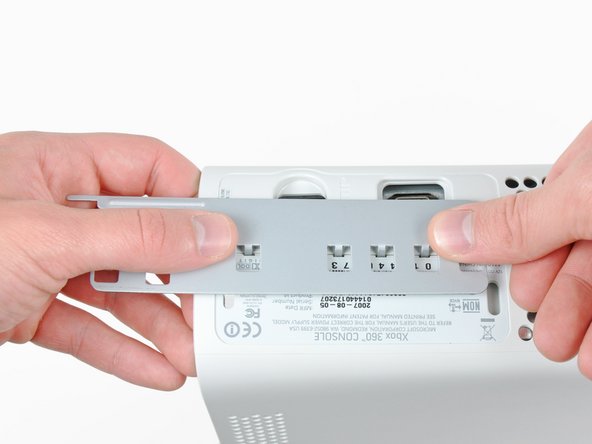
スパッジャーの平面側先端を使って、RFモジュールの上部と左端に沿って、RFモジュールシールドを固定しているクリップを外します。
-
RFモジュールシールドをコンソールから取り出します。
-
-
-
メタル製シャーシとRFモジュールを固定している5.6mm T8トルクスネジを外します。
for whatever reason the T8 screws holding the RF receiver on my unit were torqued on pretty hard. almost impossible to get off. IS taking the RF off really necessary?
They all seem like that the further down we go. Unless you're here to just repaste the board, you have to take it off
-
-
-
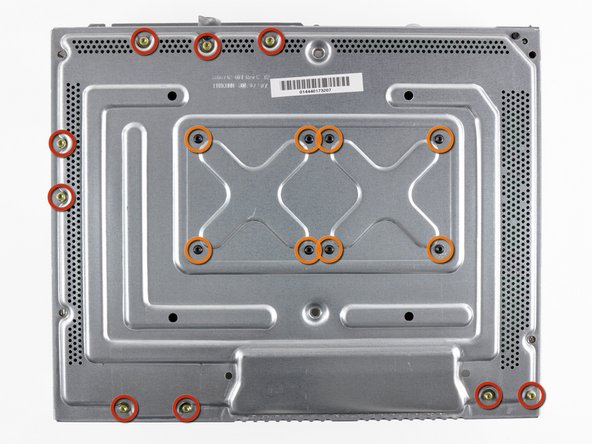
メタルケースとマザーボードを固定している次のネジを外します。
-
ゴールド 11mm T10トルクスネジー9本
-
黒 5.6mm T8トルクスネジー8本
kinda hard for a KID to do this huh also I am a 9 year old you get it
Andy Ewing - 返信
well, it almost as if this is labeled as Difficult in the beginning!
The T8’s were T9’s on mine. This guide could be wrong, or my toolkit was mislabeled. If you can’t get the T8’s out, try a T9 before stripping the screws!
They were T8’s for me
Ryan Lee -
-
-
-
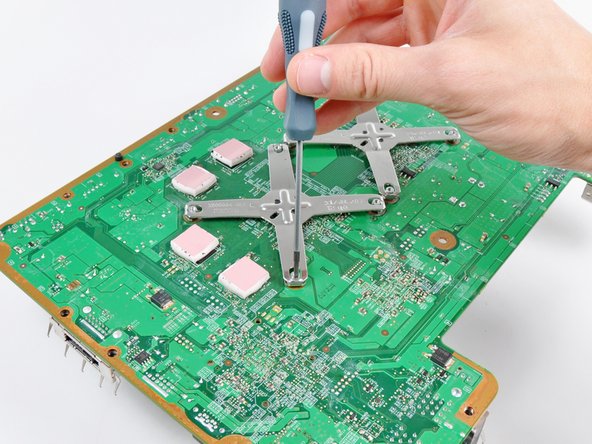
小さなマイナスドライバーの先端を、ヒートシンク上のXクランプと固定ポストの間に差し込みます。
-
固定ポスト上に生じる小さな溝の上にXクランプが持ち上がるまで、固定ポストよりXクランプをこじ開けて外します。
The instructions on how to remove the x clamps are insufficient. I had a great deal of trouble with them. The small flathead screwdriver included with the kit is too small and weak to do the job. I ended up Googling other how-to's. I used a larger screwdriver and FINALLY popped them off, however as careful as I tried to be in the process I accidentally damaged a few traces around the screw hole. Repair was a failure, still have 3 red lights. Waste of time and money.
Why the heck would you suggest using a screwdriver to release the x-clamps from the motherboard, knowing that the screwdriver could slip and damage some of the traces on the motherboard!? Didn't see the comment about placing a piece of cardboard on the motherboard to prevent scratching until I had already screwed up my Xbox. How hard would it be for iFixit to develop a tool to easily remove the x-clamps like they did to open the Xbox? I wanted to do this to prevent any possibility of overheating, and went from a working Xbox to a dead one because of this bad step. Definitely took my view of iFixit down a notch, will be much more hesitant to recommend their tools and guides after this. Would like a refund but I know that's not going to happen. Super ticked!
Same thing just happened to me, the tiny screw driver they say to use has next to 0 leverage to get it off. Now my repair kit is useless cause I physically removed some of the bits because my screwdriver slipped.
Forren -
I found that inserting a sprudger between the X clamp and retaining post and turning while lifting worked well without damaging the board
The tool provided in the kit is completely incapable of performing this step (prying the X off the post).
I originally had a lot of issues prying them up; I was really worried about accidentally scratching the board. The instructions don’t seem fully adequate. Instead, first pry all four corners as high up as possible, pointing the screwdriver towards the center of the X clamp. If you pry them practically horizontally, then it makes the whole process a lot easier. Then work individually, pushing each corner slowly outwards and upwards, putting the screwdriver in from above (not the side as step 42 shows, too dangerous) into the small space between the screw and the X. Be careful at this point, just in case. Also, DON’T use the small flat head screwdriver provided; it’s too tiny to get proper leverage. I used 1/8 in. See this tutorial: https://www.youtube.com/watch?v=pHzEV3c_...
Maybe the tiny flathead in the kit I got is newer than the old ones…
DO NOT stick the screwdriver vertical as shown in step 41!
Instead use it like step 42. Insert it only that way, between each front of the X clip arm and the post, and turn it so the screwdriver turn pushes the bottom of the X clip off the post.
No risk of damaging the board this way.
Instructions were very unclear, but comments helped. Both used cardboard and the tutorial found here https://www.youtube.com/watch?v=pHzEV3c_... as mentioned by Sophia Vera. Took my time, and mostly used a longer screwdriver like in step 42. Once the first 3 clips come off, the fourth one essentially falls off, so be ready to catch your heat block when you pop the third one.
-
-
Is the x-clamp supposed to be reinstalled? It's not pictured in any part of the instructions after this point, so I did not reinstall it, and putting the xbox back together now is different than taking it apart.
The X-clamps are not reused. Since you install machine screws in place of the X-clamp mounting posts, you do not reinstall the eight screws highlighted in orange on step 41.
-
-
Xクランプとヒートシンクの固定ポストの間に小さなマイナスドライバの先端を挿入します。
-
Xクランプを、固定ポストに切り込まれた小さな溝の上に持ち上げるまで、固定ポストからこじ開けます。
-
マザーボードからCPUヒートシンクを取り外します。 CPUヒートシンクを再び取り付けるときは、必ず放熱グリスをしてください。
-
-
-
マザーボードを交換する場合は、マザーボードの下側にある4つのサーマルパッドを新しいマザーボードに移植します。
-
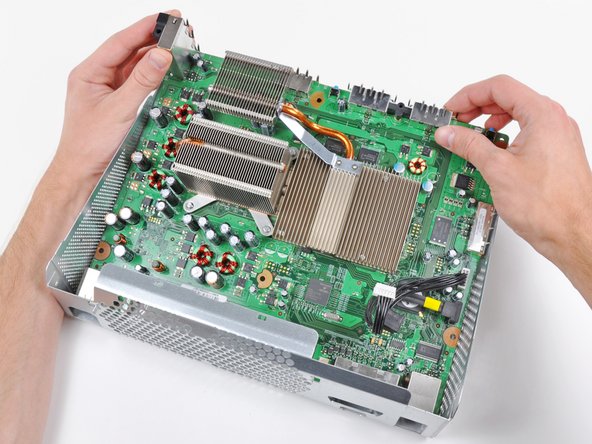
マザーボードのみが残ります。
I'm keeping the same motherboard so do I have to replace or need the thermal pads? For this guide
Replace them if they're crusty, or you can replace them
-


このデバイスを再組み立てするには、インストラクションを逆の順番に従って作業を進めてください。
このデバイスを再組み立てするには、インストラクションを逆の順番に従って作業を進めてください。
66 の人々がこのガイドを完成させました。
以下の翻訳者の皆さんにお礼を申し上げます:
100%

Midori Doiさんは世界中で修理する私たちを助けてくれています! あなたも貢献してみませんか?
翻訳を始める ›

5 件のコメント
Outstanding guide! My system did not need repairs. I simply opened it and gutted it so I could clean the entire thing inside and out like new to help maintain its lifespan. There is a metal frame underneath the top portion of the 360 case. I was unable to get inside this gap to clean it and a can of air duster is not powerful enough to blow out all the dirt/dust stuck to it. Has anyone found a way to get under there and clean?
You could use a lighter to melt the two plastic pieces holding the metal to the case.
I skipped putting back on the clamps since they were tedious to put on, Instead i just screwed the heatsink screws in and hoped that would keep it tight.
My fans sound like they are dying, what size fans do I need to replace them with, or do I have to find oem replacement parts?
WARNING: Just replacing the drive will not make it work correctly. Microsoft has married the drives to the motherboard. Hence, in order to get full operation out of the drive you'll have to perform more steps not listed here. Search in the FAQ on this specific topic for more details. Otherwise, before buying a new drive, try cleaning the inside of the old one and/or replace the belt involved in opening and closing the drive door.
- Good Luck
Eric - 返信
Thanks..helped!
joseph zulu - 返信
bress the button and lift with the same hand! i thought mine was stuck because of this pic!!!
Maths with Luigi - 返信