メインコンテンツにスキップ

このバージョンは誤った内容を含んでいる可能性があります。最新の承認済みスナップショットに切り替えてください。

必要な工具と部品

  1. この手順は未翻訳です。 翻訳を手伝う。

    : 手順 1、 3の画像 1 : 手順 1、 3の画像 2 : 手順 1、 3の画像 3
    • Remove the air intake cover by placing your hands at the top of the air intake cover and gently pulling away from the device.

    • You can choose to unplug or leave the device plugged in. Either way, it will not affect the process.

  2. この手順は未翻訳です。 翻訳を手伝う。

    : 手順 2、 2の画像 1 : 手順 2、 2の画像 2
    • Using your vacuum, clean the air intake screen.

    • Any vacuum and any attachment that has a brush will work for cleaning the air intake screen.

  3. この手順は未翻訳です。 翻訳を手伝う。

    : 手順 3、 3の画像 1 : 手順 3、 3の画像 2 : 手順 3、 3の画像 3
    • Detach the air intake screen by placing your fingers on the top two hinges.

    • Gently press the two hinges down and pull away from the device.

    • Using your vacuum, clean the other side of the air intake screen.

  4. この手順は未翻訳です。 翻訳を手伝う。

    : 手順 4、 2の画像 1 : 手順 4、 2の画像 2
    • Remove the Activated Carbon Pre-Filter by pulling it away from the device.

    • Throw away the Activated Carbon Pre-Filter into a garbage can.

  5. この手順は未翻訳です。 翻訳を手伝う。

    : 手順 5、 3の画像 1 : 手順 5、 3の画像 2 : 手順 5、 3の画像 3
    • Remove the True HEPA Filter by pulling it away from the device.

    • Throw away the True HEPA Filter into a garbage can.

  6. この手順は未翻訳です。 翻訳を手伝う。

    : 手順 6、 3の画像 1 : 手順 6、 3の画像 2 : 手順 6、 3の画像 3
    • Replace the True HEPA Filter by inserting it into the empty space in the device.

    • The arrow on the top of the True HEPA Filter should point towards the device and away from you.

  7. この手順は未翻訳です。 翻訳を手伝う。

    : 手順 7、 3の画像 1 : 手順 7、 3の画像 2 : 手順 7、 3の画像 3
    • Replace the Activated Carbon Pre-Filter by inserting it into the space in front of the True HEPA Filter.

  8. この手順は未翻訳です。 翻訳を手伝う。

    : 手順 8、 3の画像 1 : 手順 8、 3の画像 2 : 手順 8、 3の画像 3
    • Attach the air intake screen by placing the bottom two hinges in the bottom two holes of the device.

    • Using your fingers, gently press down on the top two hinges while placing them in the top two holes of the device.

  9. この手順は未翻訳です。 翻訳を手伝う。

    : 手順 9、 3の画像 1 : 手順 9、 3の画像 2 : 手順 9、 3の画像 3
    • Attach the air intake cover by gently pressing the top of the cover against the device.

ゴール

7 の人々がこのガイドを完成させました。

作成者

1人の作成者と共同作成されました。

[deleted]

メンバー登録日: 09/26/18

379 ポイント

1ガイドが承認済み

5 件のコメント

Very easy to replace. Breeze.

Alex Parson - 返信

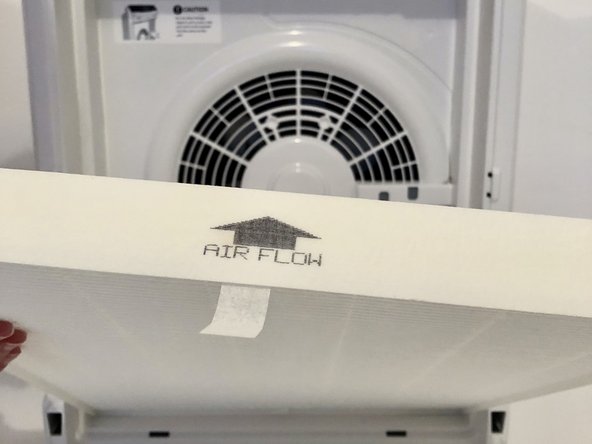
@tackerman Where can I get a replacement air intake screen (the mesh ‘Pre-Filter’?) Mine has a tear in it and I can't find a replacement anywhere online. Thanks!

Aftab Khan - 返信

You can just scotch tape the tear (from two sides) if it is not too big

Anwar Ben Tanfous -

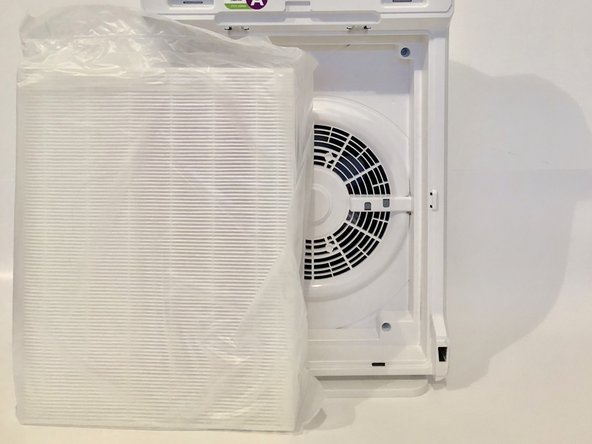
My Winix C535 came with two air filters. This video should only shows one. So is it supposed to have two filters inserted?

Ray Hill - 返信

No, it's likely yours came with an extra replacement filter with the purchase. Their should only be one HEPA filter followed by one carbon filter and then lastly the mesh pre filter screen that locks into place.

JASON UNDERWOOD -

コメントを追加

統計データ:

過去 24時間: 2

過去 7 日: 15

過去 30 日: 97

今までの合計 13,435