この修理ガイドは変更されています。最新の未承認バージョンに切り替えます。
はじめに
使用本指南更换iPad的电池。
必要な工具と部品
-
-
在显示屏组件和后壳之间的顶部插入金属撬棒。
-
抬起撬棒来释放显示屏顶角的卡扣。
-
在顶角处显示屏和后壳之间插入第二根金属撬棒,防止卡扣自动归位。
-
-
-
使用一个撬棒来在iPad的右边沿工作。
-
前面板被顶部底部和左侧的金属卡扣与铝制背板相固定。 右侧为塑料卡扣在身处固定。。
-
一旦卡扣被释放,将前面板的左侧向上提起,然后开始撬动左侧,来释放与后铝制面板之间的卡扣。
Its seems easier to undo the clips on the left and bottom by levering them with an iPad tool and pusing the clips in from the edge with another tool when i can visually see them. One the right side, bottom and most of the left side is done there isnt much need to do the top as it will slide off if moved about a centimeter
-
-
-
在接下来几步中,您将要断开三条将显示屏与逻辑板相连的排线。 线缆是下列几种:
-
数字化线缆
-
光感传感器
-
显示数据线
It would be easier to detach the Display Data Cable at its connector on the far right in the picture, since there doesnt seem to be much play to undo the suggested one.
-
-
-
使用塑料打开工具来翻转挡板来解锁固定在逻辑板插座上的数字化线缆。
-
将数字化线缆直接从插座中拉出
Adding this comment in its proper place:
After flipping up the metal retainer, pull it sideways.
Do not pull it up vertically.
-
-
-
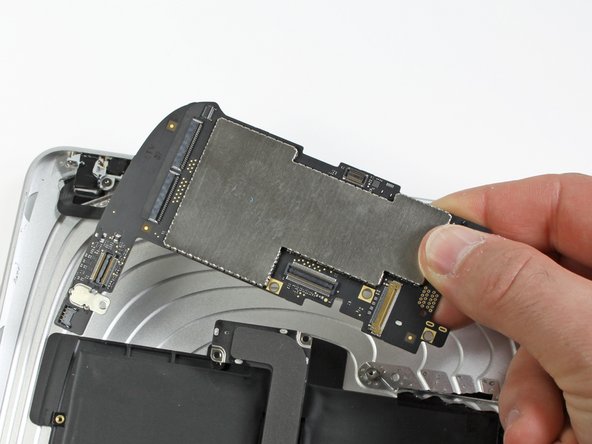
从主板中翻转金属固定器,断开显示数据线缆与主板的连接。
-
从插座中拉出线缆。
IMHO, unhooking data display cable from the other end is preferable to the above location, since the cable itself is sealed or taped onto the assembly.
-
-
-
-
使用塑料打开工具撬开边缘:
-
从侧面的电线上将侧按钮从逻辑板上取下。
-
将扬声器从扬声器导线下方的逻辑板上的插座上拔下。
-
小心地将ZIF带状电路保持盖翻转在耳机插孔附近的插座上。
-
将耳机插孔带状电路拉向iPad的左侧,以将其与插座断开连接。
Just skip removing the “side button connector” as you may instead sever the small solder connections to the socket. It’s not a necessary step and is more dangerous than anything.
Max Powers - 返信
I wish I had understood your post a little better, the socket popped off of the logic board for me. Is there any way to reconnect it or did I just waste my money trying to fix my own device? Thanks for any suggestions, listen to Max, good advice, there’s no reason to remove that connection and it just puts you in danger of doing what i did. Good luck to all.
-
-
-
使用撬棒的平头端轻轻地从下壳体撬起电池。
-
轻轻地通过摆动撬棒并沿着电池右侧运行来扩大间隙。
No joke with the “excessive amount of adhesive” you may cut yourself or bend your metal sponger like I did. This part alone took me about 25 min, just the removal from the back panel.
-
-
-
当有足够的间隙时,用手把仍然被粘合剂固定在后盖上的电池分离出来。
-
从后面板上取出电池。
-


要重新组装您的设备,请按照该指南并按照相反的顺序重新组装。
要重新组装您的设备,请按照该指南并按照相反的顺序重新组装。
114 の人々がこのガイドを完成させました。
以下の翻訳者の皆さんにお礼を申し上げます:
100%

これらの翻訳者の方々は世界を修理する私たちのサポートをしてくれています。 あなたも貢献してみませんか?
翻訳を始める ›

14 件のコメント
Tried this with 2 ebay "OEM" cheapo batteries. Both failed- wouldn't charge, reboot every few minutes.
Solution: Dissected both new and original batteries. Snipped out old LI-ION cells from original Apple battery pack frame. Soldered new LI-ON cells into original battery frame.
Success!
The battery pack includes both LI-ION cells and an small circuit board. The cheapo replacement battery packs don't work (with newer IOS versions? are they actively blocking 3rd party battery replacements?)
Using the circuit board from the original battery pack with new LI-ION cells seems to fix everything.
Be ready to peel off a lot of adhesive label stickers and maybe use a bit of electrical tape to produce a renovated battery pack that works- original Apple battery frame + new LI-ION cells..
Thanks for letting us know that battery PCB takes LiIon cells replacement. I have the same problem with reboot using cheap ebay replacement battery. Going to test new LiIon cells for capacity and if OK - will resolder them.
Paul G -
PS: just replaced two cells, it works. Just in case, to prevent the charging PCB to loose the power (some LiIon controllers can lock because of power loss) I did it one by one. First I removed one cell, soldered replacement, then second one. I estimated capacity of new cells using Imax B6 charger - both of them were around 3100mah, not bad for noname $12 battery from ebay.
Paul G -
I am new to this. Does the iPad need to be kept powered up by an external battery while changing out the battery pack to prevent loss of apps and data? I don't mind so much losing data, it is backed to cloud. But apps are a problem as many of mine are no longer available.
Mike Nixon - 返信
No, iProduct storage doesn't depend on the battery.
jasonq -
I've performed the steps and it worked with Kastar replacement part, just to note that to open it first I've used the side were the volume button is located and slided through the botton were the front button is located.
Also is almost impossible to open it without broke some clips, I've bought some spares (10 pieces) that come handy because 6 were broken during the procedure.
What kind of replacement adhesive would I need to secure the new battery? Or is it okay without any new adhesive?
The iPad gen 1 battery I replaced did not need any extra adhesive. It stuck to the old large mess without issue.
Post battery replacement. Looks like it worked but the screen would not light up. I assumed the back light was damaged from the water damage (was dropped in a full bath tub) so I replaced the screen and now it will not charge. Should I assume it’s a cable or the logic board?
this is purely entertainment and not for work.
tres bien moi jaurais preferer un film sur youtub
1) Are you recommending to cover the display with clear packing tape even if it is intact (not cracked)?
2) If so,will the tape take the display’s oleophobic coating with it when removed?
Mitch Stary - 返信
Hola necesito comprar
Alsone Michel - 返信
Hola, ¿no estoy seguro si te refieres a las gafas de protección o a la pantalla? Te dejo los dos enlaces aquí:
iPad LCD Panel
Safety Glasses
Sandra Hiller -