メインコンテンツにスキップ

Wahl Professional Designer Power Switch Replacement

必要な工具と部品

  1. Wahl Professional Designer Power Switch Replacement, Power Switch: 手順 1、 2の画像 1 Wahl Professional Designer Power Switch Replacement, Power Switch: 手順 1、 2の画像 2
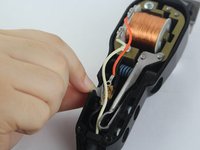
    • Unscrew the 12 mm Phillips head screws located at the top of the cover and at the bottom two corners, using a Phillips #1 Screwdriver.

  2. Wahl Professional Designer Power Switch Replacement: 手順 2、 2の画像 1 Wahl Professional Designer Power Switch Replacement: 手順 2、 2の画像 2
    • Unscrew the two black 5.556 mm Phillip head screw on the power switch with a Phillips #0 Screwdriver.

  3. Wahl Professional Designer Power Switch Replacement: 手順 3、 3の画像 1 Wahl Professional Designer Power Switch Replacement: 手順 3、 3の画像 2 Wahl Professional Designer Power Switch Replacement: 手順 3、 3の画像 3
    • Shimmy the power switch off the mount until it is completely removed.

終わりに

To reassemble your device, follow these instructions in reverse order.

作成者

1人の作成者と共同作成されました。

Sophia Swearengin

メンバー登録日: 09/26/17

718 ポイント

5のガイドは作成済み

チーム

USF Tampa, Team S14-G5, Boczar Fall 2017 USF Tampa, Team S14-G5, Boczar Fall 2017人のメンバー

USFT-BOCZAR-F17S14G5

2 メンバー

5のガイドは作成済み

コメント 1 件

Hello Mrs/ms Swearengin, I’m disassembled my Wahl desingner I’m unable to make the power switch stiff . It’s very loose I can’t recall which screw goes in between two black 5.556 mm Phillip head screw or if it needs a screw at all

Carlos Olvera - 返信

コメントを追加

統計データ:

過去 24時間: 0

過去 7 日: 0

過去 30 日: 0

今までの合計 554