メインコンテンツにスキップ

Wacker Pump PST2 400 2008 Impeller Replacement

必要な工具と部品

  1. Wacker Pump PST2 400 2008 Impeller Replacement, Remove the cotter pins: 手順 1、 3の画像 1 Wacker Pump PST2 400 2008 Impeller Replacement, Remove the cotter pins: 手順 1、 3の画像 2 Wacker Pump PST2 400 2008 Impeller Replacement, Remove the cotter pins: 手順 1、 3の画像 3
    • Before starting, ensure the device is unplugged from power.

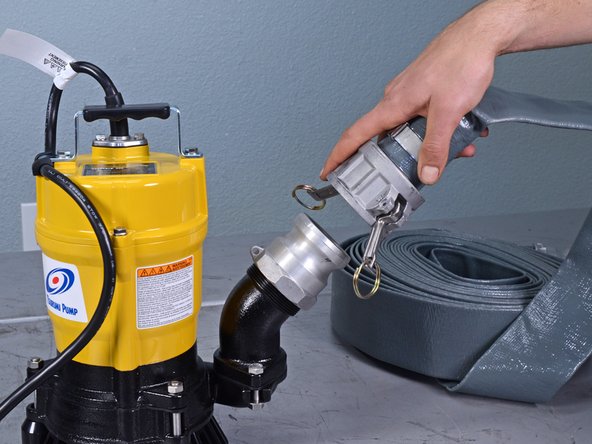
    • Pull to remove the two cotter pins securing the hose's locking arms, one on either side.

  2. Wacker Pump PST2 400 2008 Impeller Replacement, Unlock the collar arms: 手順 2、 3の画像 1 Wacker Pump PST2 400 2008 Impeller Replacement, Unlock the collar arms: 手順 2、 3の画像 2 Wacker Pump PST2 400 2008 Impeller Replacement, Unlock the collar arms: 手順 2、 3の画像 3
    • Flip the two locking arms down to unlock the hose collar.

  3. Wacker Pump PST2 400 2008 Impeller Replacement, Remove the hose: 手順 3、 2の画像 1 Wacker Pump PST2 400 2008 Impeller Replacement, Remove the hose: 手順 3、 2の画像 2
    • Lift the hose away from the collar on the pump body to remove it.

  4. Wacker Pump PST2 400 2008 Impeller Replacement, Remove the strainer assembly nuts: 手順 4、 2の画像 1 Wacker Pump PST2 400 2008 Impeller Replacement, Remove the strainer assembly nuts: 手順 4、 2の画像 2
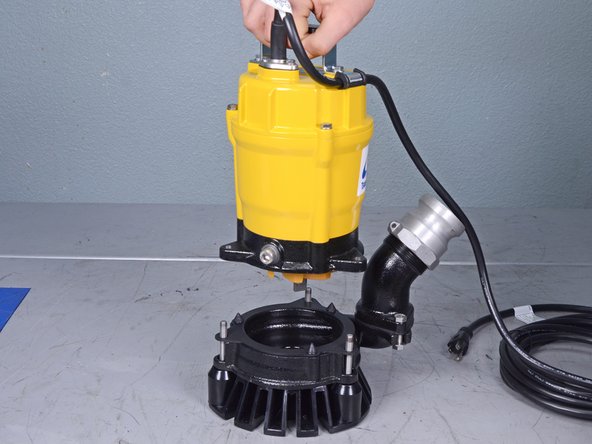
    • Use a 13 mm socket to remove the three nuts securing the strainer assembly to the main body.

  5. Wacker Pump PST2 400 2008 Impeller Replacement, Lift the body off of the strainer: 手順 5、 2の画像 1 Wacker Pump PST2 400 2008 Impeller Replacement, Lift the body off of the strainer: 手順 5、 2の画像 2
    • Lift the main body up and off of the strainer assembly.

    • If the gasket between the body and the strainer comes off with the body, remove it and leave it with the strainer assembly.

    • If the gasket is cracked or excessively dirty, replace it.

  6. Wacker Pump PST2 400 2008 Impeller Replacement, Remove the stirrer nut: 手順 6、 3の画像 1 Wacker Pump PST2 400 2008 Impeller Replacement, Remove the stirrer nut: 手順 6、 3の画像 2 Wacker Pump PST2 400 2008 Impeller Replacement, Remove the stirrer nut: 手順 6、 3の画像 3
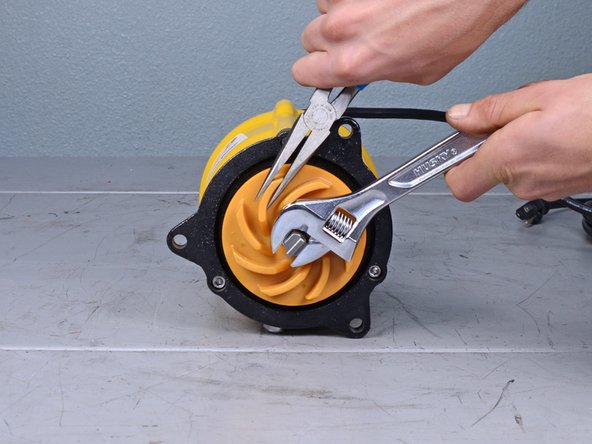
    • Grip one of the impeller blades with a pair of needle nose pliers.

    • With the impeller held in place, use an adjustable wrench to loosen the stirrer nut securing the impeller to the main body.

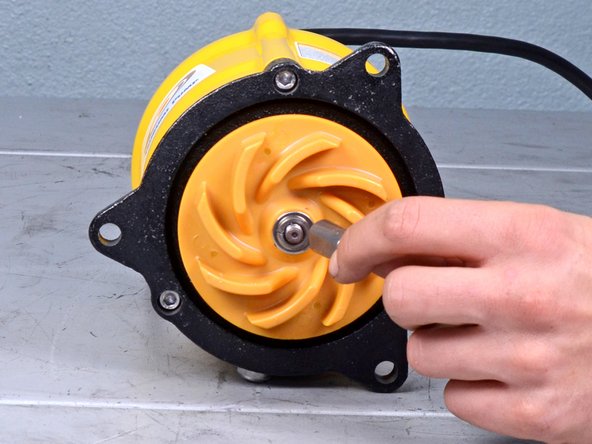
    • Remove the stirrer nut.

  7. Wacker Pump PST2 400 2008 Impeller Replacement, Remove the impeller washers: 手順 7、 2の画像 1 Wacker Pump PST2 400 2008 Impeller Replacement, Remove the impeller washers: 手順 7、 2の画像 2
    • Remove the lock washer from the face of the impeller.

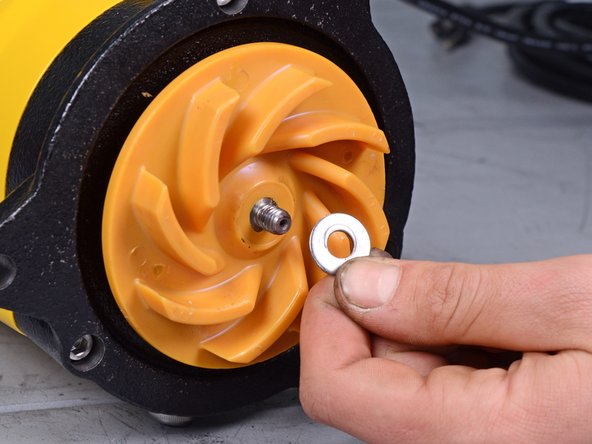
    • Remove the flat washer.

  8. Wacker Pump PST2 400 2008 Impeller Replacement, Remove the impeller: 手順 8、 2の画像 1 Wacker Pump PST2 400 2008 Impeller Replacement, Remove the impeller: 手順 8、 2の画像 2
    • Remove the impeller.

    • If the dust seal behind the impeller is cracked or shows excessive wear, replace it.

終わりに

To reassemble your device, follow these instructions in reverse order.

ある他の人がこのガイドを完成しました。

Carsten Frauenheim

メンバー登録日: 03/10/20

115,255 ポイント

339のガイドは作成済み

チーム

iFixit iFixit人のメンバー

Staff

136 メンバー

17,421のガイドは作成済み

0 件のコメント

コメントを追加

統計データ:

過去 24時間: 0

過去 7 日: 12

過去 30 日: 43

今までの合計 752