メインコンテンツにスキップ

Vulcan Venture II VNB14002IE I/O Board Replacement

必要な工具と部品

  1. Vulcan Venture II VNB14002IE I/O Board Replacement, Back Panel: 手順 1、 1の画像 1
    • Use a J00 screwdriver to unscrew the 10 back-plate screws.

  2. Vulcan Venture II VNB14002IE I/O Board Replacement: 手順 2、 1の画像 1
    • Gently separate the back panel from the laptop.

  3. Vulcan Venture II VNB14002IE I/O Board Replacement, I/O Board: 手順 3、 1の画像 1
    • Locate the IO board on the back panel.

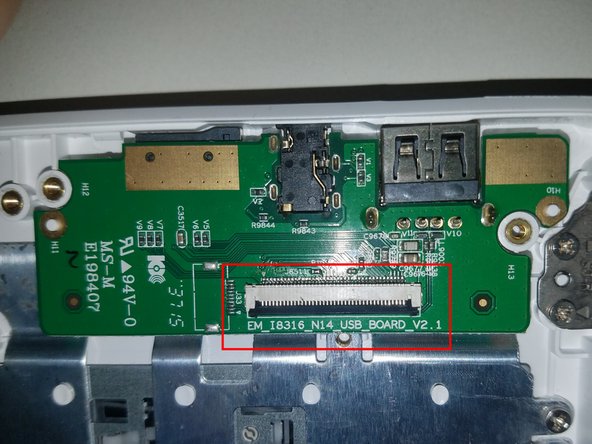
  4. Vulcan Venture II VNB14002IE I/O Board Replacement: 手順 4、 2の画像 1 Vulcan Venture II VNB14002IE I/O Board Replacement: 手順 4、 2の画像 2
    • Locate the ribbon connector on the IO board, and lift the black bar closest the the ribbon.

    • Pull the ribbon cable away from the connector, releasing it.

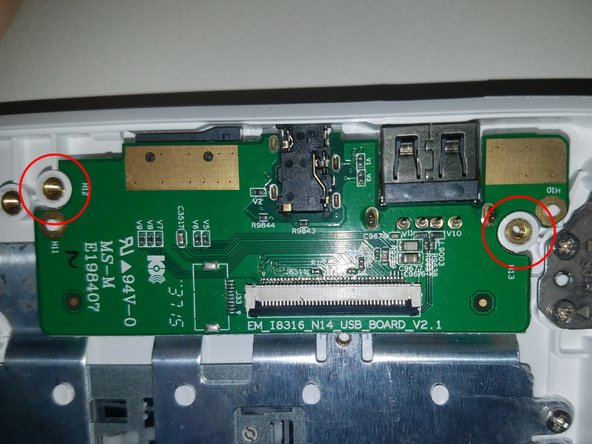
  5. Vulcan Venture II VNB14002IE I/O Board Replacement: 手順 5、 2の画像 1 Vulcan Venture II VNB14002IE I/O Board Replacement: 手順 5、 2の画像 2
    • Locate the screws on the IO panel, and use the J00+ bit to unscrew them.

  6. Vulcan Venture II VNB14002IE I/O Board Replacement: 手順 6、 1の画像 1
    • The IO Board is now safe to remove from the computer.

終わりに

To reassemble your device, follow these instructions in reverse order.

作成者

4人の作成者と共同で作成されました。

Parish Brandt

メンバー登録日: 09/21/18

615 ポイント

5のガイドは作成済み

チーム

University of North Texas, Team S1-G5, Riccardelli Fall 2018 University of North Texas, Team S1-G5, Riccardelli Fall 2018人のメンバー

UNT-RICCARDELLI-F18S1G5

4 メンバー

7のガイドは作成済み

0 件のコメント

コメントを追加

統計データ:

過去 24時間: 0

過去 7 日: 3

過去 30 日: 6

今までの合計 511