メインコンテンツにスキップ

Verizon Ellipsis 10 Motherboard Replacement

必要な工具と部品

  1. Verizon Ellipsis 10 Motherboard Replacement, Back Cover: 手順 1、 1の画像 1
    • Open the SD/SIM card cover to start prying off the back cover.

  2. Verizon Ellipsis 10 Motherboard Replacement: 手順 2、 1の画像 1
    • Start using the iFixit Opening Tool in the SD/SIM area to release the clips holding the back panel on.

  3. Verizon Ellipsis 10 Motherboard Replacement: 手順 3、 1の画像 1
    • Follow along the edge of the device to undo all of the retaining clips.

  4. Verizon Ellipsis 10 Motherboard Replacement: 手順 4、 1の画像 1
    • Once all the clips are undone, the back panel should come off with little effort.

  5. Verizon Ellipsis 10 Motherboard Replacement, Battery: 手順 5、 1の画像 1
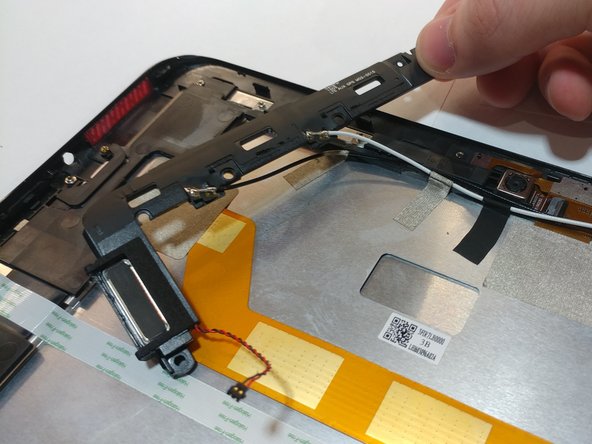
    • Remove the bottom piece of tape securing the battery making sure you are not peeling up anything else in the process.

  6. Verizon Ellipsis 10 Motherboard Replacement: 手順 6、 1の画像 1
    • Remove the top piece of tape using an iFixit opening tool.

  7. Verizon Ellipsis 10 Motherboard Replacement: 手順 7、 1の画像 1
    • Once you have a hold on the tape, carefully remove it making sure you aren’t damaging the battery in the process.

  8. Verizon Ellipsis 10 Motherboard Replacement: 手順 8、 1の画像 1
    • Unplug the battery power connector by sliding the white plastic plug down away from the board.

  9. Verizon Ellipsis 10 Motherboard Replacement: 手順 9、 1の画像 1
    • The battery should be free to come out of the device. Make sure not to bend or damage the battery.

  10. Verizon Ellipsis 10 Motherboard Replacement, Camera: 手順 10、 1の画像 1
    • Remove 4 M1.5 screws holding in the labeled LTE module.

  11. Verizon Ellipsis 10 Motherboard Replacement: 手順 11、 1の画像 1
    • Use a nylon spudger to pry up the module.

    • It's held in with some clips so there will be a little bit of resistance.

  12. Verizon Ellipsis 10 Motherboard Replacement: 手順 12、 2の画像 1 Verizon Ellipsis 10 Motherboard Replacement: 手順 12、 2の画像 2
    • Remove the 4 M1.5 screws holding in the labeled auxiliary LTE/GPS module.

    • The module should come up with a little resistance.

  13. Verizon Ellipsis 10 Motherboard Replacement: 手順 13、 1の画像 1
    • Use a pair of tweezers to lift up the front camera off its locating post.

  14. Verizon Ellipsis 10 Motherboard Replacement: 手順 14、 2の画像 1 Verizon Ellipsis 10 Motherboard Replacement: 手順 14、 2の画像 2
    • Remove the non-conductive tape covering the camera ribbon cable.

    • You may need to remove the white antenna cable to remove the tape.

  15. Verizon Ellipsis 10 Motherboard Replacement: 手順 15、 1の画像 1
    • Carefully unplug the ribbon cable from the motherboard.

  16. Verizon Ellipsis 10 Motherboard Replacement: 手順 16、 2の画像 1 Verizon Ellipsis 10 Motherboard Replacement: 手順 16、 2の画像 2
    • Peel up the ribbon cable carefully as it is glued to the device.

    • After having peeled up the cable, the cameras should be free to come out of the device.

  17. Verizon Ellipsis 10 Motherboard Replacement, Motherboard: 手順 17、 1の画像 1
    • Remove the non-conductive tape covering two ribbon cables.

  18. Verizon Ellipsis 10 Motherboard Replacement: 手順 18、 1の画像 1
    • Gently unplug both the orange and white ribbon cables.

  19. Verizon Ellipsis 10 Motherboard Replacement: 手順 19、 1の画像 1
    • Use tweezers to pry/disconnect both the black and white antenna cables from the top of the motherboard.

  20. Verizon Ellipsis 10 Motherboard Replacement: 手順 20、 1の画像 1
    • Unplug the last ribbon cable from the bottom of the motherboard.

  21. Verizon Ellipsis 10 Motherboard Replacement: 手順 21、 1の画像 1
    • Remove all M1.5 screws holding in the motherboard.

  22. Verizon Ellipsis 10 Motherboard Replacement: 手順 22、 1の画像 1
    • Once all screws are removed, the motherboard should easily come off the device without any resistance.

終わりに

To reassemble your device, follow these instructions in reverse order.

ある他の人がこのガイドを完成しました。

作成者

4人の作成者と共同で作成されました。

Marco Bellutta

メンバー登録日: 04/05/19

253 ポイント

1ガイドが承認済み

チーム

0 件のコメント

コメントを追加

統計データ:

過去 24時間: 1

過去 7 日: 1

過去 30 日: 1

今までの合計 354